If you’re looking to brighten up your meals, this Easy Pickled Okra recipe is for you! I’ll guide you through quick steps to create a tasty, crunchy treat that’s perfect for snacking or adding zest to your dishes. With easy-to-find ingredients and simple instructions, you’ll have a jar of delicious pickled okra in no time. Let’s dive in and make something that’ll impress your friends and family!
Ingredients
Fresh Okra
To make easy pickled okra, you need fresh okra. Look for firm, bright green pods. One pound of okra works well for this recipe. Wash them gently and trim the stems. Fresh okra adds a crisp texture and a lovely taste.
Brine Ingredients
The brine is key to flavor. Here are the ingredients you will need:
- 2 cups distilled white vinegar
- 1 cup water
- 2 tablespoons kosher salt
- 2 cloves garlic, peeled and smashed
- 1 tablespoon sugar
- 1 teaspoon mustard seeds
- 1 teaspoon coriander seeds
- 1 teaspoon black peppercorns
- 2-3 small dried red chilies (optional for heat)
These ingredients blend to create a tangy and savory brine. The vinegar gives a sharp taste, while the sugar adds a hint of sweetness.
Optional Add-ins
Feel free to customize your pickled okra! Here are some optional add-ins:
- Fresh dill sprigs for aroma
- Sliced jalapeños for extra heat
- Carrots or baby carrots for added crunch
These add-ins can enhance the flavor and make your pickled okra unique. You can mix and match based on your taste.
Step-by-Step Instructions
Sterilizing the Jars
Start by cleaning your jars. This step is key to keeping your pickled okra safe. Place the jars in a large pot of boiling water for about 10 minutes. This heat will kill any germs. After boiling, let the jars drain upside down. Allow them to cool completely before using.
Preparing the Brine
Next, make the brine. In a medium saucepan, combine the following:
- 2 cups distilled white vinegar
- 1 cup water
- 2 tablespoons kosher salt
- 1 tablespoon sugar
- 2 cloves garlic, peeled and smashed
- 1 teaspoon mustard seeds
- 1 teaspoon coriander seeds
- 1 teaspoon black peppercorns
- 2-3 small dried red chilies (optional)
Put this mixture over medium heat. Stir it gently until the salt and sugar dissolve. Once it boils, take it off the heat and let it cool for about 10 minutes. The brine gives the okra its zingy flavor.
Packing the Jars with Okra
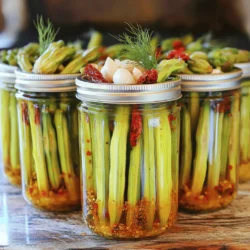
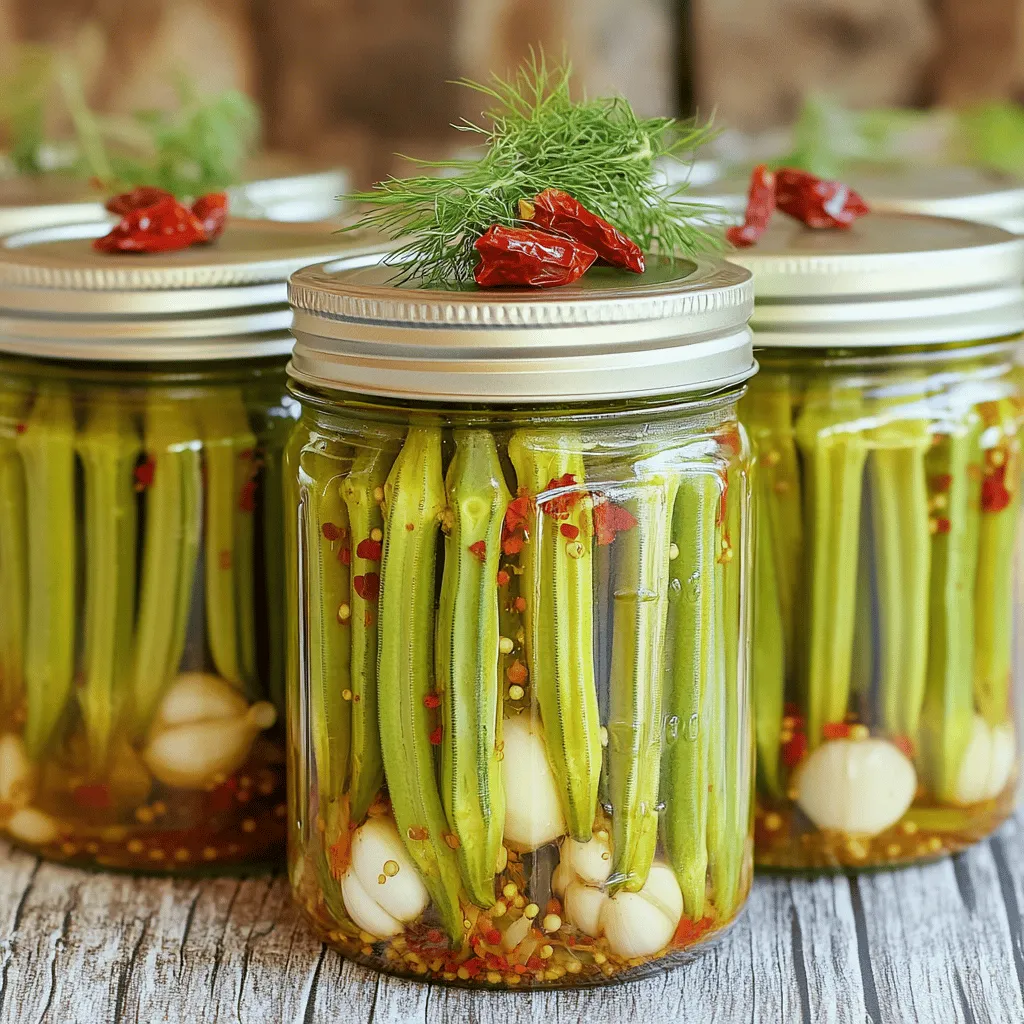
Now, it’s time to pack the jars. Take the sterilized jars and fill them with fresh okra. Make sure the okra is washed and trimmed. Stand the okra upright for a neat look.
Once the jars are packed, pour the warm brine over the okra. Cover them completely, leaving about half an inch of space at the top. This space helps with sealing.
Add fresh dill sprigs on top for extra flavor. Seal the jars tightly with lids. Cool them to room temperature before putting them in the fridge. For the best taste, wait at least three days before eating. Enjoy your zesty pickled okra!
Tips & Tricks
Enhancing Flavor Profiles
To boost the flavor in your pickled okra, think about adding spices. You can use a mix of mustard seeds, coriander seeds, and black peppercorns. These spices add depth and warmth. If you like heat, add dried red chilies or fresh jalapeños. For a twist, try adding lemon zest or a splash of fresh citrus juice. Adding fresh herbs like dill or thyme can brighten the taste too.
Common Mistakes to Avoid
One mistake is using old or wilted okra. Fresh okra ensures crispness. Another error is not sterilizing jars properly. Always sterilize your jars to keep your pickled okra safe. If you skip this step, your okra may spoil faster. Lastly, don’t skimp on the vinegar. It’s key for flavor and preservation. Use the right amount to keep your pickles tangy and crisp.
Best Practices for Sterilization
Sterilizing your jars is crucial for safe pickling. Start by washing your jars and lids with hot, soapy water. Rinse well, then place them in a boiling water bath for about 10 minutes. This step kills germs and keeps your pickles fresh. After boiling, let the jars drain and cool upside down on a clean towel. Only pack your okra in jars that are completely dry and cool. This will help your pickled okra last longer and taste better.
Variations
Spicy Pickled Okra
If you love heat, try adding more spice. Use two or three dried red chilies. You can also add crushed red pepper flakes for extra kick. This gives your okra a bold flavor. The spicy brine enhances the taste and brings a nice zing. Just remember, you can always adjust the heat to your liking.
Herb-Infused Recipes
Herbs can make your pickled okra even better. Add fresh thyme, oregano, or basil to the jars. These herbs create a lovely aroma and flavor. You can also steep the herbs in the brine before adding it to the jars. This step infuses the okra with fragrant notes. Experiment with different herbs to find your favorite mix.
Sweet and Sour Adaptations
For a sweet and tangy twist, increase the sugar in the brine. You can try adding a tablespoon or two more. This change makes the pickled okra a great snack or side dish. You could also mix in some sliced onions or bell peppers for added sweetness. This variation works well in salads or with grilled meats. Try these options to discover new flavor profiles.
Storage Info
Refrigeration Guidelines
Once you make your zesty pickled okra, store it in the fridge. Keep the jars tightly sealed. This helps maintain their crunch and vibrant flavor. Always remember to keep them upright to avoid spills. They taste even better after a few days, so let them chill for at least three days before trying.
Shelf Life of Pickled Okra
Pickled okra lasts up to three weeks in the fridge. After opening, consume within this time for best taste. If you haven’t opened the jars, they might last even longer. However, always check for freshness.
Signs of Spoilage
Watch for signs that your pickled okra has gone bad. If you see mold, a strange smell, or an unusual color, it’s time to toss them. If the brine looks cloudy or the okra feels slimy, do not eat it. Your health is important, so when in doubt, throw it out.
FAQs
How long does it take for pickled okra to be ready?
Pickled okra needs about three days in the fridge to be ready. This time allows the flavors to blend well. The longer you wait, the better the taste will be. After three days, you can enjoy the zesty crunch that makes this dish special.
Can I use frozen okra for pickling?
I do not recommend using frozen okra for pickling. Frozen okra loses its crispness and can become mushy. Fresh okra gives the best texture and taste. If you only have frozen okra, consider cooking it instead.
What dishes pair well with pickled okra?
Pickled okra pairs well with many foods. It adds a tangy crunch to sandwiches and salads. You can also serve it as a side with fried chicken or barbecue. Its unique taste makes it a great addition to cheese platters too. For those who enjoy a kick, add it to tacos or nachos for extra flavor.
This article detailed how to make pickled okra from start to finish. You learned about key ingredients, methods for sterilizing jars, and tips to avoid common mistakes. I also shared fun variations, storage info, and answered your FAQs.
Pickling is easy and fun. Homemade pickled okra can add flavor to many meals. Enjoy experimenting with your own recipes!