

Craving a sweet treat without the oven? You’re in the right place! In this post, I’ll show you how to make No-Bake Chocolate Peanut Butter Oat Bites that are quick, easy, and oh-so-delicious. Packed with nutty flavor and wholesome oats, these bites are perfect for a snack or dessert. Let’s dive into the simple ingredients and steps that will make your taste buds dance with delight!
Ingredients
List of Required Ingredients
To make No-Bake Chocolate Peanut Butter Oat Bites, gather these simple ingredients:
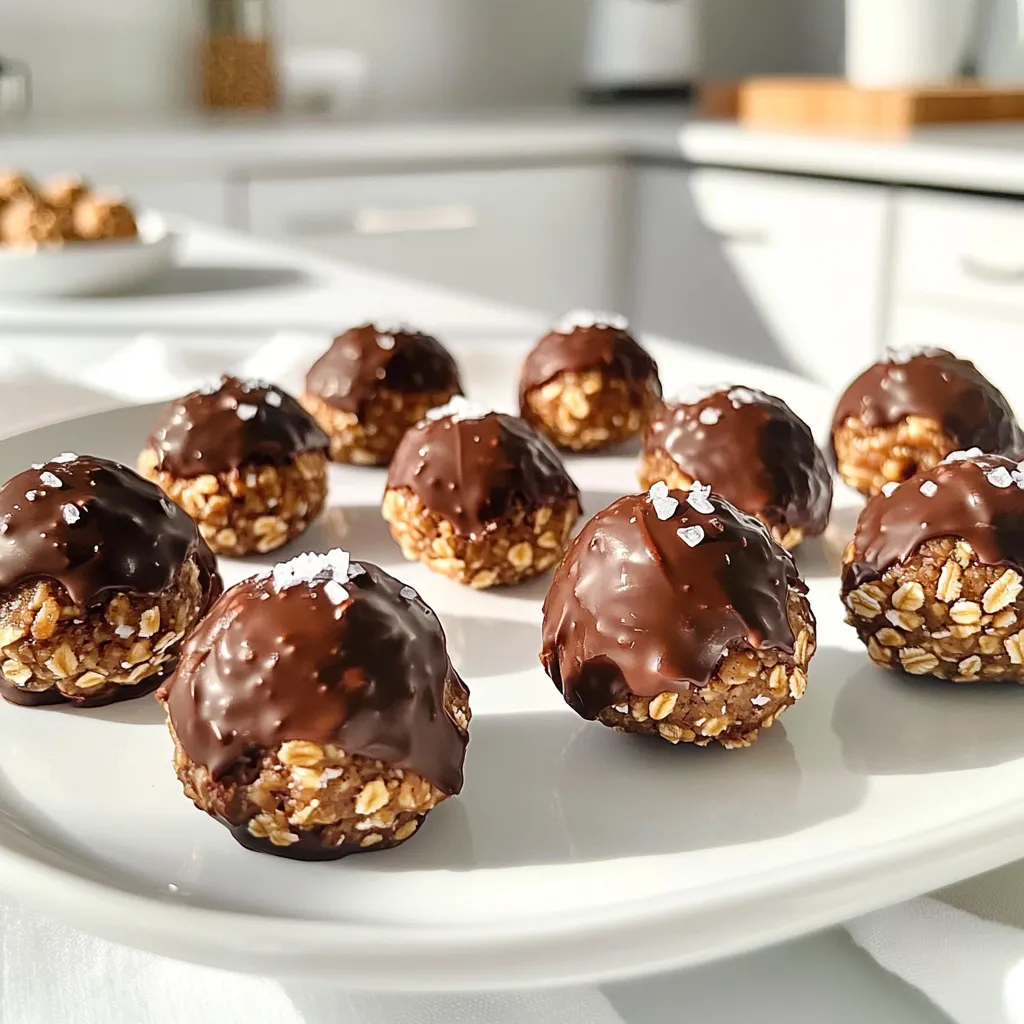
- 1 cup rolled oats
- 1/2 cup natural peanut butter
- 1/3 cup honey or maple syrup
- 1/2 cup dark chocolate chips
- 1/4 cup ground flaxseed (optional)
- 1 tsp vanilla extract
- A pinch of sea salt
These ingredients blend well to create a tasty treat. Each one serves a purpose in flavor and texture.
Ingredient Substitutions
You can swap some ingredients if you need to. Here are some ideas:
- Peanut Butter: Use almond butter or cashew butter for a nut-free option.
- Honey: Maple syrup works well for a vegan version.
- Dark Chocolate Chips: Use carob chips for a different taste or to avoid dairy.
- Ground Flaxseed: Omit it for a simpler recipe or replace it with chia seeds.
These swaps help you adjust the recipe to your tastes or dietary needs.
Nutritional Information
Each bite is not just tasty; it packs a nutritious punch. Here’s a rough breakdown per bite, based on 12 servings:
- Calories: 100
- Protein: 3g
- Carbs: 12g
- Fat: 5g
- Fiber: 1g
These bites offer energy and satisfaction. They make a great snack or treat anytime.
Step-by-Step Instructions
Detailed Preparation Steps
To make No-Bake Chocolate Peanut Butter Oat Bites, start with a large mixing bowl. Add 1 cup of rolled oats, 1/2 cup of natural peanut butter, and 1/3 cup of honey or maple syrup. If you want, you can also include 1/4 cup of ground flaxseed for extra nutrients. Then, add 1 teaspoon of vanilla extract. Mix these ingredients well until they combine into a thick dough.
Next, stir in 1/2 cup of dark chocolate chips. Add a pinch of sea salt to enhance the flavor. This step makes sure the chocolate is spread evenly throughout the mixture. Now, use your hands to roll the mixture into small balls, each about 1 inch in size. Place these balls on a parchment-lined baking sheet.
Once you form all the bites, chill the baking sheet in the refrigerator. Let them sit for about 30 minutes. This helps the bites firm up. After chilling, they are ready to enjoy!
Tips for Effective Mixing
Mixing is key in this recipe. To get the best results, use a sturdy spoon or spatula. If the mixture feels too dry, add a little more peanut butter or honey. If it’s too wet, add a bit more oats.
Mix thoroughly to ensure every bite has the same yummy flavor. If you use your hands, the warmth helps blend the ingredients better. Just remember to wash your hands well before starting!
Recommended Tools and Equipment
For this recipe, you don’t need fancy tools. Here’s what I recommend:
- Large mixing bowl
- Sturdy spoon or spatula
- Parchment paper for lining the baking sheet
- Measuring cups for accurate amounts
- An airtight container for storage
These simple tools will help you create tasty No-Bake Chocolate Peanut Butter Oat Bites with ease!
Tips & Tricks
Best Practices for Rolling Oat Bites
Rolling oat bites can be fun and easy. First, make sure your hands are slightly damp. This keeps the mixture from sticking to your fingers. Grab a small portion of the mix, about a tablespoon. Roll it gently into a ball. Aim for a size of about one inch. If the mixture feels too crumbly, add a bit more peanut butter or honey. This helps the bites hold together better.
How to Make Them Sturdier
To make your oat bites sturdier, consider adding ground flaxseed. This ingredient adds fiber and helps bind the mix. You can also chill the mixture for 10 minutes before rolling. This makes it easier to shape. If your bites still feel too soft, try adding more oats. A little extra rolled oats can help firm them up.
Flavor Enhancements for Peanut Butter Oat Bites
Enhancing flavor is simple and fun. For a twist, mix in cinnamon or cocoa powder. You can also try adding chopped nuts or dried fruit. Chopped almonds or cranberries work well. Another option is to use different types of chocolate chips, like milk or white chocolate. Each change adds a new layer of taste to the bites. Always remember to adjust the sweetness if you add more ingredients.
Variations
Alternative Mix-Ins and Add-Ins
You can make these no-bake chocolate peanut butter oat bites your own. Try adding different mix-ins for fun flavors. Here are some ideas:
- Chopped nuts: Almonds or walnuts add crunch.
- Dried fruit: Raisins or cranberries add sweetness.
- Seeds: Pumpkin or sunflower seeds boost nutrition.
- Coconut flakes: Unsweetened flakes give a tropical twist.
Mix and match these options to create your perfect bite!
Dietary-Specific Variations (Vegan, Gluten-Free)
These bites fit many diets. To make vegan bites, swap honey for maple syrup. This keeps them sweet and plant-based. For gluten-free options, ensure that your oats are labeled gluten-free. This way, everyone can enjoy them without worry!
Flavor Combinations to Try
Experiment with flavors to keep things exciting. Here are some combinations to consider:
- Chocolate mint: Add peppermint extract for a fresh twist.
- Chocolate coconut: Mix in coconut flakes for a tropical flavor.
- Peanut butter banana: Mash a ripe banana into the mix for natural sweetness.
These flavor ideas can turn a simple recipe into something special. Enjoy mixing!
Storage Info
How to Store No-Bake Bites
To keep your No-Bake Chocolate Peanut Butter Oat Bites fresh, store them in an airtight container. Place them in the fridge for the best flavor and texture. They stay yummy for up to a week. If you want to save some for later, freezing is a great option.
Freezing for Long-Term Storage
To freeze these bites, first, let them chill in the fridge. Once firm, place them in a single layer on a baking sheet. Freeze them for about an hour. After they are frozen, transfer them to a freezer-safe bag or container. You can enjoy them for up to three months. Just take out what you need and let them thaw in the fridge.
Shelf Life and Quality Tips
These bites taste best when fresh, but they hold up well in the fridge. Keep an eye on them for any changes in texture or smell. If they start to look dry or crumbly, it’s time to toss them out. Enjoying these bites within a week ensures you get the full flavor and nutrition.
FAQs
Can I use quick oats instead of rolled oats?
Yes, you can use quick oats. Quick oats are smaller and cook faster. They will still work well in the recipe. The texture may be slightly different, but the taste remains great. If you use quick oats, the bites may be a bit softer. They might not hold together as well as rolled oats. For a chewy texture, stick with rolled oats.
How long do these bites stay fresh?
These bites stay fresh for about a week. Store them in an airtight container in the fridge. If you keep them sealed, they stay tasty and firm. After a week, they may lose some flavor and texture. Always check for signs of spoilage before eating. If they smell off, it’s best to toss them.
Can I use other nut butters?
Absolutely! You can swap peanut butter with other nut butters. Almond butter, cashew butter, or sunflower seed butter works well. Each nut butter adds its own unique flavor. Choose one that you enjoy. Keep in mind that the texture may change slightly. Experimenting with different nut butters can make the bites even more fun!
This blog post covered everything you need to know about making peanut butter oat bites. We talked about the essential ingredients and tasty swaps. We also shared detailed prep steps and handy tips for mixing. Plus, you learned how to roll and flavor your bites and even various ways to personalize them. Lastly, we discussed how to store your bites for freshness. Now you can enjoy these treats anytime, knowing how to make them taste amazing! Enjoy your oat bites!