

Looking for a bite-sized treat that’s both fun and delicious? You’ve found it! These Mini Chocolate Brownie Bites are perfect for parties, snacks, or just a sweet craving. I’ll share easy steps for making them, plus tips to make them even tastier. With simple ingredients and endless variations, these bites are quick to whip up. Let’s dive into the world of brownie bliss you can make at home!
Why I Love This Recipe
- Quick and Easy: This recipe takes only 15 minutes to prepare, making it perfect for a last-minute dessert craving.
- Chocolate Bliss: With rich chocolate flavor packed into each mini bite, these brownies are a chocolate lover’s dream come true.
- Customizable: You can easily add your favorite toppings, from sea salt to colorful sprinkles, making these treats uniquely yours.
- Perfect for Sharing: With 24 mini bites, they are ideal for parties, gatherings, or just sharing with family and friends.
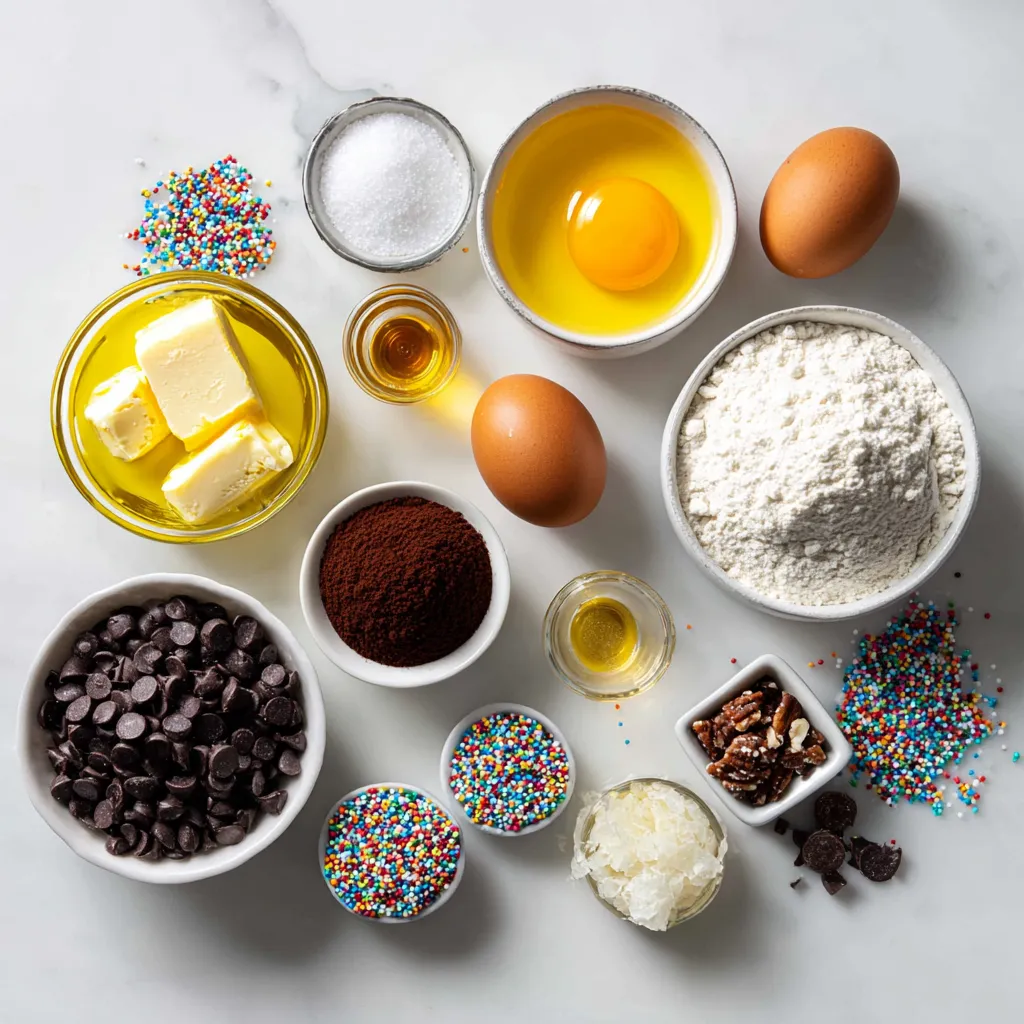
Ingredients
Required Ingredients for Mini Chocolate Brownie Bites
To make these tasty mini chocolate brownie bites, you will need:
- 1/2 cup unsalted butter, melted
- 1 cup granulated sugar
- 2 large eggs
- 1 teaspoon vanilla extract
- 1/3 cup all-purpose flour
- 1/3 cup unsweetened cocoa powder
- 1/4 teaspoon salt
- 1/4 teaspoon baking powder
- 1/2 cup chocolate chips (dark or semi-sweet)
These ingredients create a rich, fudgy bite. Each one packs a chocolate punch.
Optional Toppings for Extra Flavor
You can add fun toppings to your brownie bites. Consider these options:
- Sea salt
- Chopped nuts
- Colorful sprinkles
These toppings add crunch or a sweet touch. You can mix and match to find your favorite combo.
Ingredient Substitutions
If you need to swap some ingredients, here are some ideas:
- Use coconut oil instead of unsalted butter for a dairy-free option.
- Substitute brown sugar for granulated sugar for a deeper flavor.
- Try almond flour instead of all-purpose flour for a gluten-free version.
These swaps keep the flavor while meeting your needs. Feel free to experiment and enjoy!
Step-by-Step Instructions
Prepping Your Oven and Muffin Tin
First, you need to get your oven ready. Preheat it to 350°F (175°C). This step is key for even baking. Next, prepare your mini muffin tin. You can grease it with butter or use mini muffin liners. Either way works great. This helps the brownie bites come out easily after baking.
Combining Wet Ingredients
Now, grab a medium bowl. Add the melted butter and sugar. Whisk them together until mixed well. This should take just a minute. Next, add the eggs one at a time. Beat well after each egg. Finally, mix in the vanilla extract. Make sure the mixture is smooth and creamy before moving on.
Mixing Dry Ingredients and Incorporating Them
In another bowl, sift the dry ingredients. Combine the flour, cocoa powder, salt, and baking powder. Sifting helps remove lumps. Gradually add this dry mix to the wet ingredients. Stir gently until just combined. Be careful not to overmix, as this can make the bites tough. Lastly, fold in the chocolate chips. They add a delightful surprise in every bite!
Tips & Tricks
How to Avoid Overmixing the Batter
Mixing the batter too much makes your brownies tough. To avoid this, combine the wet and dry ingredients gently. When you mix, stop as soon as you see no dry flour. It’s okay if the batter looks a bit lumpy. Just make sure the chocolate chips are spread out well.
Ensuring Perfectly Baked Brownie Bites
To get the best brownie bites, bake them for 10 to 12 minutes. Keep an eye on them as they bake. Use a toothpick to check if they are done. If it comes out with a few moist crumbs, they are ready. If it’s too wet, bake for another minute or two, but don’t overdo it.
Best Ways to Serve Mini Brownie Bites
These bites are great on their own. You can also add a sprinkle of sea salt or colorful sprinkles for fun. Chopped nuts can add crunch and flavor. Serve them warm or at room temperature with a scoop of ice cream for a special treat!
Pro Tips
- Use Room Temperature Ingredients: Ensure your eggs and butter are at room temperature for better emulsification, which leads to a smoother batter.
- Don’t Overmix: Mix the batter until just combined to keep the brownie bites fudgy and tender. Overmixing can lead to a cakey texture.
- Customize Your Toppings: Get creative with toppings! Consider adding crushed candy bars, mini marshmallows, or a drizzle of caramel for extra flair.
- Check for Doneness Early: Start checking your brownie bites at the 10-minute mark. They should have a few moist crumbs on the toothpick, ensuring they’re fudgy.

Variations
Flavor Variations (Mint, Peanut Butter, etc.)
You can easily change the flavor of your mini brownie bites. For a mint twist, add 1/4 teaspoon of peppermint extract to the batter. This gives a fresh and fun taste. If you love peanut butter, mix in 1/4 cup of creamy peanut butter. This will add a rich flavor that pairs well with chocolate. You can also try adding a few drops of almond extract for a nutty surprise.
Healthier Alternatives (Gluten-Free, Low Sugar)
You can make these brownie bites gluten-free by using almond flour or a gluten-free flour blend. Both options work well and keep the taste great. To lower the sugar, try using a sugar substitute like stevia. Just remember, this might change the texture a bit. You can also reduce the number of chocolate chips to cut back on sugar without losing flavor.
Creative Serving Ideas for Parties
Mini brownie bites are perfect for parties. You can serve them on a tiered stand for a fun display. Try stacking them with colorful toothpicks or serving them in small paper cups. For a more festive touch, drizzle melted white chocolate on top. You can also add a dollop of whipped cream or a scoop of ice cream on the side. Each bite will be a hit among your guests!
Storage Info
How to Store Mini Chocolate Brownie Bites
To keep your mini chocolate brownie bites fresh, place them in an airtight container. You can store them at room temperature for up to three days. If you have leftovers, this is a great way to enjoy them later.
Freezing Instructions for Longer Shelf Life
If you want to save some for later, freezing is easy. First, let the brownie bites cool completely. Then, place them in a single layer on a baking sheet. Freeze them for about an hour. Once firm, transfer them to a freezer bag. They can last in the freezer for up to three months.
Reheating Tips for Optimal Taste
To warm up your brownie bites, preheat your oven to 300°F (150°C). Place the bites on a baking sheet and cover them with foil. Heat for about 10 minutes. This keeps them soft and tasty. You can also microwave them for about 10-15 seconds if you want a quick treat. Enjoy!
FAQs
How do I know when the brownie bites are done?
You can tell when brownie bites are done by using a toothpick. Insert it into the center of a bite. If it comes out with a few moist crumbs, they are ready. If you see wet batter, they need more time. Bake for 10-12 minutes for the best results.
Can I make these brownie bites ahead of time?
Yes, you can make these brownie bites ahead of time. Bake them and let them cool completely. Store them in an airtight container at room temperature for up to three days. You can also freeze them for up to three months. Just thaw them before serving.
What do I serve with mini chocolate brownie bites?
Mini chocolate brownie bites pair well with many treats. You can serve them with vanilla ice cream or whipped cream. Fresh berries also add a nice touch. For a fun twist, drizzle them with caramel or chocolate sauce. These toppings make the bites even more delightful!
You learned about making mini chocolate brownie bites, from ingredients to serving. We discussed key ingredients, fun variations, and how to store them. I shared tips to ensure they bake perfectly every time. Remember, you can customize flavors and toppings to suit your taste. Enjoy these tasty bites at any gathering. Your friends and family will love them! Now, get baking and share your delicious creation

Mini Chocolate Brownie Bites
Ingredients
- 1/2 cup unsalted butter, melted
- 1 cup granulated sugar
- 2 large eggs
- 1 teaspoon vanilla extract
- 1/3 cup all-purpose flour
- 1/3 cup unsweetened cocoa powder
- 1/4 teaspoon salt
- 1/4 teaspoon baking powder
- 1/2 cup chocolate chips (dark or semi-sweet)
- to taste optional toppings: sea salt, chopped nuts, or sprinkles
Instructions
- Preheat your oven to 350°F (175°C). Grease a mini muffin tin or line with mini muffin liners.
- In a medium mixing bowl, combine the melted butter and sugar. Whisk together until well blended.
- Add in the eggs one at a time, stirring well after each addition. Mix in the vanilla extract until smooth.
- In a separate bowl, sift together the flour, cocoa powder, salt, and baking powder.
- Gradually incorporate the dry mixture into the wet ingredients, stirring until just combined. Be careful not to overmix.
- Fold in the chocolate chips until evenly distributed throughout the batter.
- Using a mini ice cream scoop or a spoon, fill each muffin cup about three-quarters full with the brownie batter.
- Bake in the preheated oven for 10-12 minutes, or until a toothpick inserted into the center comes out with a few moist crumbs (not wet batter).
- Once done, remove the brownie bites from the oven and allow them to cool in the tin for 5 minutes before transferring to a wire rack.
- If desired, top with a sprinkle of sea salt, chopped nuts, or colorful sprinkles while still warm.
