Looking for a sweet and quick dessert? I’ve got you covered with my Minute No-Bake Twinkie Cake! This easy treat combines the classic Twinkie flavor with creamy vanilla pudding and whipped cream. Perfect for any occasion, this cake is a fun way to impress your friends and family. Let’s dive into the simple steps and tasty variations that make this dessert a hit!
Why I Love This Recipe
- Quick and Easy: This recipe comes together in just 15 minutes, making it perfect for last-minute gatherings or sweet cravings.
- No Baking Required: No need to turn on the oven! This no-bake dessert is ideal for hot days or when you want a hassle-free treat.
- Customizable Layers: You can easily modify the layers with different toppings or flavors, such as adding nuts or using different fruits.
- Deliciously Decadent: The combination of Twinkies, whipped cream, and chocolate creates a rich and indulgent dessert that everyone will love.
Ingredients
List of Required Ingredients
To make Minute No-Bake Twinkie Cake, gather these key ingredients:
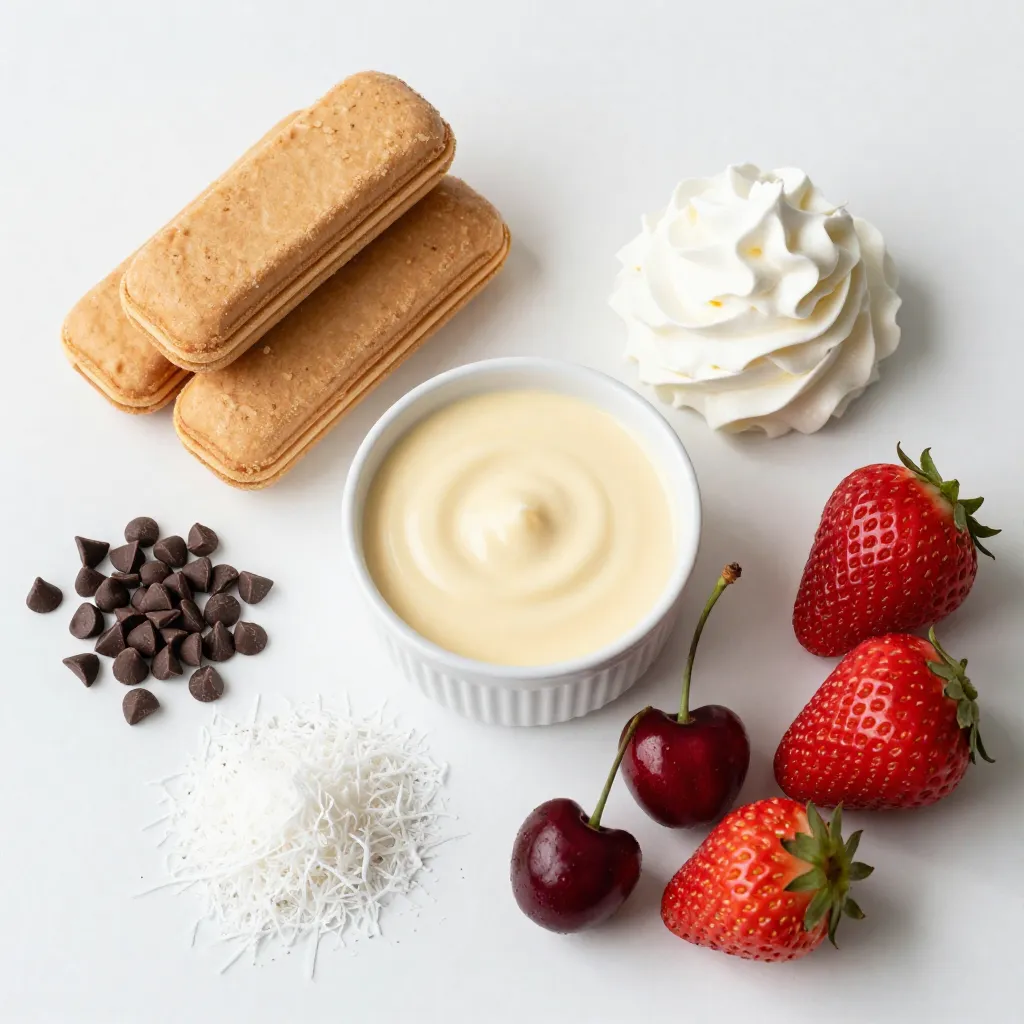
- 10 Twinkies
- 1 cup whipped cream (store-bought or homemade)
- 1 cup vanilla pudding (instant mix is fine)
- 1/2 cup chocolate chips
Optional Ingredients for Variation
You can add some fun twists to your cake with these optional items:
- 1/4 cup shredded coconut
- Fresh strawberries or cherries for garnish
Ingredient Substitutions
If you need to swap items, here are some ideas:
- Use a different type of cake, like sponge cake, instead of Twinkies.
- Make your own whipped cream with heavy cream and sugar.
- Try chocolate pudding instead of vanilla for a richer taste.
- Use nuts or dried fruit in place of chocolate chips for a unique flavor.
Step-by-Step Instructions
Preparation Steps for the Twinkies
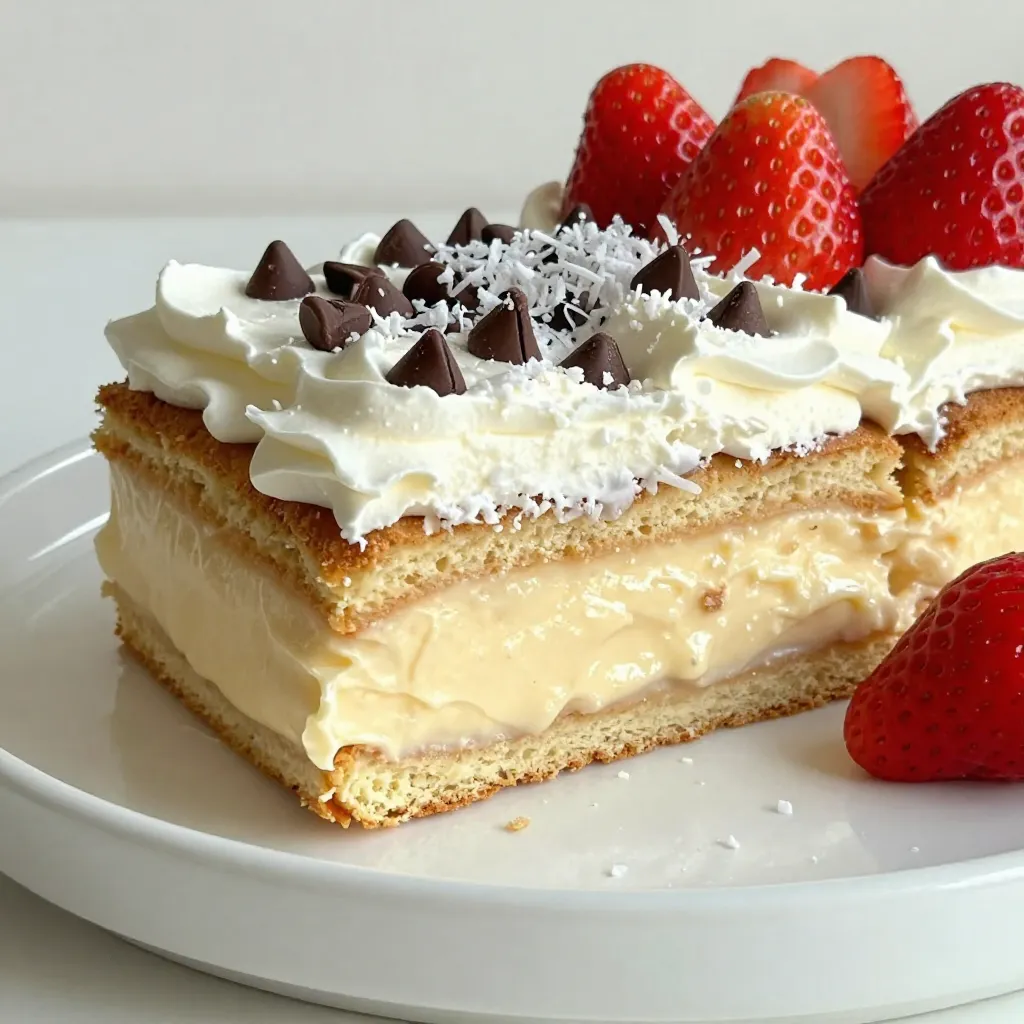
Start by slicing the Twinkies in half lengthwise. You will need 20 halves for the cake. This step is simple but key to a good layer. Use a sharp knife to make even cuts. Place the Twinkie halves cut side up in your container. This will be the first layer of your cake.
Mixing the Vanilla Pudding and Whipped Cream
In a mixing bowl, add one cup of vanilla pudding mix. Pour in one cup of whipped cream. Mix with a spatula until it is smooth and creamy. This will make a delicious filling for your cake. You want it to be well combined, with no lumps. This mixture adds sweetness and creaminess to each bite.
Layering the Cake
Now, it’s time to build your cake. Start with half of the Twinkie halves. Place them in your dish, cut side up. Next, spread half of the vanilla pudding mixture over the Twinkies. Use a spatula to get an even layer. Sprinkle half of the chocolate chips and coconut on top. Repeat this process with the rest of the Twinkie halves. Add the remaining pudding mixture and finish with the last bits of chocolate chips and coconut. Cover the dish with plastic wrap. Chill in the fridge for at least 30 minutes. This helps the flavors blend together.
Tips & Tricks
Tips for Perfecting the No-Bake Cake
To make this cake extra tasty, use fresh Twinkies. They should be soft and moist. When you cut them, slice carefully to keep the halves even. This cake needs layers, so make sure to spread the pudding mixture smoothly. For added flavor, mix in a few chocolate chips with the pudding. Chill the cake for at least 30 minutes. This helps the flavors meld together.
Presentation and Serving Suggestions
Serving is key to making the cake look great. You can put it in a clear dish. This lets everyone see those lovely layers. For a fun twist, serve in cups. Top each serving with whipped cream and a sprinkle of chocolate chips. Fresh strawberries or cherries add a nice touch and color. If you want, add a mint leaf for a pop of green.
Common Mistakes to Avoid
One mistake is rushing the chilling time. If you skip this step, the cake won’t hold its shape. Another mistake is not layering evenly. This can make the cake fall apart when you serve it. Avoid using too much pudding; it should not overflow. Lastly, don’t forget to garnish! A plain top looks boring, so add those fruits for flair.
Pro Tips
- Layer for Texture: Ensure you alternate the layers of Twinkies and pudding mixture to create a balanced texture and flavor in every bite.
- Chill for Flavor: Allow the cake to chill longer than 30 minutes if possible; this will enhance the melding of flavors and make the cake even more delicious.
- Use Fresh Ingredients: Opt for fresh whipped cream and ripe fruits for garnish to elevate the overall taste and presentation of the cake.
- Experiment with Toppings: Feel free to customize the toppings; try adding nuts, sprinkles, or even a drizzle of caramel for extra flavor and visual appeal.
Variations
Flavor Variations
You can easily change the flavor of the Minute No-Bake Twinkie Cake. For a chocolate twist, use chocolate pudding instead of vanilla. This adds a rich taste that pairs well with the Twinkies. You can also add a layer of chocolate syrup for extra sweetness. For a fruity flair, try strawberry pudding. This gives a fresh and vibrant taste. Fresh strawberries can top off the cake, adding color and flavor.
Dietary Modifications
If you need gluten-free options, choose gluten-free Twinkies or sponge cakes. Instead of instant pudding, use a gluten-free mix. For a dairy-free cake, opt for coconut whipped cream and almond milk pudding. Both options keep the cake creamy and delicious. You can even use dairy-free chocolate chips to maintain the taste.
Serving Suggestions for Different Occasions
This cake fits many occasions! For birthday parties, slice it into fun shapes. Add colorful sprinkles for a festive touch. For casual gatherings, serve it in cups for easy eating. If it’s a holiday, use seasonal fruits for decoration. Fresh cherries or raspberries add a nice pop of color. No matter the event, this cake will wow your guests!
Storage Info
How to Store the No-Bake Twinkie Cake
To keep your Minute No-Bake Twinkie Cake fresh, cover it tightly. Use plastic wrap or a lid. Store it in the fridge for the best taste. This cake stays cool and creamy, ready for a sweet snack.
Freezing Instructions
You can freeze this cake if you want to save some for later. Cut the cake into slices before freezing. Wrap each slice in plastic wrap and then in foil. This way, it stays fresh and tasty. When you want to eat it, let it thaw in the fridge overnight.
Shelf Life Guide
The no-bake Twinkie cake lasts about 3 to 4 days in the fridge. After that, it may lose some flavor and texture. If frozen, it can last up to 2 months. Just remember, the sooner you eat it, the better it will taste!
FAQs
Can I use homemade vanilla pudding instead of instant?
Yes, you can use homemade vanilla pudding. Just make sure it is fully set before using. This will give your cake a richer flavor. Homemade pudding adds a nice touch, but instant pudding saves time.
How long does the no-bake cake need to chill?
The no-bake cake needs at least 30 minutes to chill. Chilling helps the layers blend together. If you want a firmer cake, chill it for a few hours. Longer chilling time can improve the taste.
What can I substitute for whipped cream?
You can use cool whip for a quick swap. If you want a healthier option, try Greek yogurt. It adds creaminess and protein. Another choice is whipped coconut cream for a dairy-free version. These options work well in the cake.
You learned how to make a no-bake Twinkie cake with simple steps and tasty options. We covered ingredients, preparation, and tips for a perfect dessert. I shared ideas for variations and how to store it. Don’t forget to try different flavors and note the common mistakes to avoid. Enjoy your cake at any special event or just for fun. Now, get ready to impress friends and family with your delicious creatio

Minute No-Bake Twinkie Cake
Ingredients
- 10 pieces Twinkies
- 1 cup whipped cream (store-bought or homemade)
- 1 cup vanilla pudding (instant mix is fine)
- 0.5 cup chocolate chips
- 0.25 cup shredded coconut (optional)
- to taste pieces Fresh strawberries or cherries for garnish
Instructions
- Begin by slicing the Twinkies in half lengthwise so that you have 20 halves to work with.
- In a rectangular or square container, layer the bottom with half of the Twinkie halves, cut side up.
- In a mixing bowl, combine the vanilla pudding with one cup of whipped cream. Mix until smooth and creamy.
- Spread half of the vanilla pudding mixture evenly over the layer of Twinkies.
- Sprinkle half of the chocolate chips and shredded coconut over the pudding layer for added texture and flavor.
- Repeat the layers by adding another layer of the remaining Twinkie halves, followed by the rest of the pudding mixture, and finish with the remaining chocolate chips and coconut.
- Cover the container with plastic wrap and refrigerate for at least 30 minutes to allow the flavors to meld.
- Just before serving, garnish the top with fresh strawberries or cherries for a pop of color and freshness.
