Craving a sweet treat that’s easy to make? You’ll love this No-Bake Buckeye Cheesecake Bar! With a creamy peanut butter filling, a rich chocolate drizzle, and no oven required, it’s perfect for any occasion. I’ll guide you step-by-step through this simple recipe, ensuring you get a delicious dessert that looks as good as it tastes. Let’s dive in and turn your kitchen into a treat paradise!
Ingredients
Main Ingredients for No-Bake Buckeye Cheesecake Bar
To make this tasty treat, you’ll need a few simple ingredients. Here’s what you should gather:
- 1 cup graham cracker crumbs
- 1/2 cup unsalted butter, melted
- 1/4 cup sugar
- 8 oz cream cheese, softened
- 1 cup powdered sugar
- 1 cup creamy peanut butter
- 1 teaspoon vanilla extract
- 1 cup heavy whipping cream
- 1/2 cup semi-sweet chocolate chips
- 1 tablespoon coconut oil
These ingredients come together to create a rich and creamy cheesecake bar. The graham cracker crumbs form a crunchy base, while the peanut butter gives it a delicious flavor. The chocolate topping adds a sweet finish.
Step-by-Step Instructions
Preparation of the Crust
To start, you will need to make the crust. Combine 1 cup of graham cracker crumbs, 1/2 cup of melted unsalted butter, and 1/4 cup of sugar in a mixing bowl. Stir these ingredients together until the crumbs look like damp sand. This mixture will hold together well.
Next, take a 9×9 inch square baking pan. Firmly press the crumb mixture into the bottom of the pan. Make sure it is even and compact. Once done, place the pan in the refrigerator while you prepare the filling. This helps the crust set nicely.
Making the Cheesecake Filling
Now it’s time for the cheesecake filling. In a large bowl, beat 8 oz of softened cream cheese with an electric mixer until it is smooth and fluffy. Gradually add in 1 cup of powdered sugar. Keep mixing until everything is combined.
Next, blend in 1 cup of creamy peanut butter and 1 teaspoon of vanilla extract. Mix until the filling is smooth and creamy. This step adds rich flavor to your cheesecake.
Assembling the Bars
For the next step, whip 1 cup of heavy whipping cream in a separate bowl until stiff peaks form. This is key for a light texture. Gently fold the whipped cream into your peanut butter cheesecake mixture. Be careful not to deflate the whipped cream.
Now, pour the cheesecake filling over the chilled crust. Use a spatula to smooth it into an even layer. Afterward, cover the baking dish with plastic wrap and refrigerate for at least 4 hours. This allows the bars to set properly.
Chocolate Topping
Finally, it’s time for the chocolate topping. In a microwave-safe bowl, combine 1/2 cup of semi-sweet chocolate chips and 1 tablespoon of coconut oil. Microwave this mixture in 30-second intervals, stirring in between until it melts smoothly.
Once the cheesecake layer is firm, drizzle the melted chocolate over the top. You can use a spoon or a piping bag for a fun design. Let the chocolate set briefly before slicing the bars.
Tips & Tricks
Perfecting the Cheesecake Texture
Using softened cream cheese is key. It mixes in better and helps create a smooth filling. If your cream cheese is cold, it will be lumpy. To soften it, leave it out for about 30 minutes before you start. You can also cut it into small pieces to speed up the softening process.
Achieving stiff peaks in whipped cream is vital too. Start with cold heavy cream and use a clean bowl. Whip on medium speed until you see soft peaks. Keep beating until peaks hold their shape. Be careful not to overbeat, or it can turn into butter!
Serving Suggestions
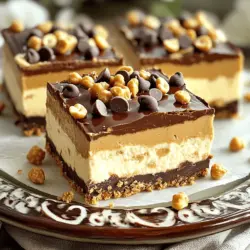
Presentation makes a difference. For an appealing dessert, arrange the bars on a nice platter. You can cut them into neat squares or rectangles. Drizzle melted chocolate on top for a rich look. Add extra mini chocolate chips and chopped peanuts as a garnish. This adds color and texture, making each bite more fun!
Tools Needed
To make the No-Bake Buckeye Cheesecake Bars, you will need a few tools. A large mixing bowl is great for mixing the cheesecake filling. An electric mixer helps to whip the cream and cream cheese smoothly. For the crust, a 9×9 inch baking pan works perfectly. Using these tools will make your baking experience easier and more enjoyable!

Variations
Flavor Alternatives
You can change up the flavor of your No-Bake Buckeye Cheesecake Bars easily. Start by experimenting with different nut butters. Try almond butter or cashew butter for a new twist. Each nut butter brings its unique taste. You can also use flavored extracts like almond or chocolate. These small changes can make your bars taste like a whole new dessert.
Gluten-Free Option
For those who need a gluten-free option, it’s simple to swap ingredients. Use gluten-free graham cracker crumbs instead of regular ones. You can find these in most grocery stores. This swap keeps the bars tasty while meeting dietary needs.
Vegan Version
Creating a vegan version of these bars is fun and easy. First, replace cream cheese with a vegan cream cheese option. You can also use coconut cream for a rich texture. For the heavy cream, try using coconut whipped cream. Use maple syrup or agave nectar instead of powdered sugar for sweetness. These swaps let you enjoy the bars while keeping them plant-based.
Storage Info
Proper Storage Techniques
To keep your No-Bake Buckeye Cheesecake Bars fresh, store them in the fridge. Use an airtight container for best results. This helps to lock in moisture and flavor. If you don’t have a container, you can cover the dish with plastic wrap. Make sure to press it down gently to avoid air pockets. This keeps the bars from drying out.
Freezing Instructions
You can freeze these bars for long-term storage. First, cut them into squares. Then, place each square on a baking sheet. Freeze them for about an hour until firm. After that, transfer the bars to a freezer-safe bag. Remove as much air as possible before sealing. When you’re ready to enjoy them, thaw the bars in the fridge overnight. This method keeps them tasty and fresh for you to enjoy later.
FAQs
How long do No-Bake Buckeye Cheesecake Bars last?
No-Bake Buckeye Cheesecake Bars can last about 5 days in the fridge. Keep them in an airtight container. If you want to freeze them, they can last up to 2 months. Make sure to wrap them tightly in plastic wrap and then in foil.
Can I make these bars ahead of time?
Yes, you can make these bars a day or two in advance. This makes them great for parties. Just store them in the fridge. When ready to serve, let them sit for 10 minutes at room temperature. This will help bring out the flavors.
What can I use instead of peanut butter?
If you have nut allergies, you can use sun butter or soy nut butter. Both are safe and tasty. You can also try using a seed butter made from pumpkin seeds. These options keep the creaminess and flavor.
How do I know when the cheesecake is set?
The cheesecake is set when it feels firm to the touch. You can gently press the surface with your finger. If it holds its shape, it is ready. The edges should look slightly pulled away from the pan. This means it is chilled well and ready to enjoy.
You’ve learned how to make No-Bake Buckeye Cheesecake Bars. We covered the main ingredients, step-by-step instructions, and useful tips. You can change flavors, go gluten-free, or even make a vegan version. Proper storage helps keep these bars fresh for longer. Remember, you can make these ahead and impress your friends. Enjoy creating this delicious treat!