Cheesy Garlic Chicken Wraps Quick and Tasty Meal

WANT TO SAVE THIS RECIPE?

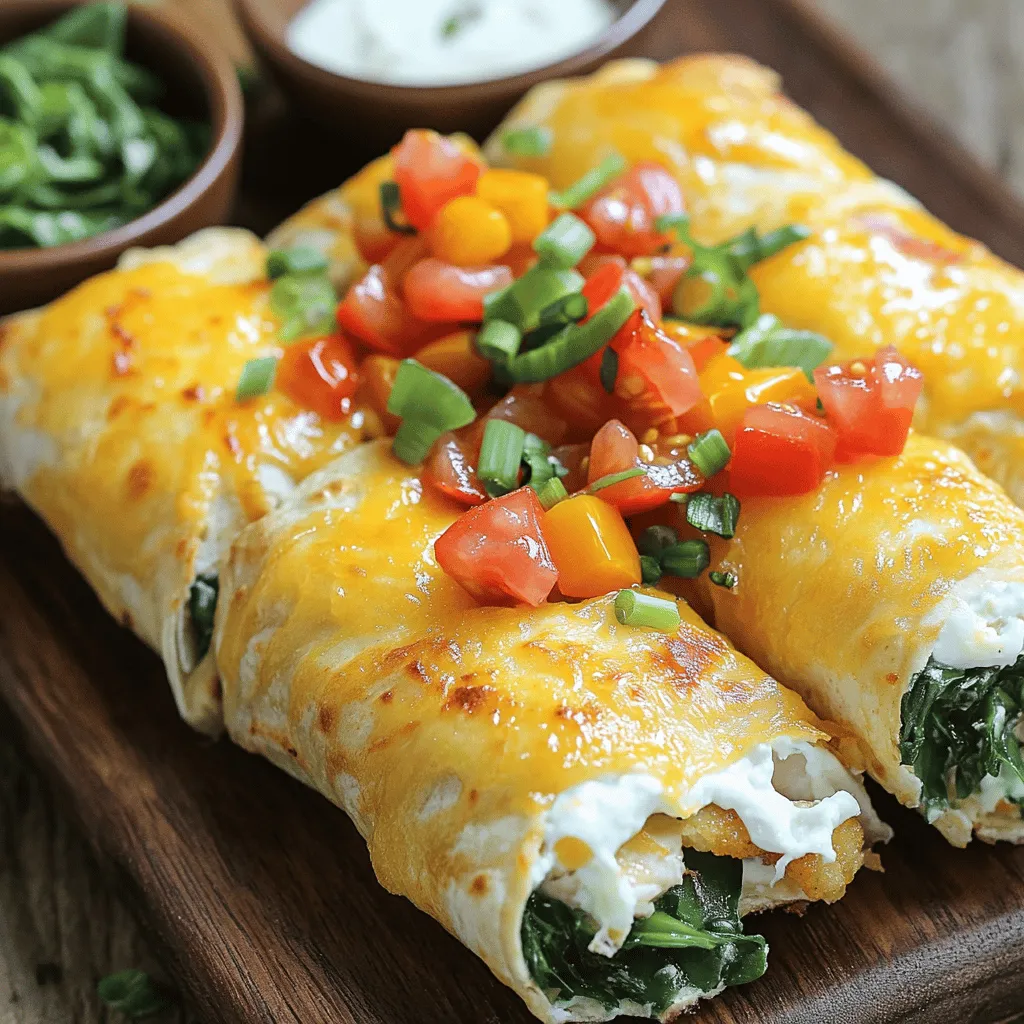
Are you craving a meal that’s both cheesy and easy? You’re in the right place! My Cheesy Garlic Chicken Wraps combine tender chicken, melted cheese, and flavorful spices, all wrapped in a soft tortilla. This quick and tasty meal is perfect for busy weeknights or lunch on the go. Let me guide you through the simple steps to whip up these delicious wraps in no time. Your taste buds will thank you!

Ingredients

Complete List of Ingredients

Chicken and Dairy Products

– 2 large chicken breasts, cooked and shredded

– 1 cup shredded mozzarella cheese

– 1/2 cup cream cheese, softened

Seasonings and Spices

– 1 teaspoon garlic powder

– 1 teaspoon onion powder

– 1/2 teaspoon smoked paprika

– Salt and pepper to taste

Tortillas and Vegetables

– 4 large flour tortillas

– 1 cup fresh spinach leaves

– 1/2 cup diced tomatoes

– 1/4 cup sliced green onions

– Olive oil for cooking

– Optional: hot sauce for extra flavor

These ingredients make the perfect combination for cheesy garlic chicken wraps. The chicken provides protein, while the cheese adds creaminess. The spices bring a burst of flavor that makes every bite delicious. Fresh spinach and tomatoes add a nice crunch and color. The tortillas hold everything together, making them easy to eat. You can find the full recipe above to help you prepare this tasty meal!

Step-by-Step Instructions

Preparation of Chicken Mixture

To start, gather your chicken and cheese. You need 2 large chicken breasts, cooked and shredded. In a mixing bowl, add the chicken, 1 cup of shredded mozzarella cheese, and 1/2 cup of softened cream cheese. Sprinkle in 1 teaspoon of garlic powder and 1 teaspoon of onion powder. Add 1/2 teaspoon of smoked paprika. Season with salt and pepper to taste. Mix everything well until it becomes a creamy, cheesy blend. This mixture is the heart of your wraps.

Assembling the Wraps

Lay out 4 large flour tortillas on a clean surface. In the center of each tortilla, place a handful of fresh spinach leaves. This gives a nice crunch and a fresh taste. Next, add a generous spoonful of your cheesy chicken mixture on top of the spinach. For extra flavor, sprinkle diced tomatoes and sliced green onions over the mixture. Now, fold the sides of the tortilla in, then roll it up tightly from the bottom to the top. Make sure it’s secure to hold all the goodness inside.

Cooking the Wraps

Heat a skillet over medium heat and drizzle in some olive oil. Place the wraps seam-side down in the skillet. Cook them for about 3-4 minutes on each side. You want them golden brown and the cheese melted. After cooking, remove the wraps from the skillet and let them rest for a minute. This helps the cheese set a bit. Slice each wrap in half before serving. I like to serve them warm, with a drizzle of hot sauce on the side for a spicy kick. Check out the Full Recipe for even more details and tips!

Tips & Tricks

Perfecting Cheese Melting

To get that perfect cheese melt, use fresh mozzarella. It has the right moisture and stretch. Combine it with cream cheese for a creamy texture. Avoid low-fat cheese, as it often doesn’t melt well. Heat the wraps on medium heat. This allows the cheese to melt slowly without burning.

Ensuring Wraps Don’t Tear

To keep your wraps intact, warm the tortillas first. You can do this in a dry pan for a few seconds. This step makes them more flexible. Use a generous amount of filling but not too much. This helps prevent tearing while rolling them. When you fold the sides in, do it gently but firmly.

Best Cooking Methods

I love using a skillet for cooking these wraps. A non-stick skillet prevents sticking and ensures a nice golden color. Use medium heat and add olive oil before placing the wraps in the pan. Cook for about 3 to 4 minutes on each side. This method allows the outside to crisp while the cheese melts inside. You can also grill them for a smoky flavor. This gives a lovely char to the wraps.

- <strong>Chicken and Dairy Products</strong> – 2 large chicken breasts, cooked and shredded – 1 cup shredded mozzarella cheese – 1/2 cup cream cheese, softened” /></p>
</p>
<h2>Variations</h2>
</p>
<h3>Adding Vegetables for Extra Nutrition</h3>
</p>
<p>You can boost the nutrition of your cheesy garlic chicken wraps by adding vegetables. Fresh vegetables not only add color but also enhance flavor and health benefits. Try adding:</p>
</p>
<p>– Bell peppers, diced</p>
<p>– Zucchini, grated</p>
<p>– Mushrooms, sliced</p>
<p>– Broccoli, finely chopped</p>
</p>
<p>These veggies pair well with the creamy chicken mixture. They bring extra crunch and vitamins to your meal. Plus, they add a bright look to your wraps.</p>
</p>
<h3>Different Cheese Options</h3>
</p>
<p>Cheese is key in this dish, but you can mix it up. While mozzarella is a great choice, here are some other cheeses to consider:</p>
</p>
<p>– Cheddar for a sharp flavor</p>
<p>– Pepper jack for a spicy kick</p>
<p>– Gouda for a smoky taste</p>
<p>– Feta for a tangy twist</p>
</p>
<p>Feel free to experiment with different cheeses. Each cheese brings its own unique taste and texture to the wraps.</p>
</p>
<h3>Flavor Enhancements with Sauces and Spices</h3>
</p>
<p>You can take your wraps to the next level with sauces and spices. Here are some ideas:</p>
</p>
<p>– Add BBQ sauce for a sweet and savory twist.</p>
<p>– Use ranch dressing for a creamy touch.</p>
<p>– Sprinkle in red pepper flakes for heat.</p>
<p>– Mix in fresh herbs like cilantro or parsley for brightness.</p>
</p>
<p>These additions can change the flavor profile of your wraps. Don’t be afraid to get creative! Each option will turn a simple meal into a gourmet experience. For the full recipe, check out the details above.</p>
</p>
</p>
<h2>Storage Info</h2>
</p>
<h3>How to Store Leftover Wraps</h3>
</p>
<p>To keep your leftover wraps fresh, wrap them in plastic wrap. You can also place them in an airtight container. Store the wraps in the fridge. They stay good for about three days. Make sure they cool down before you store them. This helps keep them from getting soggy.</p>
</p>
<h3>Freezing Tips for Long-Term Storage</h3>
</p>
<p>If you want to store the wraps for longer, freezing is a great option. First, let the wraps cool completely. Then, wrap each one in plastic wrap. Place them in a freezer bag and remove as much air as you can. You can freeze them for up to three months. When you’re ready to eat them, just take out the wraps and let them thaw in the fridge overnight.</p>
</p>
<h3>Reheating Instructions</h3>
</p>
<p>To reheat your cheesy garlic chicken wraps, you have a few options. The best way is to use a skillet. Heat it over medium heat. Place the wraps seam-side down in the skillet. Cook for about 3-4 minutes on each side. This will make them warm and crispy. You can also use a microwave. Wrap them in a damp paper towel and heat for about one minute. The wraps may not be as crispy, but they will be warm and tasty. For the best results, follow the Full Recipe for guidance on cooking times and temperatures.</p>
</p>
<h2>FAQs</h2>
</p>
<h3>What can I use instead of chicken?</h3>
<p>You can use turkey or shredded beef. For a meatless option, try black beans or tofu. Both options work well with the cheese and spices. Just ensure they are cooked and seasoned well before mixing.</p>
</p>
<h3>Can I make these wraps ahead of time?</h3>
<p>Yes, you can! Prepare the wraps, then wrap them in foil or plastic. Store them in the fridge for up to a day. When ready, just heat them in a skillet until warm and the cheese melts. This saves time for busy days.</p>
</p>
<h3>How do I make them spicier?</h3>
<p>Add hot sauce to the chicken mixture. You can also include diced jalapeños or crushed red pepper. These additions will give your wraps a nice kick. Adjust the spice level based on your taste. Enjoy the flavor!</p>
</p>
<p>For the full recipe, check out the section above.</p>
</p>
<p>This article covered all you need for delicious wraps. You learned about the key ingredients, from chicken to spices. I explained how to prepare, assemble, and cook your wraps step by step. I shared tips to melt cheese perfectly and keep wraps intact. You can explore fun variations and how to store leftovers. Remember, making these wraps your own is easy. Don’t be afraid to try new flavors. Enjoy creating tasty meals that fit your lifestyle. Happy cooking!</p>
</div>

- Chicken and Dairy Products - 2 large chicken breasts, cooked and shredded - 1 cup shredded mozzarella cheese - 1/2 cup cream cheese, softened

Cheesy Garlic Chicken Wraps

Get ready to satisfy your cravings with these Cheesy Garlic Chicken Wraps! This quick and tasty meal combines tender shredded chicken, gooey mozzarella, and savory spices, all wrapped in a soft tortilla. Perfect for busy weeknights or a delicious lunch, these wraps are packed with flavor and easy to make. Click through to discover the full recipe and elevate your mealtime with this cheesy delight that everyone will love!

Ingredients
  

2 large chicken breasts, cooked and shredded

1 cup shredded mozzarella cheese

1/2 cup cream cheese, softened

1 teaspoon garlic powder

1 teaspoon onion powder

1/2 teaspoon smoked paprika

Salt and pepper to taste

4 large flour tortillas

1 cup fresh spinach leaves

1/2 cup diced tomatoes

1/4 cup sliced green onions

Olive oil for cooking

Optional: hot sauce for extra flavor

Instructions
 

In a mixing bowl, combine the shredded chicken, mozzarella cheese, cream cheese, garlic powder, onion powder, smoked paprika, salt, and pepper. Mix until well combined.

    Lay out the flour tortillas on a clean surface. In the center of each tortilla, add a handful of fresh spinach leaves followed by a generous spoonful of the cheesy chicken mixture.

      Top the mixture with diced tomatoes and sliced green onions for freshness and crunch.

        Fold in the sides of the tortilla and then roll it up tightly from the bottom to the top to form a wrap.

          Heat a skillet over medium heat and add a drizzle of olive oil. Place the wraps seam-side down in the skillet and cook for about 3-4 minutes on each side, or until golden brown and the cheese is melted.

            Remove the wraps from the skillet and let them rest for a minute before slicing them in half.

              Serve warm with a drizzle of hot sauce on the side for those who enjoy a spicy kick.

                Prep Time: 10 mins | Total Time: 20 mins | Servings: 4 wraps

                  - Presentation Tips: Arrange the wraps on a platter and serve with a small bowl of ranch or garlic dipping sauce. Garnish with fresh herbs for a colorful touch!

                    WANT TO SAVE THIS RECIPE?

                    Leave a Comment

                    Recipe Rating