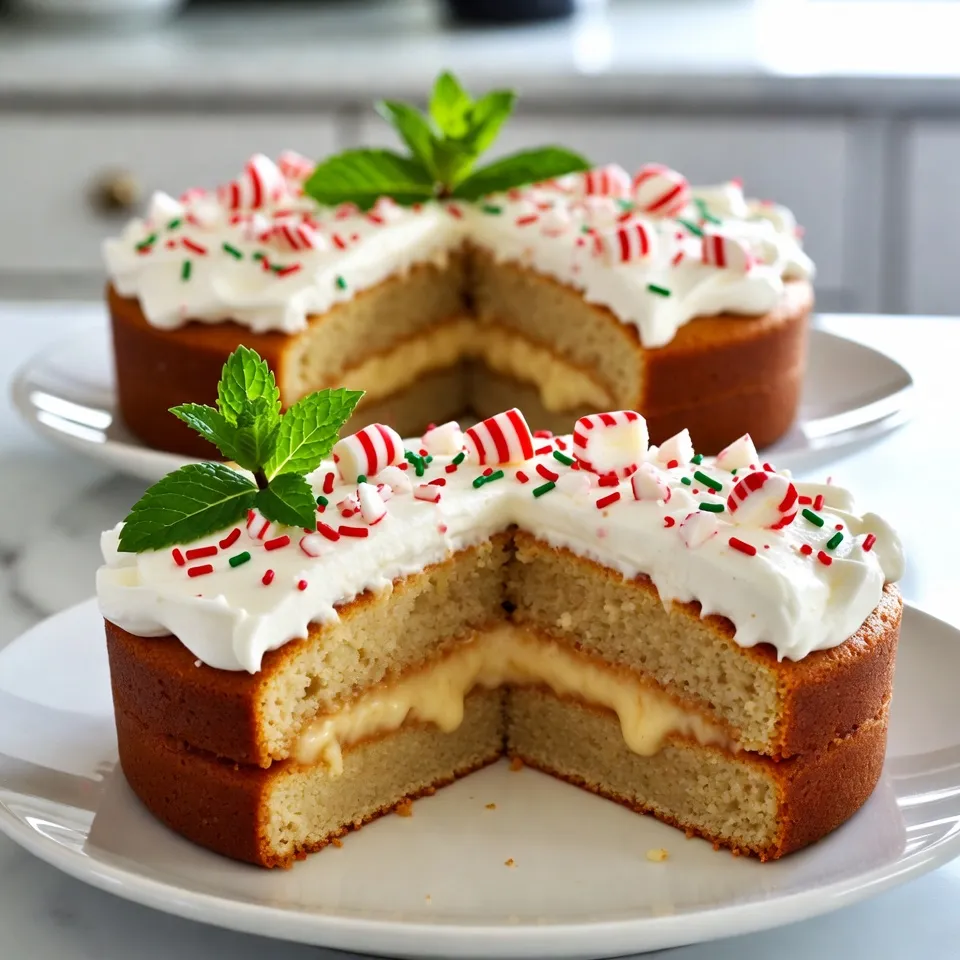
Celebrate the season with my Festive Christmas Poke Cake! This delightful holiday dessert is not just easy to make, but it also looks stunning on your table. You’ll find layers of rich flavor, topped with bright colors perfect for Christmas. With a few simple ingredients and some fun twists, you can impress your family and friends. Ready to dive into this sweet holiday treat? Let’s get started!
Why I Love This Recipe
- Festive Flavor Explosion: This cake combines the classic taste of vanilla with the refreshing kick of peppermint, making it perfect for the holiday season.
- Easy to Make: With a simple cake mix and easy preparation steps, this recipe is perfect for bakers of all skill levels.
- Impressive Presentation: The vibrant red and green sprinkles alongside the whipped topping make this cake a visual delight for any holiday gathering.
- Chill and Serve: Preparing this cake ahead of time is a breeze, allowing you to enjoy your festivities without a last-minute rush.
Ingredients
Main Ingredients for the Cake
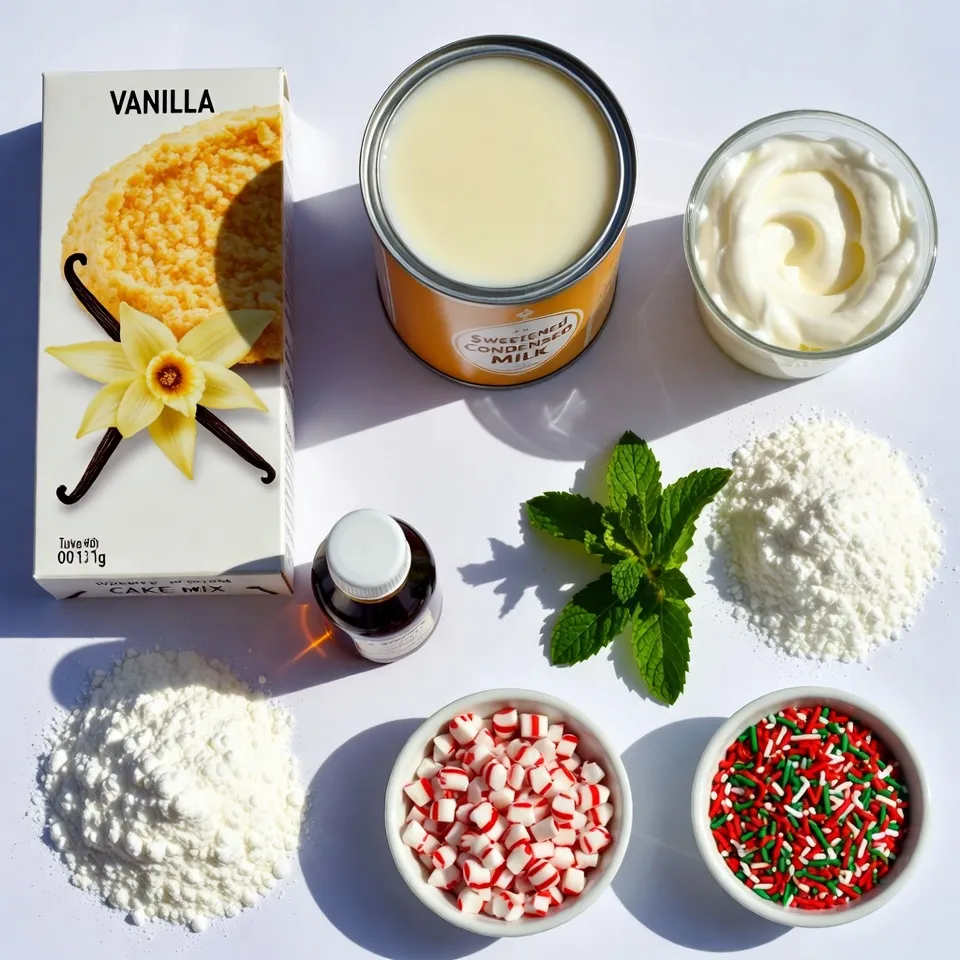
– 1 box of vanilla cake mix (plus ingredients as directed on the box)
– 1 can (14 oz) sweetened condensed milk
– 1 cup heavy whipping cream
– 1 teaspoon vanilla extract
– 1 ½ cups powdered sugar
To start, I use a box of vanilla cake mix. This makes it easy and quick. You’ll also need sweetened condensed milk. It adds a rich sweetness. Heavy whipping cream is essential for the topping. Don’t forget the vanilla extract for flavor and powdered sugar for that perfect sweetness.
Toppings and Garnishes
– 1 cup crushed peppermint candies
– 1 cup red and green sprinkles
– Fresh mint leaves for garnish (optional)
For a festive touch, crushed peppermint candies work great. They bring a nice crunch and holiday flavor. Red and green sprinkles add color and fun. Fresh mint leaves are optional but add a lovely look.
Optional Ingredients for Customization
Feel free to swap some ingredients. You can use chocolate cake mix instead of vanilla. This gives a different but tasty flavor. For a creamier topping, add cream cheese to the whipped cream. You can also mix in different candies for a unique twist.
Step-by-Step Instructions
Preparing the Cake
First, preheat your oven as the box directions say. Grease and flour a 9×13 inch baking pan. Next, mix the vanilla cake according to the box. Pour the batter into the pan and bake it. Once done, let the cake cool for about 10 minutes in the pan. This step is key for a moist cake.
How to Poke the Cake
Once your cake has cooled slightly, it’s time to poke it. Use the handle of a wooden spoon to create holes in the cake. Space the holes about 1 inch apart. Make sure the holes are deep enough for the sauce to seep in. This step allows all the yummy flavors to soak into the cake.
Making the Peppermint Sauce
In a mixing bowl, combine the sweetened condensed milk with half a cup of crushed peppermint candies. Stir well to mix it all together. Then, pour this rich mixture evenly over the poked cake. Let it soak into the holes. This will create a festive flavor that will delight your guests.
Preparing the Whipped Topping
In another bowl, whip together heavy cream, powdered sugar, and vanilla extract. Use an electric mixer to beat the mixture until soft peaks form. This step gives your cake a light and fluffy topping. Be gentle, as over-mixing can ruin the texture.
Frosting and Decorating the Cake
Carefully spread the whipped topping over the entire surface of the cake. Make it even and smooth. Then, sprinkle the remaining crushed peppermint candies on top. Add the red and green sprinkles for a festive look. This is where the cake gets its holiday charm.
Chilling and Serving Suggestions
Refrigerate the cake for at least 2 hours. This allows the flavors to meld and the cake to set perfectly. When ready to serve, slice it and place each piece on festive plates. You can add a fresh mint leaf on top for a pop of color. Enjoy this delightful holiday treat with family and friends!
Tips & Tricks
Perfecting the Cake Texture
To get a soft and moist cake, bake it just until done. Follow the box instructions for time. Check with a toothpick; it should come out clean. Let the cake cool for at least 10 minutes in the pan. This helps keep it moist when you poke holes. Ensure the holes are deep enough for the sauce to soak in well.
Enhancing Flavor with Variations
You can add extra flavors to your poke cake. Try mixing in a teaspoon of peppermint extract into the cake batter for a stronger mint taste. You can also swap the vanilla for almond extract for a different twist. If you want more fruit, add crushed strawberries or raspberries on top of the whipped cream. These add great color and flavor.
Presentation Ideas for Holiday Festivities
Presentation makes your cake look festive. Use a large, colorful cake plate to serve it. Cut squares and place them on holiday-themed plates. Add a mint leaf or a small candy cane on each slice for style. A sprinkle of powdered sugar over the top also adds a wintery look. Be creative; you can even arrange some extra crushed candies around the cake for a fun touch.
Pro Tips
- Use Room Temperature Ingredients: Allow your eggs and butter to come to room temperature before mixing. This helps create a smoother batter and a lighter cake texture.
- Poke Holes with Care: When poking the cake, use the handle of a wooden spoon gently to avoid breaking the cake apart. Deep holes help the sauce soak in better.
- Chill for Best Results: Refrigerating the cake for at least 2 hours allows the flavors to meld together beautifully and ensures a firmer texture for slicing.
- Creative Garnishing: Get creative with your toppings! Use crushed chocolate candies or colorful fruits along with the peppermint for a unique twist on presentation.
Variations
Alternate Flavor Combinations
You can easily change the flavors of your poke cake. Try using chocolate cake mix instead of vanilla. This adds a rich taste that pairs well with peppermint. You can also mix in different extracts, like almond or orange. For a fruity twist, add a layer of raspberry or strawberry sauce. These flavors create a fun surprise in every bite.
Gluten-Free or Healthier Options
To make a gluten-free poke cake, use a gluten-free cake mix. Many brands offer delicious options that taste great. You can also reduce sugar by using a sugar substitute in the cake mix and whipped topping. For a healthier version, swap the heavy cream for Greek yogurt. It still gives a creamy texture and adds protein.
Fun Twists on Decoration
Get creative with how you decorate your cake. Instead of just sprinkles, consider using crushed nuts or edible glitter. You can also create patterns with the whipped cream. Use a piping bag for swirls and shapes. Add fresh fruit like berries or slices of oranges on top. This adds color and freshness to your festive cake.
Storage Info
Best Storage Methods
To keep your festive Christmas poke cake fresh, store it in the fridge. Use an airtight container to prevent drying. You can also cover it tightly with plastic wrap. This will keep the cake moist and delicious.
Shelf Life of the Poke Cake
This poke cake lasts for about 3 to 5 days in the fridge. After that, it may lose its flavor and texture. If you want to keep it longer, consider freezing it. Just make sure to wrap it well to avoid freezer burn.
Reheating Tips for Leftovers
If you have leftovers, you can enjoy them cold or warm. For a warm treat, slice a piece and place it in the microwave. Heat it for about 10 to 15 seconds. This will warm the cake and melt the topping slightly, making it extra tasty.
FAQs
What is a Poke Cake?
A poke cake is a fun dessert. You bake the cake and then poke holes in it. This lets sweet liquids soak into the cake. The result is a moist and flavorful treat. It’s perfect for special occasions like Christmas.
Can I Make This Cake in Advance?
Yes, you can make this cake in advance. Prepare the cake and let it cool. Then, poke the holes and add the sweetened condensed milk. Cover and store the cake in the fridge. This keeps it fresh for up to two days. Just add the whipped topping before serving.
What Can I Use Instead of Heavy Whipping Cream?
If you don’t have heavy whipping cream, try using cool whip. You can also use whipped coconut cream for a dairy-free option. Another choice is to make a cream cheese frosting. Mix cream cheese with a bit of milk and sugar for a tasty substitute.
How to Make the Cake More Festive?
To make the cake more festive, add more sprinkles. Use red and green sprinkles to match the holiday theme. You can also use edible glitter for a sparkle effect. Fresh mint leaves on top add a nice touch, too.
Can I Use a Different Cake Mix?
Absolutely! You can use any cake mix you like. Chocolate cake mix works great for a fun twist. You can also try lemon or red velvet for a festive look. Just make sure to follow the box instructions for baking.
You now have all the tools to make a perfect poke cake. We covered the key ingredients, step-by-step instructions, and helpful tips. We also explored variations and storage methods to keep your cake fresh.
As you enjoy this fun dessert, remember to get creative with flavors and toppings. With practice, you’ll impress everyone at your next gathering. Enjoy baking and sharing your delicious poke cak