
Craving a crowd-pleaser for your next gathering? Look no further than these French Dip Sliders! With tender roast beef, gooey cheese, and a flavorful broth for dipping, these sliders pack a punch in every bite. Easy to make and fun to serve, they’ll impress your guests and leave them coming back for more. Let’s dive into the ingredients and steps to make this delicious treat!
Why I Love This Recipe
- Deliciously Savory: The combination of juicy roast beef and melted cheese creates a rich and satisfying flavor that is hard to resist.
- Perfect for Gatherings: These sliders are easy to make and serve, making them a fantastic choice for parties or game day.
- Easy to Customize: You can easily swap out the cheeses or add your favorite toppings to make these sliders your own.
- Comfort Food at Its Best: Warm, cheesy, and packed with flavor, these sliders are the ultimate comfort food that everyone will love.
Ingredients
Main Ingredients
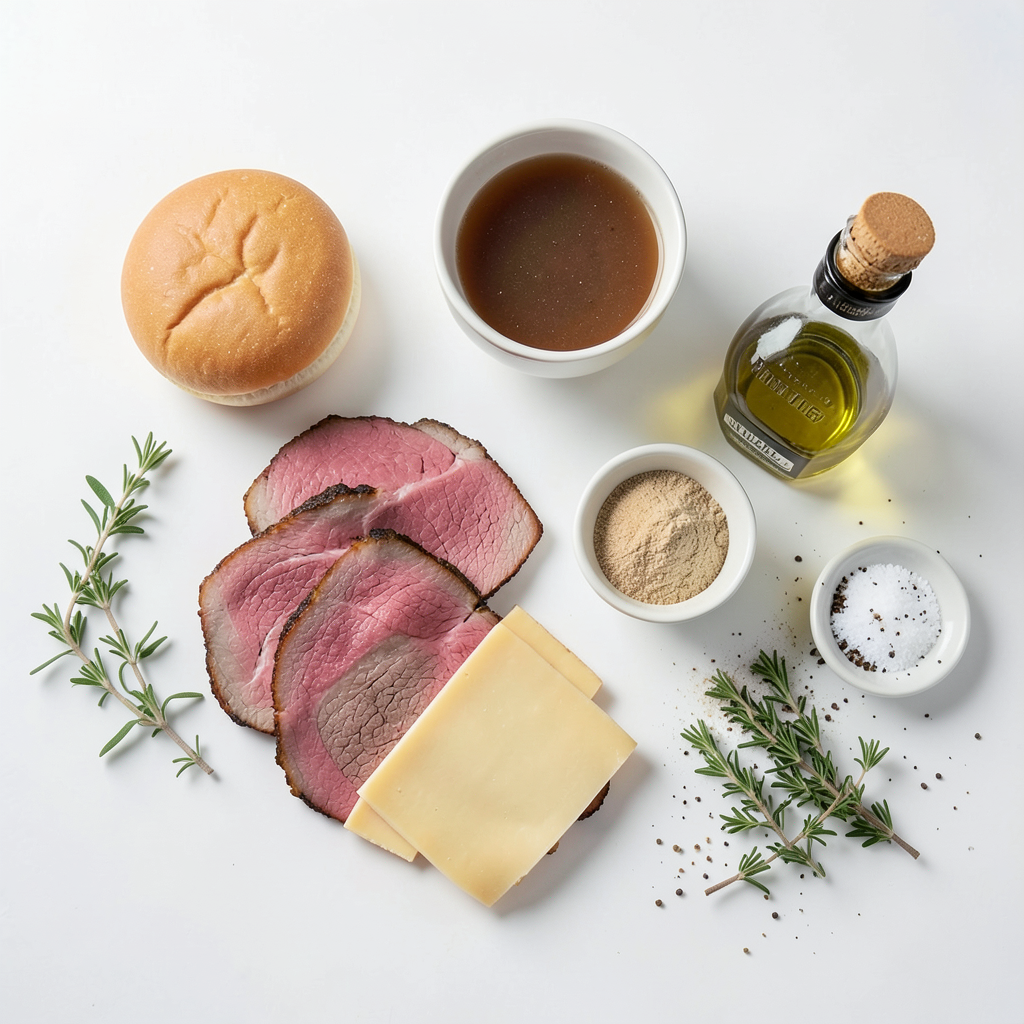
- 1 pound thinly sliced roast beef
- 8 slices provolone cheese (or mozzarella)
- 12 small slider buns (brioche or potato)
Broth and Seasoning Ingredients
- 1 cup beef broth
- 2 tablespoons soy sauce
- 1 tablespoon Worcestershire sauce
- 1 teaspoon garlic powder
- 1 teaspoon onion powder
- Olive oil
- Salt and pepper
Garnish
- Fresh thyme leaves
When I make French Dip Sliders, I focus on fresh, quality ingredients. The roast beef is the star here. I like to use thinly sliced roast beef. It makes the sliders juicy and full of flavor. For the cheese, provolone melts beautifully, but mozzarella works too if you want a twist.
The slider buns are important. I always choose soft brioche or potato buns. They hold up well and add a nice touch of sweetness.
For the broth, I mix beef broth with soy sauce and Worcestershire sauce. This combination adds depth to the flavor. I also use garlic powder and onion powder for extra taste. Don’t forget the olive oil, salt, and pepper for seasoning.
Lastly, I sprinkle fresh thyme leaves on top. They give a nice pop of color and taste. This simple ingredient list sets the stage for a dish that everyone will love.
Step-by-Step Instructions
Prepping the Oven and Broth
- Preheat your oven to 350°F (175°C).
- In a small saucepan, combine 1 cup beef broth, 2 tablespoons soy sauce, 1 tablespoon Worcestershire sauce, 1 teaspoon garlic powder, 1 teaspoon onion powder, salt, and pepper. Heat over medium heat until warmed through, but do not boil. Set aside.
Cooking the Beef
- Heat 1 tablespoon of olive oil in a large skillet over medium heat.
- Add 1 pound of thinly sliced roast beef to the skillet. Sauté for 2-3 minutes until heated through.
Assembling the Sliders
- Split 12 small slider buns in half and place the bottom halves in a lightly greased baking dish.
- Layer the sautéed roast beef evenly on the bottom buns. Top with 8 slices of provolone cheese.
- Place the top halves of the buns over the cheese.
- Use a pastry brush to lightly brush the tops of the buns with some of the broth mixture for added flavor.
Baking and Serving
- Cover the dish with foil and bake in the preheated oven for about 15 minutes.
- Remove the foil and bake for an additional 5-10 minutes until the cheese is bubbly and the buns are slightly toasted.
- Serve the sliders warm, accompanied by the remaining broth for dipping. Garnish with fresh thyme leaves.
Tips & Tricks
Enhancing Flavor
- Use freshly ground spices: Fresh spices boost taste. They give a rich flavor that dried spices lack. A simple grind of black pepper or sea salt can lift your sliders.
- Try different cheese options: Provolone is classic, but mozzarella works well too. You can also use cheddar or pepper jack for a fun twist. Each cheese gives a unique taste.
Perfecting Texture
- Toasting sliders before serving: Toasting adds a nice crunch. It also helps keep the buns from getting soggy. A quick toast in the oven makes a big difference.
- Adjusting baking time for desired crispiness: Baking longer makes the buns crispier. Keep an eye on them to avoid burning. You want a golden brown top with melted cheese.
Serving Suggestions
- Pair with sides like potato chips or salad: Potato chips add a nice crunch. A fresh salad balances the rich flavors of the sliders. Both options make great sides.
- Presentation tips to elevate the dish: Use a nice platter for serving. Garnish with fresh thyme leaves for color. Serve the broth in small cups for dipping. This makes the meal more inviting and fun.
Pro Tips
- Use Quality Beef: Opt for high-quality roast beef for the best flavor. Look for cuts that are well marbled for a juicy bite.
- Cheese Options: While provolone is traditional, trying mozzarella or even gouda can give a delicious twist to the sliders.
- Broth Variations: Experiment with different types of broth, such as mushroom or chicken, to create unique flavor profiles for your dipping sauce.
- Make Ahead: Prepare the sliders in advance and store them in the refrigerator. Just bake them when you're ready to serve for an easy meal.
Variations
Alternative Meats
You can easily switch meats in this recipe. Try using turkey or chicken for a lighter option. Both meats work well with the savory broth. If you want a vegetarian twist, consider mushrooms or jackfruit. They soak up flavor and add nice texture.
Different Breads
Don't feel stuck with the same type of bun. Whole wheat or gluten-free buns offer great choices. They add a different taste and texture. You can also experiment with flavored breads, like garlic or herb. Flavored bread can make your sliders even more special.
Flavor Infusions
Want to spice things up? Add sliced jalapeños for a kick. They bring heat and flavor that pairs well with beef. You can also include caramelized onions for sweetness. Both options elevate the dish and make it more fun to eat.
Storage Info
Refrigeration Guidelines
To keep your French dip sliders fresh, store any leftovers in an airtight container. This helps prevent the buns from getting soggy. Place the sliders in the fridge within two hours of cooking. When you want to reheat them, preheat your oven to 350°F. Wrap the sliders in foil to keep them moist and heat for about 10-15 minutes.
Freezing Tips
You can freeze these sliders for later. First, let them cool completely. Then, wrap each slider tightly in plastic wrap. Place the wrapped sliders in a freezer bag or container. When you want to enjoy them, take the sliders out of the freezer. Let them thaw in the fridge overnight. To reheat, use the same method as for refrigerated sliders.
Shelf Life
These sliders are best when eaten within three days if stored in the fridge. If frozen, they will stay good for up to three months. After that, they may lose taste and texture. Enjoy your sliders while they're fresh for the best flavor!
FAQs
What can I serve with French Dip Sliders?
You can serve your sliders with many tasty sides. Here are some ideas:
- Crispy potato chips
- Fresh garden salad
- Steamed veggies like broccoli or carrots
- Sweet potato fries
- Pickles for a tangy crunch
These sides will balance the rich flavors of the sliders. They add color and texture to your meal.
Can I make these sliders ahead of time?
Yes, you can! Making sliders ahead saves time on busy days. Here are some tips:
- Prepare the beef and seasonings the day before.
- Assemble the sliders in the baking dish, but do not bake yet.
- Cover the dish with plastic wrap and store it in the fridge.
When you are ready, just bake them as directed. They will still taste fresh and delicious.
How do I reheat leftovers?
To keep the sliders tasty, reheat them right. Here are the best methods:
- Use the oven: Preheat to 350°F (175°C). Cover sliders with foil and heat for 10-15 minutes.
- Use a microwave: Heat on low power for about 30 seconds. This helps avoid sogginess.
Both methods help keep the bread soft and cheese melty.
Is there a vegetarian version of French Dip Sliders?
Absolutely! You can make them plant-based. Here are some ideas:
- Use sautéed mushrooms or jackfruit instead of beef.
- Add cheese options like vegan provolone or mozzarella.
- Use vegetable broth for dipping.
These swaps will keep the flavors while being meat-free. Enjoy a delicious meal that fits your diet!
You now have all the essentials for making delicious French Dip Sliders. We covered main ingredients, seasoning, and cooking steps, ensuring each slider packs flavor. We also shared tips for enhancing taste and texture, along with variations to keep your meals exciting. Lastly, we discussed storage to enjoy these sliders later. Whether for dinner or a party, these sliders are sure to please. Enjoy creating a dish that brings joy to your table!