Craving a sweet treat that's easy to make? Look no further! In this post, I'll show you how to whip up delicious Homemade No-Bake Snickers Bars. With simple ingredients and no oven required, you can satisfy your candy cravings in no time. Plus, I’ll share tips, tricks, and variations to make these bars your own. Ready to indulge? Let’s get started on this quick and tasty recipe!
Why I Love This Recipe
- Healthy Ingredients: This recipe uses wholesome ingredients like dates and oats, making it a guilt-free treat.
- No Baking Required: Perfect for those hot days when you don’t want to turn on the oven!
- Customizable: Feel free to switch up the nuts or add extras like shredded coconut for a unique twist.
- Deliciously Indulgent: The combination of chocolate and peanut butter delivers a rich, satisfying flavor that everyone loves.
Ingredients
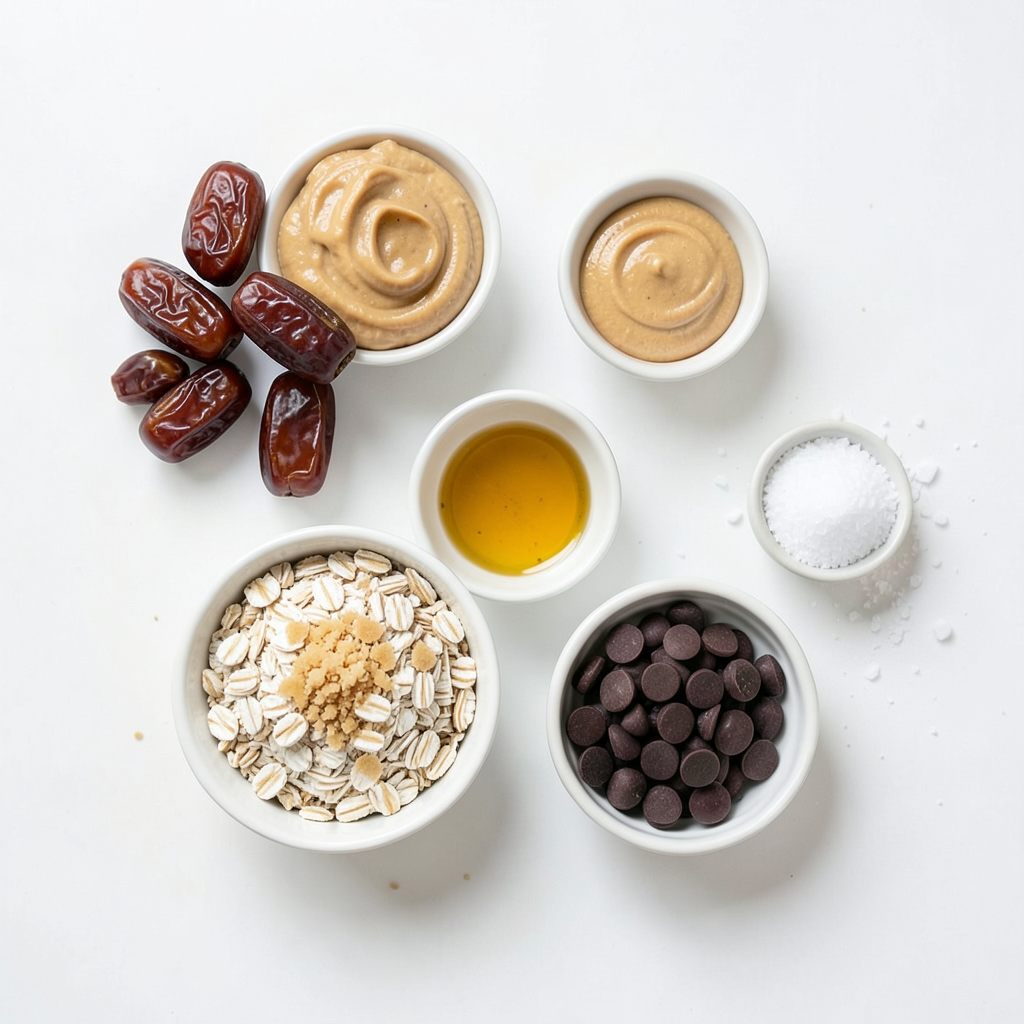
List of Ingredients for Homemade No-Bake Snickers Bars
Here are the simple ingredients you need:
- 1 cup dates, pitted
- 1/2 cup natural peanut butter
- 1/4 cup maple syrup
- 1 cup rolled oats
- 1/2 cup crushed unsalted peanuts
- 1 cup dark chocolate chips
- 1 tablespoon coconut oil (optional, for melting chocolate)
- Sea salt, to taste
Ingredient Substitutions and Suggestions
If you want to change things up, here are some swaps:
- Dates: You can use dried figs or prunes if you like.
- Peanut Butter: Almond butter or sunflower seed butter works great too.
- Maple Syrup: Honey or agave syrup is a good choice.
- Rolled Oats: Quick oats can be used, but they may change the texture.
- Crushed Peanuts: Try using walnuts or even almond pieces.
- Dark Chocolate Chips: Milk chocolate chips or white chocolate chips can be fun.
Nutritional Information Breakdown
Here’s a quick look at the nutrition per bar:
- Calories: About 180
- Protein: 4g
- Fat: 9g
- Carbohydrates: 22g
- Fiber: 3g
- Sugar: 8g
These bars are tasty and give you energy without added junk. You can enjoy them knowing they are made with wholesome ingredients.
Step-by-Step Instructions
Detailed Instructions for Making No-Bake Snickers Bars
1. Start by pitting the dates. Measure one cup and place them in a food processor.
2. Add half a cup of natural peanut butter and a quarter cup of maple syrup. Blend until smooth and creamy.
3. Next, add one cup of rolled oats and half a cup of crushed unsalted peanuts. Blend lightly until mixed. The mixture should be sticky but hold together.
4. Line an 8x8 inch baking dish with parchment paper. Leave some paper hanging over the sides for easy removal.
5. Spread the date and peanut mixture evenly in the dish. Press down firmly to create a smooth, even layer. Use a spatula for a neat top.
6. In a microwave-safe bowl, combine one cup of dark chocolate chips with one tablespoon of coconut oil, if using. Microwave in 20-second bursts, stirring in between until melted and smooth.
7. Pour the melted chocolate over the peanut layer. Tilt the dish to cover the entire surface. Sprinkle a pinch of sea salt on top.
8. Place the dish in the refrigerator. Chill for at least one hour, or until the chocolate sets completely.
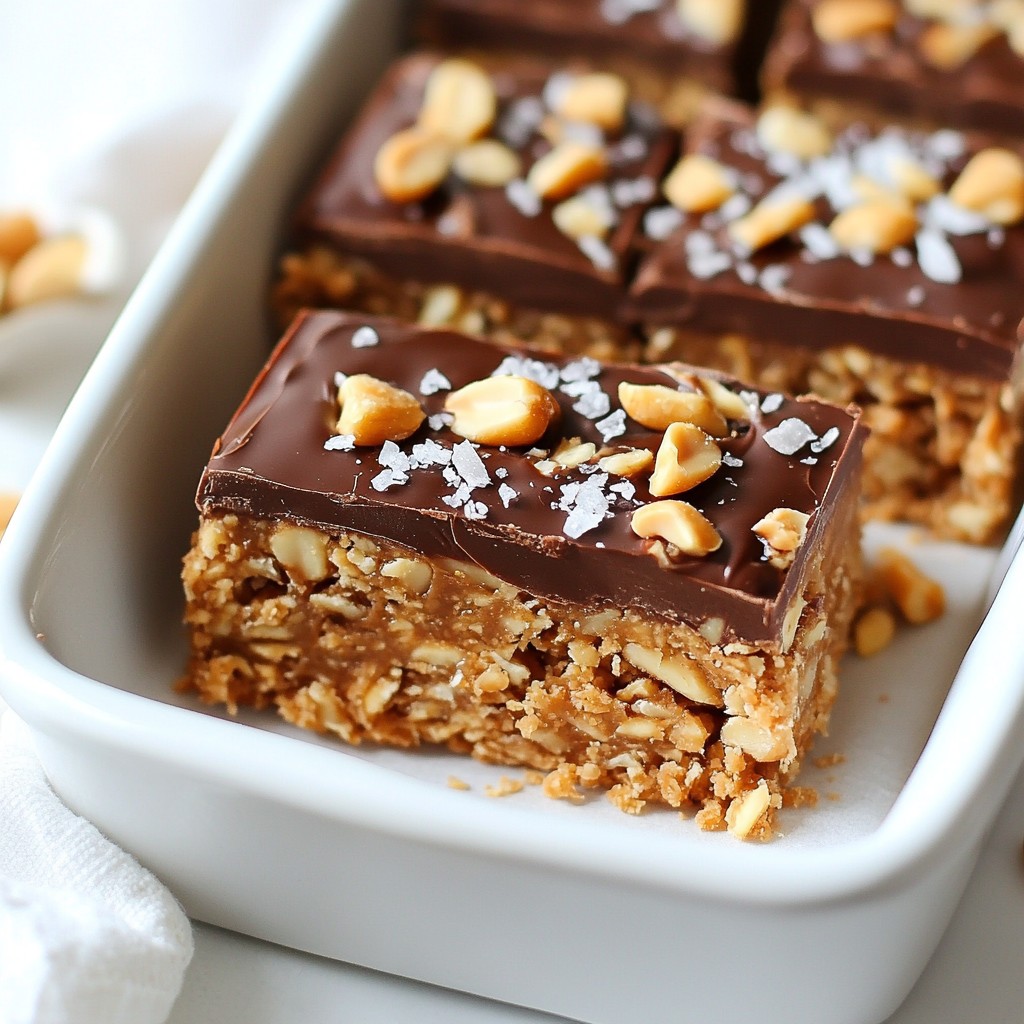
9. Once set, lift the bars out using the parchment paper. Cut them into rectangular bars.
10. Store the bars in an airtight container in the fridge for up to a week.
Tips for Preparing the Ingredients
- Ensure all dates are pitted before blending. This step is crucial for a smooth texture.
- Use natural peanut butter for the best taste. It should have no added sugar or oils.
- Crush the peanuts finely, but not into dust. This adds crunch to the bars.
- Measure all ingredients accurately for the best results. Too much or too little can change the texture.
Visual Guide or Video Suggestions for Each Step
- Consider recording a short video of each step. This can help others follow along easily.
- Use photos to show the texture of the mixture at each stage. This will help others know what to expect.
- Create a series of Instagram stories. Share quick tips and tricks during the process.
Tips & Tricks
Best Practices for Achieving the Perfect Texture
To get that ideal chewy and crunchy feel, start with fresh dates. They should be soft and sticky. If your dates are too dry, soak them in warm water for a few minutes. This will help them blend better. When mixing, make sure to pulse the food processor. This keeps some oats and peanuts chunky, adding nice texture. Press the mixture firmly into the pan. This helps the bars hold their shape when cut.
Common Mistakes to Avoid
One common mistake is using too many dry ingredients. This can make the bars crumbly. Stick to the amounts listed in the recipe. Another pitfall is not blending the mixture enough. It should be smooth but still hold its shape. Don’t skip the sea salt on top. It enhances the flavors and balances the sweetness. Lastly, be patient and let the bars chill in the fridge. This step is key for setting the chocolate.
How to Personalize Your Bars for Different Tastes
You can easily change these bars to fit your taste. Try adding different nuts or seeds. Almonds or sunflower seeds work great. For a sweeter touch, mix in mini chocolate chips or dried fruit. If you love coconut, add shredded coconut into the mixture. You can also swap the peanut butter for almond or cashew butter for a new flavor. The options are endless, so have fun and get creative!
Pro Tips
- Storage Tip: For the best texture, store the bars in an airtight container in the refrigerator; they will stay fresh for up to a week.
- Peanut Substitution: If you don't have natural peanut butter, you can use almond butter or any nut butter of your choice for a different flavor.
- Chocolate Melting Tip: To avoid burning the chocolate, melt it in short bursts and stir in between, ensuring it is smooth and creamy.
- Sweetness Adjustment: Feel free to adjust the sweetness by adding more maple syrup or using a different type of sweetener according to your taste preference.
Variations
Different Nut Butters to Use
You can swap out peanut butter for other nut butters. Almond butter gives a nice twist. Cashew butter adds a creamy texture. Sunflower seed butter is a great choice for nut-free needs. Each brings its unique taste to the bars. Just keep the same amount in the recipe.
Vegan and Gluten-Free Options
These bars can easily be made vegan. Use maple syrup and dark chocolate that’s dairy-free. Check the labels to ensure there are no animal products. For a gluten-free version, be sure to use certified gluten-free oats. This way, everyone can enjoy the treat without worry.
Flavor Additions and Mix-Ins
Want to make your bars even more special? You can add flavors like vanilla extract for a sweet touch. A pinch of cinnamon brings warmth. For crunch, add chopped nuts or seeds to the mix. Dried fruits like cranberries or raisins can add sweetness. Experiment with these mix-ins to find your favorite blend!
Storage Info
How to Properly Store No-Bake Snickers Bars
To keep your no-bake Snickers bars fresh, store them in an airtight container. This helps prevent them from drying out. Place a piece of parchment paper between layers to avoid sticking. Always keep them in the fridge for the best taste and texture.
Shelf Life and Best Practices for Freshness
These bars stay fresh for up to one week in the fridge. After that, they may lose some flavor and texture. If you notice any changes in smell or appearance, it's best to throw them out. Enjoy them while they are fresh for the best experience!
Freezing Instructions for Long-Term Storage
You can freeze these bars for longer storage. Cut them into pieces before freezing. Wrap each bar in plastic wrap or foil and place them in a freezer-safe bag. They can last up to three months in the freezer. When you're ready to eat, thaw them in the fridge overnight for the best taste.
FAQs
Can I substitute other sweeteners for maple syrup?
Yes, you can use other sweeteners. Honey or agave syrup works well. These options add sweetness similar to maple syrup. However, honey may make the bars a bit stickier. Adjust the amount based on your taste.
How long do these bars last in the fridge?
These bars last for about one week in the fridge. Store them in an airtight container. This keeps them fresh and tasty. If you want to enjoy them longer, consider freezing them.
Can I use milk chocolate instead of dark chocolate?
Absolutely! You can use milk chocolate if you prefer it. This change will make the bars sweeter and creamier. Just melt the milk chocolate as you would with dark chocolate.
Making no-bake Snickers bars at home is fun and simple. We covered the ingredients, detailed steps, and helpful tips for the best results. You can customize your bars using different nut butters and mix-ins. Remember to store them properly to enjoy for longer. This recipe is perfect for anyone who loves a sweet treat without baking. Enjoy creating your own tasty versions!