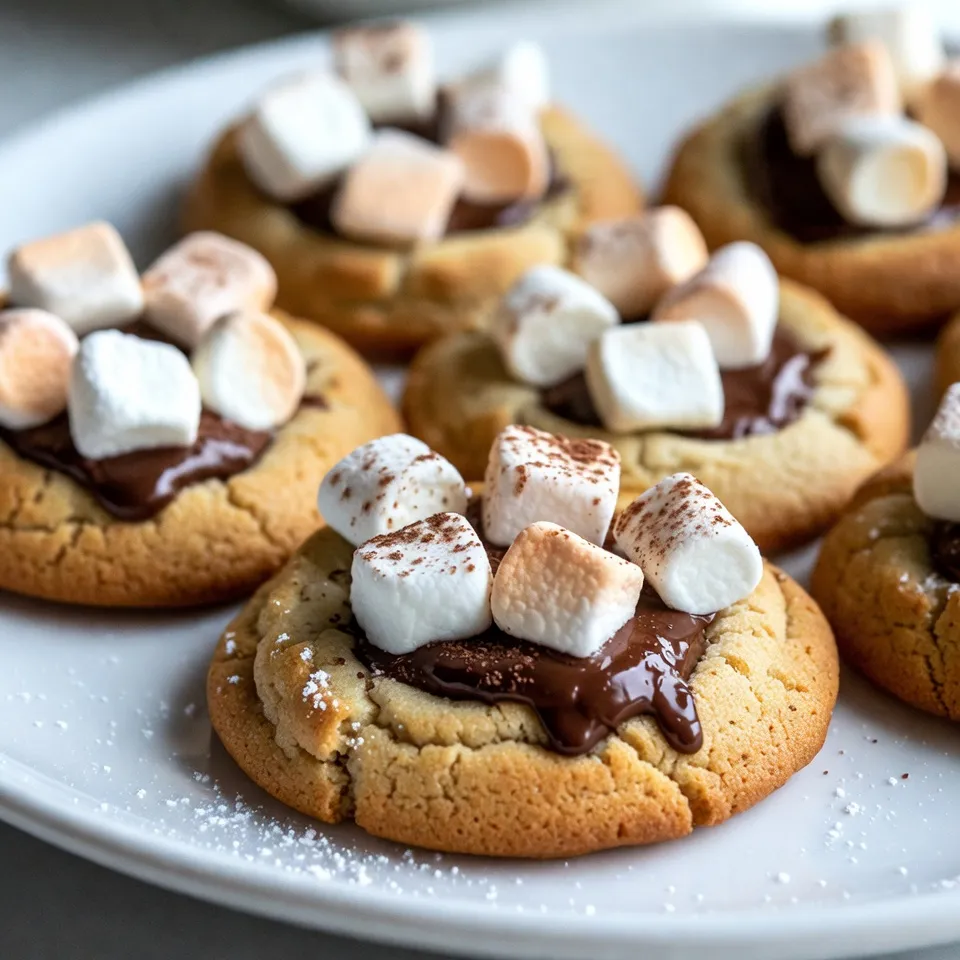
If you love chocolate, get ready for a treat! These Hot Chocolate Cookie Cups combine rich flavors and fun textures. Imagine a warm, chewy cookie cup filled with smooth chocolate and fluffy marshmallows. This dessert is perfect for any occasion or just a cozy night in. I’ll guide you step-by-step to create these irresistible delights. Let’s dive into the ingredients and start baking!
Why I Love This Recipe
- Deliciously Indulgent: These cookie cups combine the rich flavors of hot chocolate and cookies, creating a delightful treat perfect for any chocolate lover.
- Fun to Make: Shaping the cookie dough into cups adds a fun twist to baking, making it an enjoyable activity for both kids and adults.
- Perfect for Sharing: With 24 mini cookie cups, this recipe is great for gatherings, parties, or cozy nights in with friends and family.
- Endless Customization: You can easily swap out ingredients, like using different chocolate types or adding nuts, to make these cookie cups your own.
Ingredients
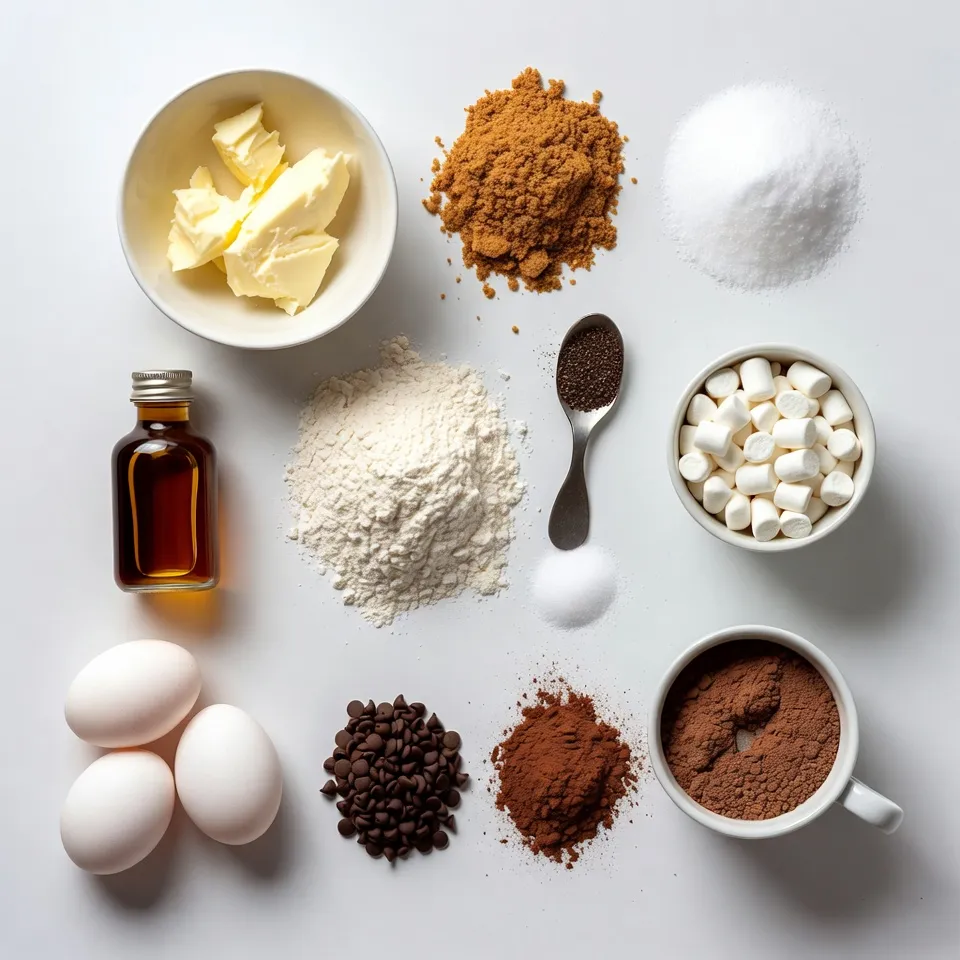
To make Hot Chocolate Cookie Cups, you need some simple, tasty ingredients. Here is what you will need:
– 1 cup unsalted butter, softened
– 1 cup brown sugar, packed
– 1/2 cup granulated sugar
– 2 large eggs
– 1 teaspoon vanilla extract
– 2 1/2 cups all-purpose flour
– 1 teaspoon baking soda
– 1/2 teaspoon salt
– 1/2 cup hot cocoa mix (powdered)
– 1 cup mini marshmallows
– 1 cup semi-sweet chocolate chips
– Cocoa powder and powdered sugar for dusting
Let’s break these down.
The butter, sugars, eggs, and vanilla form the base of your cookie cups. The softened butter makes them rich and creamy. Brown sugar adds moisture and a bit of extra flavor. Granulated sugar gives sweetness, while eggs help bind everything together.
Next, the dry ingredients include flour, baking soda, and hot cocoa mix. Flour gives structure to the cookie cups. Baking soda helps them rise and stay soft. The hot cocoa mix adds a deep chocolate flavor, making these treats extra special.
Finally, we have the fun part: the add-ins! Mini marshmallows and chocolate chips bring that classic hot chocolate vibe to your cookie cups. They melt slightly during baking, creating gooey pockets of sweetness.
Gather these ingredients, and you are all set to create a delicious dessert!
Step-by-Step Instructions
Prepping the Oven and Muffin Tin
First, set your oven to 350°F (175°C). This helps your cookie cups bake just right. Next, grab your mini muffin tin. Grease it well with cooking spray or butter. This step keeps the cookie cups from sticking.
Mixing the Wet Ingredients
In a large bowl, combine the softened butter, brown sugar, and granulated sugar. Use a hand mixer or stand mixer to beat them together until light and fluffy. This process adds air to the mix, making the cookies soft.
Now, add the eggs one at a time, mixing well after each. Then, pour in the vanilla extract. Mix everything until it’s fully combined. The batter should look smooth and creamy.
Combining Dry and Wet Ingredients
In a separate bowl, whisk together the flour, baking soda, salt, and hot cocoa mix. Make sure these dry ingredients are evenly blended. This step ensures that each cookie cup has the same great taste.
Gradually add the dry mix to the wet mix. Stir until just combined; do not over mix. Over mixing can make the cookie cups tough.
Lastly, gently fold in the mini marshmallows and chocolate chips. This adds sweetness and texture. Now you’re ready to scoop the dough into the muffin tin!
Tips & Tricks
Baking Perfect Cookie Cups
To bake perfect cookie cups, watch the time and temperature closely. Bake them at 350°F for 10 to 12 minutes. The edges should turn golden, and the middle should look soft. This helps keep the cups chewy inside.
For indentations, use the back of a small round spoon. Do this while the cookie cups are warm. Press gently but firmly in the center. This creates a space for hot chocolate or more marshmallows.
Presentation Ideas
Dusting adds flair to your cookie cups. Use cocoa powder and powdered sugar to create a sweet top layer. This makes them look fancy and taste even better!
For serving, place the cookie cups on a festive platter. Drizzle melted chocolate over them for a gourmet touch. Sprinkle extra mini marshmallows on top for a fun finish. These little touches make your dessert look amazing!
Pro Tips
- Chill the Dough: If the dough feels too soft, refrigerate it for 30 minutes before baking. This helps the cookie cups hold their shape better while baking.
- Use Quality Chocolate: Opt for high-quality semi-sweet chocolate chips for a richer flavor. Premium chocolate makes a significant difference in taste.
- Watch the Baking Time: Keep an eye on the cookie cups towards the end of the baking time. They should be golden around the edges but slightly under-baked in the center for the perfect texture.
- Experiment with Toppings: Feel free to get creative with toppings! Add crushed peppermint, sprinkles, or even a drizzle of caramel for a festive twist.
Variations
Flavor Adaptations
You can easily change the flavor of your Hot Chocolate Cookie Cups. Use different types of chocolate chips, like dark or white chocolate. This adds a new taste and richness. You can also mix in peppermint chips for a minty twist. Want more fun? Top your cookie cups with whipped cream or extra mini marshmallows. Drizzling caramel or chocolate sauce over them makes them look and taste gourmet. Each bite can be a new surprise!
Dietary Modifications
If you want vegan or gluten-free options, I have you covered. For a vegan version, replace the butter with coconut oil or vegan butter. Use flax eggs instead of regular eggs. Just mix 1 tablespoon of flaxseed meal with 2.5 tablespoons of water for each egg. For gluten-free cookie cups, swap all-purpose flour with a gluten-free blend. Make sure to check that your chocolate chips and hot cocoa mix are gluten-free, too. These changes keep the treats tasty and fun for everyone!
Storage Info
Storing Leftover Cookie Cups
To keep your cookie cups fresh, store them in an airtight container. This helps prevent them from drying out. Place parchment paper between layers to avoid sticking. Store them at room temperature for up to three days. If you want to keep them longer, consider freezing.
Freezing Instructions
Freezing cookie cups is easy and keeps them tasty. First, let the cookie cups cool completely. Then, place them on a baking sheet in a single layer. Freeze for about an hour. Once frozen, transfer them to a freezer bag or container. Label it with the date for easy tracking. They can stay in the freezer for up to three months. When you’re ready to enjoy, thaw them at room temperature or warm them in the oven for a few minutes. This way, they’ll taste like fresh-baked cookies!
FAQs
What is the best way to store hot chocolate cookie cups?
To keep your cookie cups fresh, place them in an airtight container. Make sure to layer parchment paper between each layer. This helps avoid sticking. Store them at room temperature for up to three days. If you want them to last longer, you can refrigerate them for up to a week. Just remember to let them come to room temperature before serving.
Can I make the cookie dough ahead of time?
Yes, you can make the cookie dough ahead of time. Just cover it tightly with plastic wrap or place it in an airtight container. You can store it in the fridge for up to three days. If you want to keep it longer, freeze the dough. To freeze, scoop the dough into balls and place them on a baking sheet. Freeze until firm, then transfer to a bag. You can bake them straight from the freezer; just add a couple of extra minutes to the baking time.
How can I make my cookie cups more decadent?
To elevate your cookie cups, consider adding a few fun toppings. Drizzle melted chocolate over the tops for a rich finish. You can also sprinkle extra mini marshmallows or crushed candy canes for added texture and flavor. For a gourmet touch, add whipped cream or a dollop of chocolate ganache in the center after baking. These small changes make your cookie cups even more irresistible!
You learned how to make delicious hot chocolate cookie cups. We covered the key ingredients, from butter to mini marshmallows. I shared easy steps for mixing and baking. Tips on perfecting your cookie cups helped you see how to get great results. Plus, I suggested fun ways to present them and offered tasty variations.
With proper storage, your treats stay fresh for longer. Enjoy making these cookie cups for yourself or friends! Keep experimenting with flavors, and you’ll always find new favorite