Looking for a dessert that's both simple and packed with flavor? Let me introduce you to the Italian Yogurt Pear Cake! It's moist, sweet, and full of delicious pear goodness. In this post, I'll guide you through each step with easy instructions and helpful tips. You’ll learn how to make this cake a hit at your next gathering. Get ready to impress your friends and family with this delightful treat!
Why I Love This Recipe
- Moist and Flavorful: This cake is incredibly moist thanks to the Greek yogurt, which not only adds creaminess but also enhances the flavor profile.
- Simple Ingredients: With common pantry staples and a couple of fresh pears, this recipe is both accessible and delicious, perfect for any occasion.
- Perfect for Any Time: This cake is versatile enough to serve at breakfast, as a snack, or as a dessert, making it a great all-day treat.
- Elegant Presentation: Dusting with powdered sugar and garnishing with pear slices elevates this cake, making it a stunning centerpiece for gatherings.
Ingredients
List of Required Ingredients
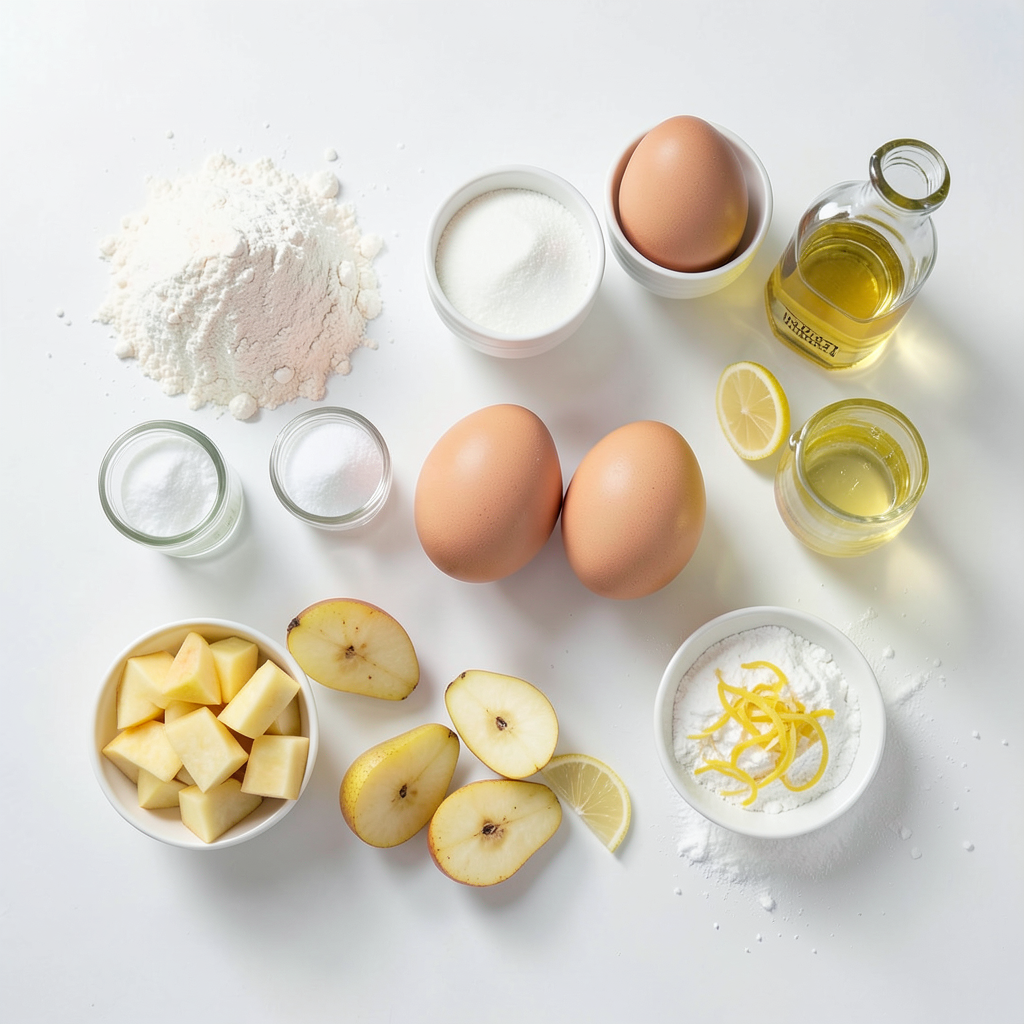
To make the Italian Yogurt Pear Cake, gather these ingredients:
- 1 ½ cups all-purpose flour
- 1 teaspoon baking powder
- ½ teaspoon baking soda
- ¼ teaspoon salt
- 1 cup plain Greek yogurt
- ¾ cup granulated sugar
- 3 large eggs
- ⅓ cup vegetable oil
- 1 teaspoon vanilla extract
- 2 ripe pears, peeled, cored, and diced
- Zest of 1 lemon
- 2 tablespoons lemon juice
These key ingredients create a cake that is both soft and flavorful. The Greek yogurt makes it moist, while the pears add a lovely texture.
Optional Ingredients for Garnishing
You can elevate your cake with these optional garnishes:
- Powdered sugar for dusting
- Thin slices of fresh pear
- A sprinkle of lemon zest
These garnishes add a nice touch and enhance the visual appeal of the cake.
Substitutions and Alternatives
If you need to make swaps, here are some ideas:
- Use almond flour for a gluten-free option.
- Swap Greek yogurt for regular yogurt if needed.
- Replace sugar with honey for a natural sweetener.
These substitutions ensure you can still enjoy the cake even with dietary restrictions.
Step-by-Step Instructions
Preparation of the Cake Batter
First, preheat the oven to 350°F (175°C). Grease a 9-inch round cake pan with butter and dust it with flour. You can also line it with parchment paper for easy removal. In a medium bowl, whisk together 1 ½ cups of all-purpose flour, 1 teaspoon of baking powder, ½ teaspoon of baking soda, and ¼ teaspoon of salt. Set this bowl aside for later.
In a large mixing bowl, combine 1 cup of plain Greek yogurt, ¾ cup of granulated sugar, and 3 large eggs. Mix these ingredients until the mixture is smooth. Next, add ⅓ cup of vegetable oil, 1 teaspoon of vanilla extract, the zest of 1 lemon, and 2 tablespoons of lemon juice. Stir until everything is well mixed.
Now, gradually add the dry ingredients to the wet mixture. Stir gently just until blended. Be careful not to overmix. Finally, fold in 2 ripe pears that you have peeled, cored, and diced. Ensure the pears are evenly spread in the batter.
Baking Process
Pour the batter into the prepared cake pan. Smooth the top with a spatula to create an even layer. Place the pan in the preheated oven and bake for 35 to 40 minutes. To check if the cake is done, insert a toothpick into the center. If it comes out clean, the cake is ready.
Cooling and Serving Suggestions
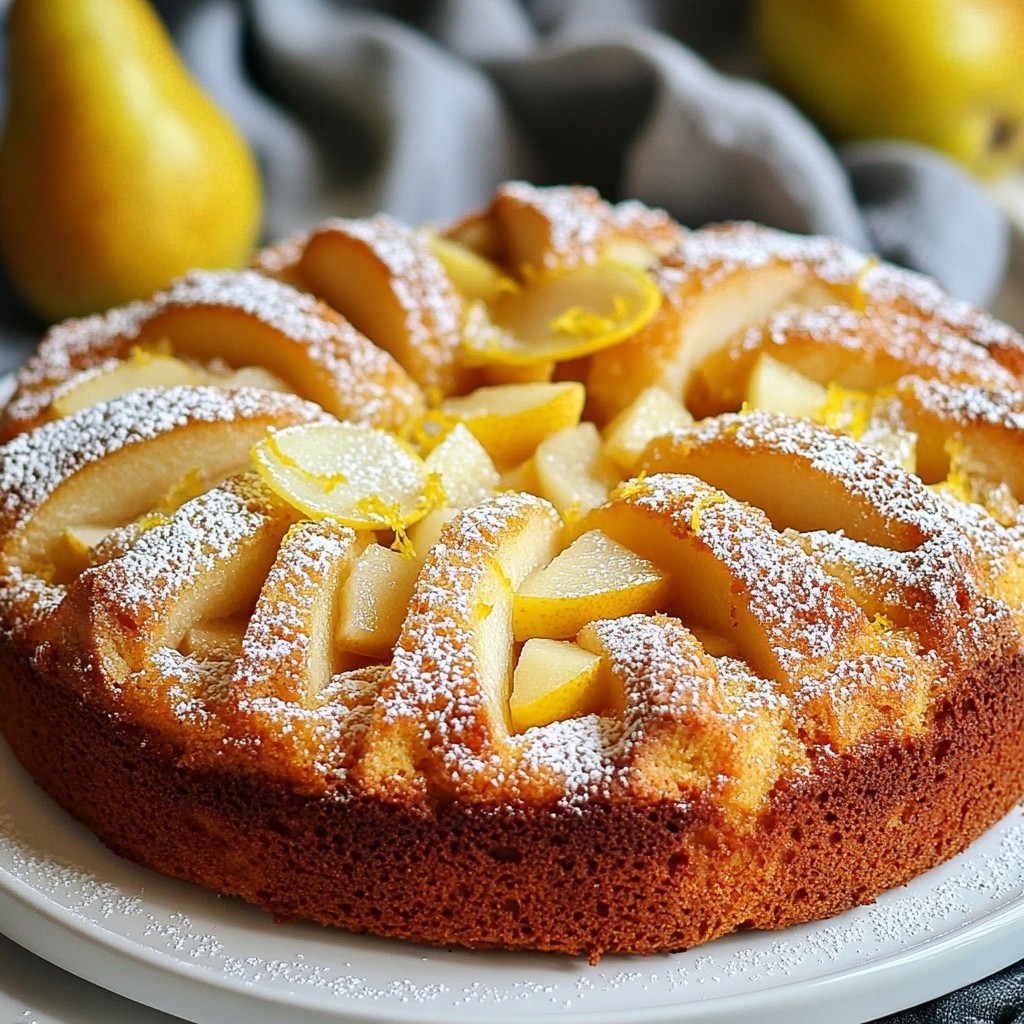
Once baked, let the cake cool in the pan for about 10 minutes. After that, transfer it to a wire rack to cool completely. Before serving, dust the cooled cake with powdered sugar for a sweet touch.
For a beautiful presentation, serve slices on a nice plate. Garnish with thin slices of fresh pear and a sprinkle of lemon zest. This small touch makes a big difference!
Tips & Tricks
How to Ensure the Cake is Moist
To keep your Italian yogurt pear cake moist, use Greek yogurt. It adds creaminess and moisture. Also, avoid overmixing the batter. Overmixing can make the cake tough. Instead, mix just until the flour disappears. This will help keep the cake light and fluffy.
Best Practices for Folding in Fruit
When you fold in the pears, do it gently. Use a spatula to lift and turn the batter. This helps keep air in the batter. If you mix too hard, you can break the fruit and change the texture. Spread the pears evenly for a delightful bite in each slice.
Baking Time and Temperature Adjustments
Bake your cake at 350°F (175°C) for about 35-40 minutes. Keep an eye on it as ovens can vary. If your cake browns too fast, cover it with foil. This will stop it from burning while it finishes baking. Always check with a toothpick. If it comes out clean, your cake is ready!
Pro Tips
- Use Ripe Pears: Ensure your pears are ripe for the best flavor and moisture. They should yield slightly when pressed. This will make the cake more flavorful and tender.
- Don't Overmix: When combining the wet and dry ingredients, mix just until incorporated. Overmixing can lead to a dense cake.
- Cool Properly: Allow the cake to cool in the pan for a short time before transferring it to a wire rack. This helps maintain its shape and prevents it from breaking.
- Flavor Variations: Experiment with spices like cinnamon or nutmeg, or add chopped nuts for extra texture and flavor. This can elevate your cake to new heights!
Variations
Different Fruit Options
You can swap pears for many fruits. Apples work well, adding crispness. Ripe bananas give a rich taste. Peaches or plums add a sweet twist. Berries like blueberries or raspberries can make it fresh. Each fruit changes the flavor and texture. Be sure to keep the fruit diced small for even baking.
Flavor Enhancements
Adding spices can boost the cake's taste. A pinch of cinnamon adds warmth. Nutmeg brings a nice, cozy flavor. You can also add a splash of almond or orange extract. Each adds a unique touch that enhances your cake. Experiment with these, but remember to keep it balanced.
Gluten-Free Adaptation
To make this cake gluten-free, swap all-purpose flour for a gluten-free blend. Look for blends made for baking. Check that baking powder is gluten-free too. The texture may change slightly but will still taste great. You can enjoy this cake without worry about gluten.
Storage Info
How to Store Leftover Cake
To keep your Italian yogurt pear cake fresh, store it in an airtight container. This helps to lock in moisture. If you do not have a container, cover the cake with plastic wrap. Keep it at room temperature for up to two days. If you want it to last longer, place it in the fridge. It can stay fresh in the fridge for about one week.
Freezing Instructions
You can freeze your cake for later enjoyment. First, let it cool completely. Then, wrap the cake tightly in plastic wrap. After that, place it in a freezer-safe bag. Make sure to label the bag with the date. The cake can stay in the freezer for up to three months. When you are ready to eat it, let it thaw in the fridge overnight.
Shelf Life of the Cake
The shelf life of this cake is quite good. If stored properly at room temperature, it lasts about two days. In the fridge, it can stay fresh for a week. When frozen, it maintains its quality for up to three months. Just remember to check for any signs of spoilage before enjoying your delicious treat.
FAQs
Can I use non-Greek yogurt?
Yes, you can use non-Greek yogurt. It might change the cake's texture slightly. Non-Greek yogurt is thinner, so your cake may be less dense. If you prefer that fluffiness, stick with Greek yogurt. It gives a rich flavor and moisture that’s hard to beat.
How can I tell when the cake is done?
To check if the cake is done, use a toothpick. Insert it into the center of the cake. If it comes out clean, your cake is ready. If there is batter on the toothpick, bake it a bit longer. The top should be golden brown.
Can I make this cake ahead of time?
Yes, you can make this cake ahead of time. Bake it and let it cool completely. Wrap it in plastic wrap or foil. Store it at room temperature for up to three days. For longer storage, freeze it for up to three months. Just remember to thaw it before serving.
This blog post covered the key steps to making a delicious cake. We explored required and optional ingredients, plus substitutions. You learned the step-by-step process for preparation, baking, and cooling. I shared tips for a moist cake and variations to try. We also discussed storage options and answered common questions.
Baking can be fun and easy. Now you have the tools to create a tasty cake, tailored to your taste. Enjoy baking and sharing this delightful treat!