Are you ready to enjoy a tasty treat? Mini baked potatoes are crispy and full of flavor. They make a great snack or side dish. I will show you how to whip up these delicious bites with just a few simple ingredients. Follow my step-by-step guide to create the perfect mini baked potatoes. Get ready to impress your family and friends with this delightful recipe!
Why I Love This Recipe
- Delicious Flavor Combination: The blend of garlic powder and smoked paprika adds a unique twist to traditional baked potatoes, elevating their taste.
- Healthy and Wholesome: Using Greek yogurt instead of sour cream makes this dish a healthier option, packed with protein and probiotics.
- Easy to Prepare: This recipe is straightforward and can be made in under an hour, making it perfect for busy weeknights or gatherings.
- Customizable Toppings: With options like chives and crispy fried onions, you can personalize each potato to suit your taste preferences.
Ingredients
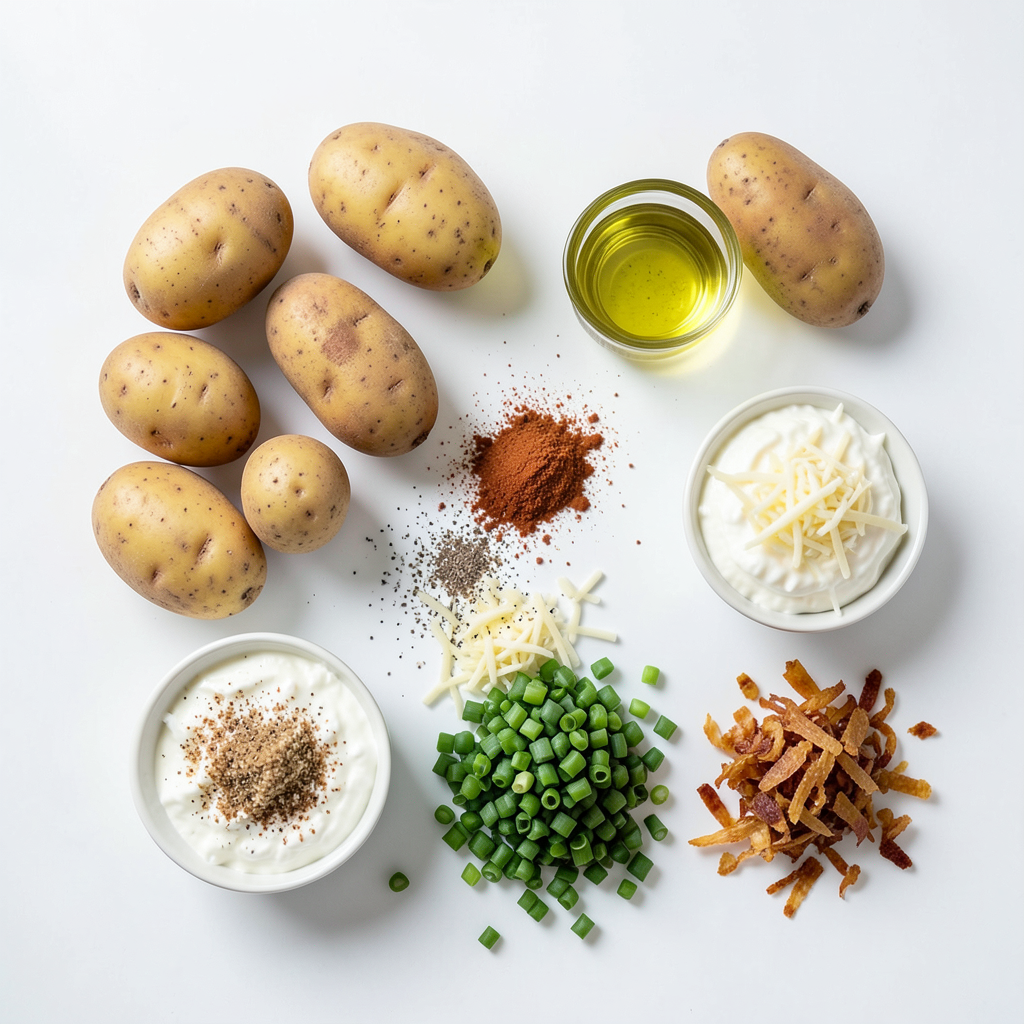
Full list of ingredients
- 12 baby potatoes
- 2 tablespoons olive oil
- 1 teaspoon garlic powder
- 1 teaspoon smoked paprika
- Salt and pepper to taste
- 1 cup Greek yogurt
- 1/2 cup shredded cheese (cheddar or your choice)
- 1/4 cup fresh chives, chopped
- 1/4 cup crispy fried onions for topping (optional)
Mini baked potatoes are fun and simple to make. They use baby potatoes, which are small and tender. I prefer using twelve baby potatoes for a great portion.
For the oil, I use two tablespoons of olive oil. It helps make the skins crispy and adds flavor. The seasonings are the star here! Garlic powder and smoked paprika are key. I add one teaspoon of each. Finally, I sprinkle salt and pepper to taste.
Now, let’s talk toppings! I really love Greek yogurt for creaminess. One cup of Greek yogurt adds a nice tang. Shredded cheese, like cheddar, is also great. I add half a cup. For a fresh touch, I chop up a quarter cup of chives. If you want extra crunch, add crispy fried onions on top. This mix makes each bite a tasty delight!
Step-by-Step Instructions
Prepping the Baby Potatoes
First, I clean the baby potatoes. I run them under cold water to remove all dirt. After washing, I pat them dry with a towel. This step is key to getting crispy skins.
Next, I toss the potatoes in a large bowl. I add two tablespoons of olive oil, one teaspoon of garlic powder, and one teaspoon of smoked paprika. I also sprinkle salt and pepper to taste. I mix it all well so every potato gets coated. This makes them flavorful and tasty.
Baking Process
Now, I arrange the potatoes on a baking sheet. I make sure they are in a single layer; this helps them bake evenly.
Then, I pop the baking sheet into a preheated oven at 400°F (200°C). I bake the potatoes for about 25 to 30 minutes. They are done when they are fork-tender and the skins are crispy.
Filling and Serving
Once the potatoes are out of the oven, I let them cool for a few minutes. Then, I take a paring knife and make a small cut in the top of each potato. I gently press the ends to create an opening.
In a separate bowl, I mix together one cup of Greek yogurt and half a cup of shredded cheese until it's well combined. I spoon a generous amount of this yogurt-cheese mixture into each potato.
To finish, I top them with chopped chives and crispy fried onions, if I want extra crunch and flavor. These mini baked potatoes are warm and ready to serve!
Tips & Tricks
Best Practices for Crispy Skins
To get crispy skins, oil and seasoning are key. First, coat the baby potatoes well in olive oil. This helps the skins crisp up nicely while baking. Next, sprinkle the seasoning mix evenly. Garlic powder and smoked paprika give great flavor and help with the crispiness. Make sure to toss them well in a bowl. This way, every potato gets a good layer of oil and spices.
Enhancing Flavor Profiles
Want to take your mini baked potatoes to the next level? Try adding more spices or herbs. You can mix in onion powder or dried thyme for extra taste. Fresh herbs like rosemary or parsley can also brighten the flavors. If you love heat, a pinch of cayenne can add a nice kick. Just remember to keep balancing flavors so each bite is tasty.
Cooking Method Alternatives
You can choose to air fry mini baked potatoes if you want a quicker option. Air frying cooks them faster and can create a crunchy skin, too. Set your air fryer to 400°F. Cook them for about 15-20 minutes, shaking the basket halfway. If you prefer the traditional baking method, stick to the oven at 400°F for 25-30 minutes. Both methods yield delicious results.
Pro Tips
- Choose the Right Potatoes: Baby potatoes work best for this recipe; their size ensures they cook evenly and have a delightful crispy skin.
- Don’t Skip the Seasoning: Make sure to thoroughly coat the potatoes in olive oil and spices for maximum flavor. The seasoning enhances the taste of the crispy skin.
- Customize Your Filling: Feel free to experiment with different cheeses or add herbs and spices to the yogurt mixture for a unique twist on flavor.
- Serve Immediately: These mini baked potatoes are best enjoyed warm right out of the oven, ensuring that the filling is creamy and the skins are crispy.
Variations
Different Cheese Options
You can switch up the cheese for your mini baked potatoes. Cheddar is popular, but you can try mozzarella for a gooey texture. Feta adds a nice tang. If you want something bold, go for blue cheese. Each type will change the flavor and make it special.
Alternative Toppings
Toppings can take these potatoes to the next level. Crumbled bacon bits add crunch and saltiness. Sour cream gives a creamy touch. If you want something fresh, add diced avocado. You can also use salsa for a zesty kick. The choice is yours!
Vegan or Dairy-Free Adaptations
If you want a vegan option, use plant-based yogurt instead of Greek yogurt. Nutritional yeast can replace cheese for a cheesy flavor. You may also use cashew cheese for creaminess. These swaps keep your dish tasty without dairy. Enjoy the same great taste!
Storage Info
How to Store Leftovers
After you enjoy your mini baked potatoes, let them cool to room temperature. Place them in an airtight container for the best results. Store in the fridge for up to three days. If you want to keep them longer, consider freezing instead.
Reheating Instructions
To warm up your mini baked potatoes, the oven is the best choice. Preheat your oven to 350°F (175°C). Place the potatoes on a baking sheet and cover them with foil. Heat for about 15 minutes or until warm. You can also use the microwave. Heat them on a plate for about 1-2 minutes. Just remember, the skin won’t be crispy in the microwave.
Freezing Tips
Yes, you can freeze mini baked potatoes! Wrap each potato tightly in plastic wrap or foil. Place them in a freezer-safe bag. They can last up to three months in the freezer. When you’re ready to eat, thaw them in the fridge overnight. Then follow the reheating instructions above for best results.
FAQs
Can I make these mini baked potatoes ahead of time?
Yes, you can prepare mini baked potatoes in advance. Here’s how:
- Roast the Potatoes: Bake the potatoes as per the recipe. Let them cool completely.
- Store: Place them in an airtight container. They can stay in the fridge for up to three days.
- Reheat: When ready to serve, warm them in the oven at 350°F (175°C) for about 10-15 minutes. This keeps them crispy.
What can I serve with mini baked potatoes?
Mini baked potatoes go great with many dishes. Here are some tasty ideas:
- Salad: A fresh garden salad adds a nice crunch.
- Grilled Meat: Pair them with grilled chicken or steak for a hearty meal.
- Vegetable Dishes: Roasted veggies bring color and flavor.
- Dips: Serve with sour cream or your favorite dip for extra fun.
Can I use larger potatoes for this recipe?
You can use larger potatoes, but you need to adjust the cooking time. Here’s what to know:
- Cooking Time: Larger potatoes will take longer to bake, around 45-60 minutes.
- Cutting: Consider cutting them in half or quarters to speed up cooking.
- Filling: Use more filling to fill larger potatoes. Enjoy experimenting with sizes!
In this post, we explored how to make delicious mini baked potatoes. We covered the right ingredients, step-by-step instructions, and tips for the best results. I shared variations and how to store leftovers effectively. You can get creative with toppings or try different cheeses. These potatoes are easy to make and perfect for sharing. Enjoy making them your own for any meal!