Craving a delightful treat that’s both simple and fun to make? You’re in the right place! These Mini Muffin Tin Apple Pies are perfect for any occasion. With just a few ingredients and easy steps, you’ll have golden, buttery pies that burst with warm apple flavor. Let’s dive into how you can create these scrumptious bites that will leave everyone wanting more!
Ingredients
To make these mini muffin tin apple pies, you need some simple ingredients. Here’s the list:
– Pre-made or Homemade Pie Crust
– Fresh Apples
– Brown Sugar
– Spices: Cinnamon and Nutmeg
– Lemon Juice
– All-purpose Flour
– Egg for Egg Wash
– Optional: Vanilla ice cream or whipped cream for serving
Using fresh apples makes a big difference. I love Granny Smith apples for their tartness. They balance well with the sweet brown sugar.
You can use a pre-made pie crust to save time. However, making your own crust can add a special touch. If you choose homemade, make sure it is chilled before rolling it out.
The spices, cinnamon and nutmeg, create a warm flavor. Just a pinch of nutmeg adds depth.
Lemon juice brightens the taste of the apples. It keeps them from browning too.
All-purpose flour helps thicken the apple filling. It keeps the filling from being too runny.
The egg wash gives a lovely golden color to the crust. It makes the pies look more appealing.
When serving, consider adding a scoop of vanilla ice cream or whipped cream. It pairs perfectly with the warm pies, making them even more delightful.
Step-by-Step Instructions
Preparation Steps
1. Preheat your oven to 400°F (200°C). Grease a mini muffin tin with non-stick spray. This helps the pies come out easily.
2. Roll out the pie crust on a lightly floured surface. Use a round cookie cutter or a glass to cut out small circles. Make sure they fit your muffin tin.
3. Gently press the circles into each muffin cavity. This will form small crusts at the bottom.
4. In a mixing bowl, combine the diced apples, brown sugar, cinnamon, nutmeg, lemon juice, and flour. Stir until the apples are well coated. This mixture will make your filling flavorful.
5. Spoon the apple filling evenly into each muffin tin crust. Fill them about 3/4 full to allow room for bubbling.
6. Optional: Roll out any leftover pie crust. Cut out small stars or hearts to place on top of the filling. This adds a decorative touch.
Baking Process
1. Beat the egg in a small bowl. Brush the tops of the mini pies with the egg wash. This gives them a golden color as they bake.
2. Bake in the preheated oven for 15-20 minutes. Watch closely until the crust is golden brown and the apple filling is bubbling.
Cooling and Serving
1. Remove the muffin tin from the oven. Allow the mini pies to cool for a few minutes. This makes them easier to handle.
2. Carefully remove the mini pies from the tin. Serve warm or at room temperature. You can add a scoop of vanilla ice cream or a dollop of whipped cream. These make great toppings!
Tips & Tricks
Perfecting the Recipe
Selecting the Best Apples
For great flavor, I love using a mix of sweet and tart apples. Granny Smith adds a nice tang, while Honeycrisp brings sweetness. You can also try Fuji or Braeburn for a different taste.
Adjusting Sweetness and Spices
Taste your apples before adding sugar. If they’re sweet, cut back on the brown sugar. For spice, start with a teaspoon of cinnamon and a pinch of nutmeg. You can always add more, but you can’t take it out!
Tips for a Flakier Crust
Keep your pie crust cold. If it warms up, it won’t be flaky. Use cold butter and chill your dough before rolling. Also, don’t overwork the dough. Just mix until combined for the best texture.
Presentation Tips
Decorative Serving Ideas
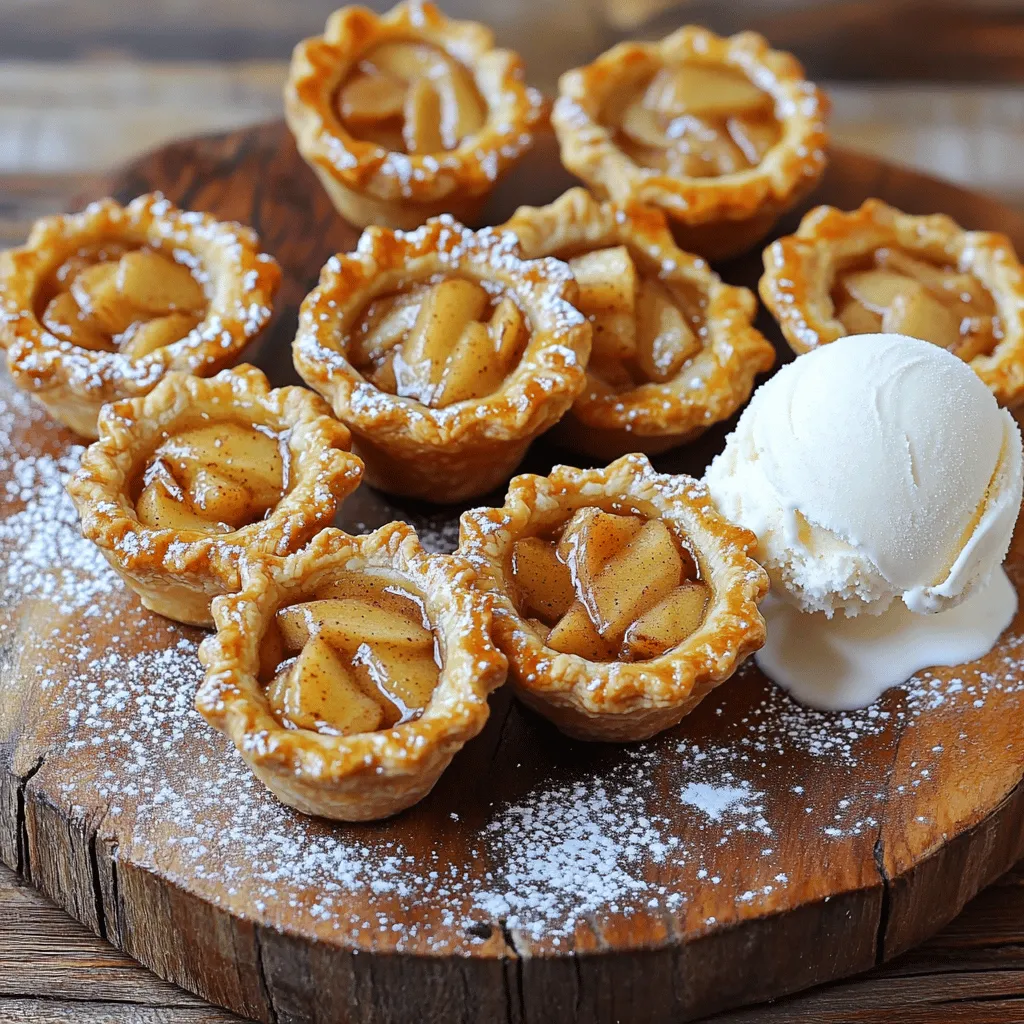
Serve your mini pies on a pretty platter. Dust them with powdered sugar for a touch of elegance. You can even arrange them with some fresh apple slices around the edges for color.
Using Ice Cream or Whipped Cream
Add a scoop of vanilla ice cream or a dollop of whipped cream on the side. The creamy texture pairs well with the warm apple filling. It makes each bite even better!
Variations
Flavor Variations
Caramel Apple Mini Pies
You can add a twist by using caramel. Just drizzle some caramel sauce over the apple filling. Mix it in gently before you fill the crusts. This gives each bite a sweet and rich flavor. Kids and adults love this treat!
Nutty Adding: Pecans or Walnuts
Chop up some pecans or walnuts for added crunch. Mix them with the apples and spices. This makes the pies more interesting. The nuts give a nice texture and a rich taste.
Adding Dried Fruit
You can also use dried fruits like raisins or cranberries. They add a chewy texture and extra sweetness. Just mix them into the apple filling. This variation is fun and adds a new flavor layer.
Dietary Adjustments
Gluten-Free Options
If you need a gluten-free option, use gluten-free pie crust. There are many good store-bought choices. You can also make your own using gluten-free flour. This way, everyone can enjoy these mini pies.
Vegan Substitutes
To make these mini pies vegan, skip the egg wash. Instead, brush the tops with almond milk or a bit of maple syrup. You can also replace the butter in the crust with coconut oil. This keeps the flavor rich while being plant-based.
Storage Info
Storing Mini Apple Pies
Room Temperature Storage
Store your mini apple pies at room temperature. Place them in an airtight container. They will stay fresh for up to two days. If you want to keep them longer, refrigeration is best.
Refrigeration Guidelines
For longer storage, keep the mini pies in the fridge. They can last up to a week when stored this way. Make sure to wrap each pie in plastic wrap. This helps keep them moist and fresh.
Reheating Instructions
Best Methods for Reheating
Reheat your mini apple pies in the oven for the best results. Preheat the oven to 350°F (175°C). Place the pies on a baking sheet and warm them for about 10 to 15 minutes. This method keeps the crust nice and flaky.
Tips for Maintaining Crispiness
To keep your mini apple pies crispy, avoid microwaving them. If you must use a microwave, heat them for only a short time. This helps prevent the crust from becoming soggy. Enjoy your pies warm, fresh out of the oven!
FAQs
Common Questions
Can I use frozen apples for this recipe?
Yes, you can use frozen apples. Just thaw them first. Drain any extra liquid to avoid a soggy crust. Frozen apples work well in pies because they soften during baking.
How long do these mini pies last?
These mini pies last about 3 days at room temperature. If you store them in the fridge, they can last up to a week. Just keep them in an airtight container to stay fresh.
Can I make these ahead of time?
Yes, you can make these pies ahead of time. Prepare them, bake, and let them cool. Store them in the fridge. Reheat them in the oven before serving for the best taste.
Troubleshooting
Why did my pie crust shrink?
Your pie crust may shrink if it’s too warm when baking. Make sure to chill the dough before rolling it out. If the dough is too wet, it can also shrink. Use the right amount of flour when rolling.
How do I prevent the filling from leaking?
To prevent leaking, ensure you mix the apples with flour. The flour helps absorb juice. Also, don’t overfill the mini crusts. Fill them about 3/4 full for the best results.
Serving Suggestions
What drinks pair well with mini apple pies?
Mini apple pies pair well with warm cider or vanilla-flavored tea. You can also serve them with a scoop of ice cream. A cup of coffee is a nice choice too.
Can I use a different fruit for these mini pies?
Absolutely! You can use peaches, cherries, or berries. Just adjust the sugar and spices to match the fruit’s natural taste. Each fruit adds a unique twist to the mini pies.
In this blog post, we explored how to make delicious mini apple pies. We discussed the best ingredients, step-by-step instructions, and helpful tips for success. You learned about different flavor variations and how to store your pies properly.
Mini apple pies are fun to make and share. With practice, your skills will grow. Enjoy baking, and don’t hesitate to try new ideas. Bringing joy through food is always worth it!
