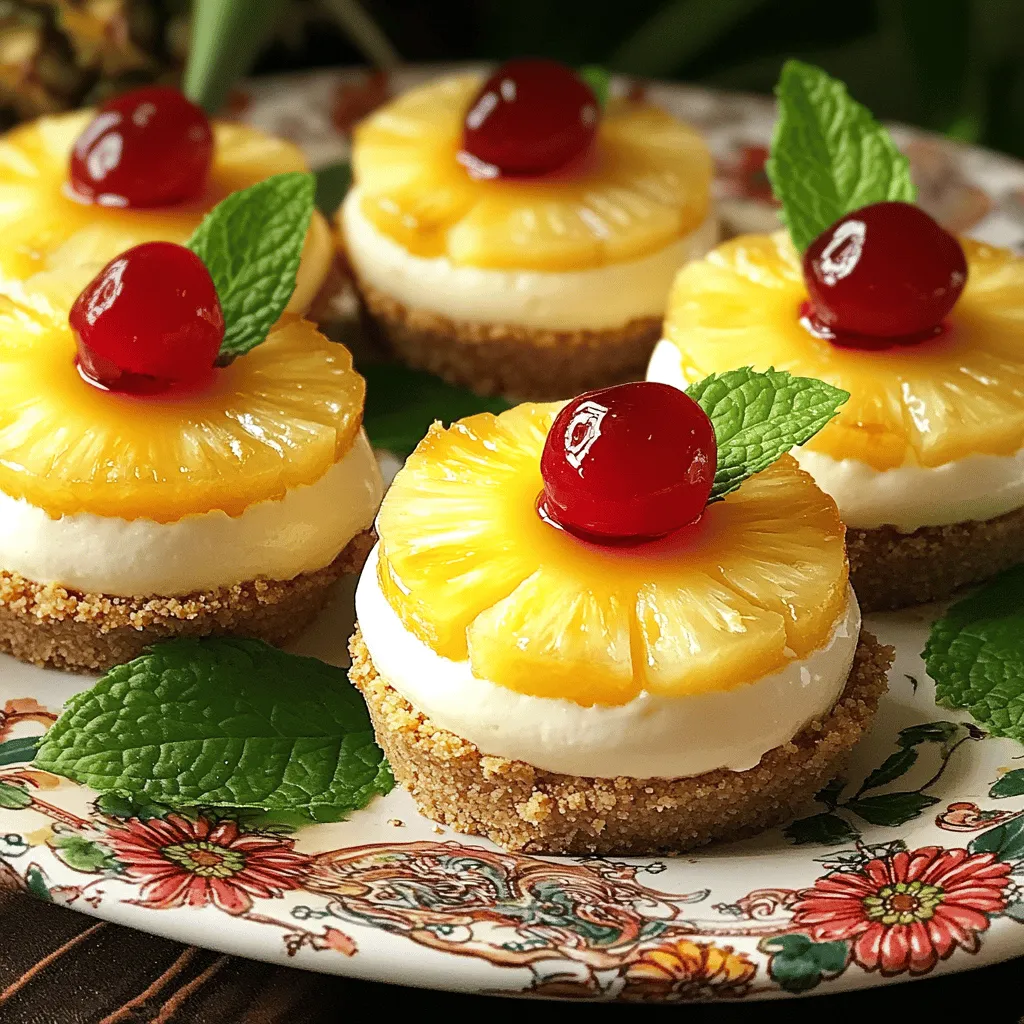
If you’re craving a sweet treat that bursts with flavor, you’re in the right place! These Mini Pineapple Upside-Down Cheesecakes are a delightful twist on a classic dessert. They offer a creamy filling and a buttery crust, all topped with juicy pineapple. With my step-by-step guide, you’ll easily whip up these little delights for any occasion. Get ready to impress your friends and family with this tasty recipe!
Ingredients
Complete List of Ingredients
To make these mini pineapple upside-down cheesecakes, you will need:
– 1 cup graham cracker crumbs
– 1/4 cup unsalted butter, melted
– 2 tablespoons brown sugar
– 8 oz cream cheese, softened
– 1/2 cup granulated sugar
– 1 teaspoon vanilla extract
– 1 cup whipped cream (or whipped topping)
– 1 can (8 oz) pineapple rings, drained and sliced into halves
– Maraschino cherries for garnish
Using fresh ingredients is key to great flavor. Fresh cream cheese makes the filling smooth. Fresh pineapple adds a nice burst of sweetness. If you can’t find fresh, canned works too.
If you have dietary restrictions, there are easy swaps. Use gluten-free graham crackers instead of regular ones. For a lighter option, try low-fat cream cheese or a sugar substitute. These swaps help everyone enjoy this fun treat.Enjoy making your cheesecakes!
Step-by-Step Instructions
Preparation Steps
1. Preheat your oven to 325°F (160°C). Line a muffin pan with cupcake liners. This helps for easy removal later.
2. Prepare the crust mixture. In a mixing bowl, combine:
– 1 cup graham cracker crumbs
– 1/4 cup unsalted butter, melted
– 2 tablespoons brown sugar
Mix these until well combined. You want a crumbly texture that holds together.
3. Bake the crusts. Press about 2 tablespoons of the crumb mixture into the bottom of each muffin liner. Use the bottom of a glass to pack it tightly. Bake in the preheated oven for 5-7 minutes. They should look slightly golden. Remove them from the oven and let them cool.
Cheesecake Filling
1. Mix the cream cheese filling. In another bowl, beat together:
– 8 oz cream cheese, softened
– 1/2 cup granulated sugar
– 1 teaspoon vanilla extract
Keep beating until the mixture is smooth and creamy.
2. Folding in the whipped cream. Gently fold in 1 cup of whipped cream into the cream cheese mixture. You want it to be fully combined and fluffy.
3. Spoon and assemble the filling. Carefully spoon the cream cheese mixture on top of the cooled crusts. Fill each liner about 3/4 full.
Baking and Setting
1. Place pineapple on top of cheesecakes. Take a half slice from a can of pineapple rings and press it lightly into the filling of each cheesecake.
2. Bake times and checking doneness. Bake for 15-18 minutes. The cheesecake filling should be set but still slightly jiggly in the center.
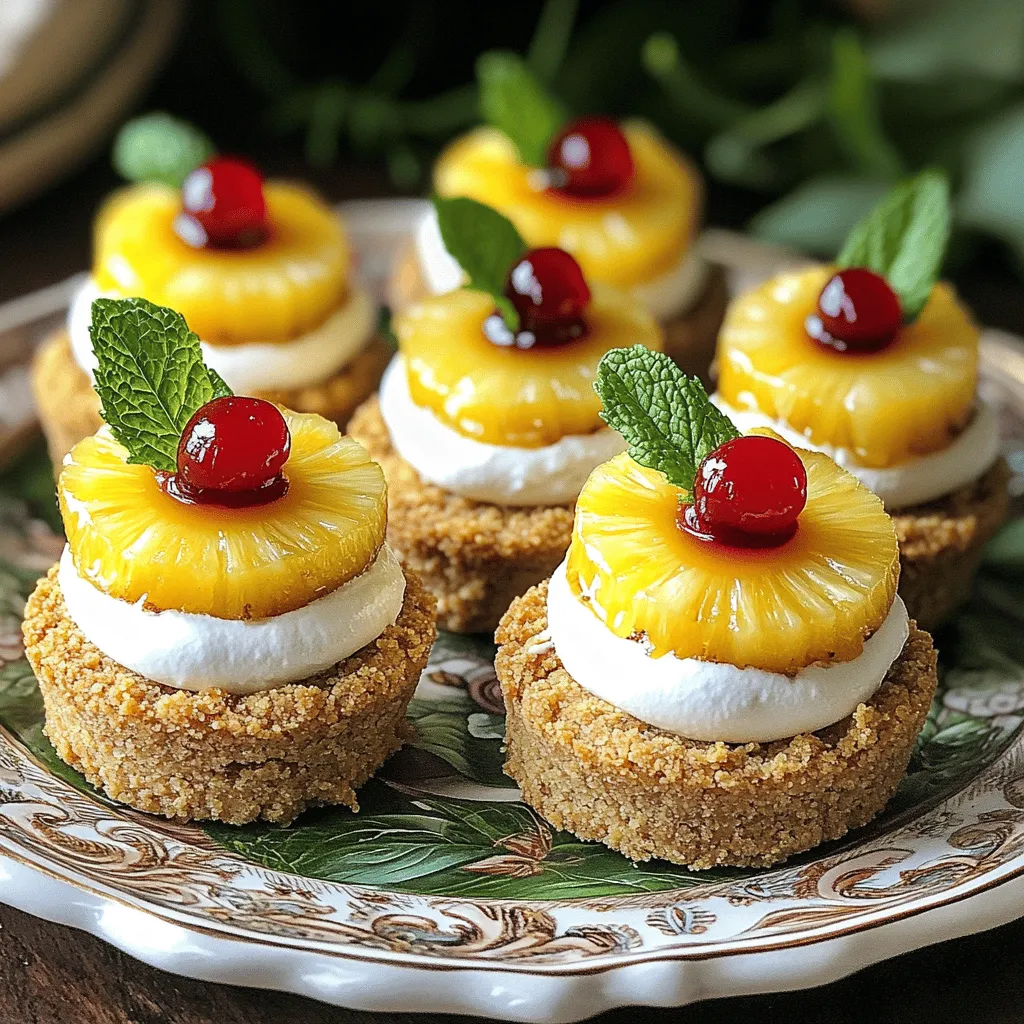
3. Cooling and refrigeration. Allow the cheesecakes to cool in the pan. Once cool, refrigerate for at least 2 hours, or overnight. This helps them fully set. After chilling, remove the cheesecakes from the muffin pan. You can garnish each with a maraschino cherry for a fun touch.
Tips & Tricks
How to Ensure Perfect Crusts
To make a great crust, pack it tightly. Use a flat-bottomed glass or measuring cup to press down. This will help it hold its shape after baking. Aim for a level layer without gaps. A sturdy crust will make your cheesecake taste better.
For even distribution, use a mixing bowl. Make sure the butter and crumbs blend well. You can also use a food processor for a fine crumb texture. This helps the crust bake evenly.
Achieving Creamy Filling
The cream cheese must be at room temperature. Cold cream cheese will not mix well. To soften it, let it sit out for about 30 minutes. This ensures a smooth and creamy filling.
When mixing, start at a low speed. Gradually increase the speed to avoid splatters. Fold in the whipped cream gently. This keeps your filling light and fluffy. Over-mixing can make it dense.
Garnishing Ideas
You can use more than just cherries for topping. Try fresh slices of kiwi or strawberries. They add color and taste. You can also drizzle caramel or chocolate for flair.
For presentation, serve these cheesecakes on a bright platter. Add fresh mint leaves for a pop of color. This small touch makes your dessert look fancy. It enhances the overall experience.
Variations
Flavor Variations
You can make mini pineapple upside-down cheesecakes even more fun! Adding coconut gives them a tropical taste. Just mix shredded coconut into your cream cheese filling. Another great idea is to use other fruits. Mango or mixed berries can bring new flavors. Try different fruits to see what you like best.
Healthier Alternatives
If you want a lighter dessert, use low-fat cream cheese instead of regular cream cheese. This swap keeps the taste while cutting calories. You can also use alternative sweeteners, like honey or agave syrup. These options can make your cheesecakes healthier, while still being sweet and tasty.
Gluten-Free Options
For a gluten-free version, swap graham crackers with gluten-free crumbs. You can find many brands that offer this. It’s important to check the label to ensure they are truly gluten-free. To keep the texture, use similar amounts of gluten-free crumbs as the recipe calls for. This way, your mini cheesecakes will still taste great!
Storage Info
How to Store Mini Cheesecakes
To keep your mini cheesecakes fresh, place them in an airtight container. You want to avoid moisture loss and keep them tasty. Always refrigerate them right after they cool down. These cheesecakes last about five days in the fridge. If you plan to serve them later, this method works great for keeping their flavor and texture.
Freezing Instructions
If you want to save some for later, you can freeze these treats. First, let them cool completely in the fridge. Then, wrap each cheesecake tightly in plastic wrap. Place them in a freezer-safe container or bag. They can stay frozen for up to three months.
When you’re ready to enjoy them, transfer the cheesecakes to the fridge to thaw overnight. This slow thaw helps maintain their creamy texture. Avoid microwaving them, as it can make the cheesecakes runny. Enjoy your mini pineapple upside-down cheesecakes at their best!
FAQs
Can I make these cheesecakes ahead of time?
Yes, you can make these cheesecakes a day in advance.
– Storage method: Place them in an airtight container.
– Storage time: They last well for up to three days in the fridge.
This makes them perfect for parties or gatherings. Just chill them overnight, and they will be ready to serve.
Can I use fresh pineapple instead of canned?
Absolutely! Fresh pineapple adds a bright, juicy flavor.
– Tips: Cut fresh pineapple into rings and slice them in half.
– Preparation: Make sure to drain any excess juice to avoid sogginess.
Fresh pineapple can enhance the taste of your cheesecakes. Just be sure to use ripe fruit for the best flavor.
What’s the best way to remove cheesecakes from the liners?
Removing the cheesecakes is simple with the right technique.
– Chill first: Let them cool completely in the pan.
– Use a knife: Run a small knife along the edges of each liner.
This helps to separate the cheesecake from the liner. Then, gently pull the liner away from the cheesecake.
How do I know when the cheesecakes are done?
Check for a few signs to ensure they are ready.
– Visual cue: The edges should look set, while the center remains slightly jiggly.
– Tactile cue: Lightly touch the center; it should feel firm but soft.
These cues help you avoid overbaking. Remove them from the oven when they meet these conditions for the best texture.
In this post, we explored how to make delicious mini cheesecakes. We covered ingredients, preparation, and baking steps. You learned tips for firm crusts and creamy fillings. We also talked about variations and ways to store these cheesecakes.
These sweet treats are easy to customize and perfect for sharing. Remember to use fresh ingredients for the best taste. Enjoy making them for your family or friends, and have fun experimenting with flavors!