Craving a sweet treat without turning on the oven? Look no further! In this post, I’ll show you how to make a No Bake Cookies & Cream Icebox Cake that is both simple and delicious. With just a few easy steps and everyday ingredients, you’ll create a cool dessert that’s perfect for any occasion. Let’s dive into this delightful recipe and impress your family and friends!
Ingredients
List of Ingredients
– 2 cups heavy whipping cream
– 1 cup powdered sugar
– 1 teaspoon vanilla extract
– 16 ounces chocolate sandwich cookies (like Oreos), crushed
– 1 cup chocolate sandwich cookies, whole (for layering)
– 1/2 cup cream cheese, softened
– 1 cup milk (for dipping cookies)
– Optional: shaved chocolate or cookie crumbs for garnish
To create the best no bake cookies and cream icebox cake, you need some key ingredients. First, heavy whipping cream gives the cake its fluffy texture. Powdered sugar adds sweet flavor, while vanilla extract enhances that creaminess.
You will also need chocolate sandwich cookies. Use them crushed and whole for the layers. The cream cheese adds richness to the filling. Milk helps soften the cookies when you dip them. For an extra touch, you can use shaved chocolate or cookie crumbs as garnish.
Each ingredient plays an important role. The cream makes it light, while the cookies add crunch. This combination makes every bite a delight.
Step-by-Step Instructions
Preparing the Whipped Cream Mixture
Start by pouring 2 cups of heavy whipping cream into a large bowl. Use a hand mixer to whip the cream until you see soft peaks. This means the cream holds its shape but is still soft. Next, add 1 cup of powdered sugar and 1 teaspoon of vanilla extract. Keep whipping until you get stiff peaks. This is when your cream stands tall and firm. Set this bowl aside.
Combining the Cream Cheese and Whipped Cream
In another bowl, take 1/2 cup of softened cream cheese. Beat it until it is smooth. Now, gently fold in half of your whipped cream mixture. Use a spatula and be careful not to deflate it. This adds a nice creamy texture to your cake. Once mixed, add the rest of the whipped cream. Fold it in gently again. You want to keep it light and fluffy.
Layering the Icebox Cake
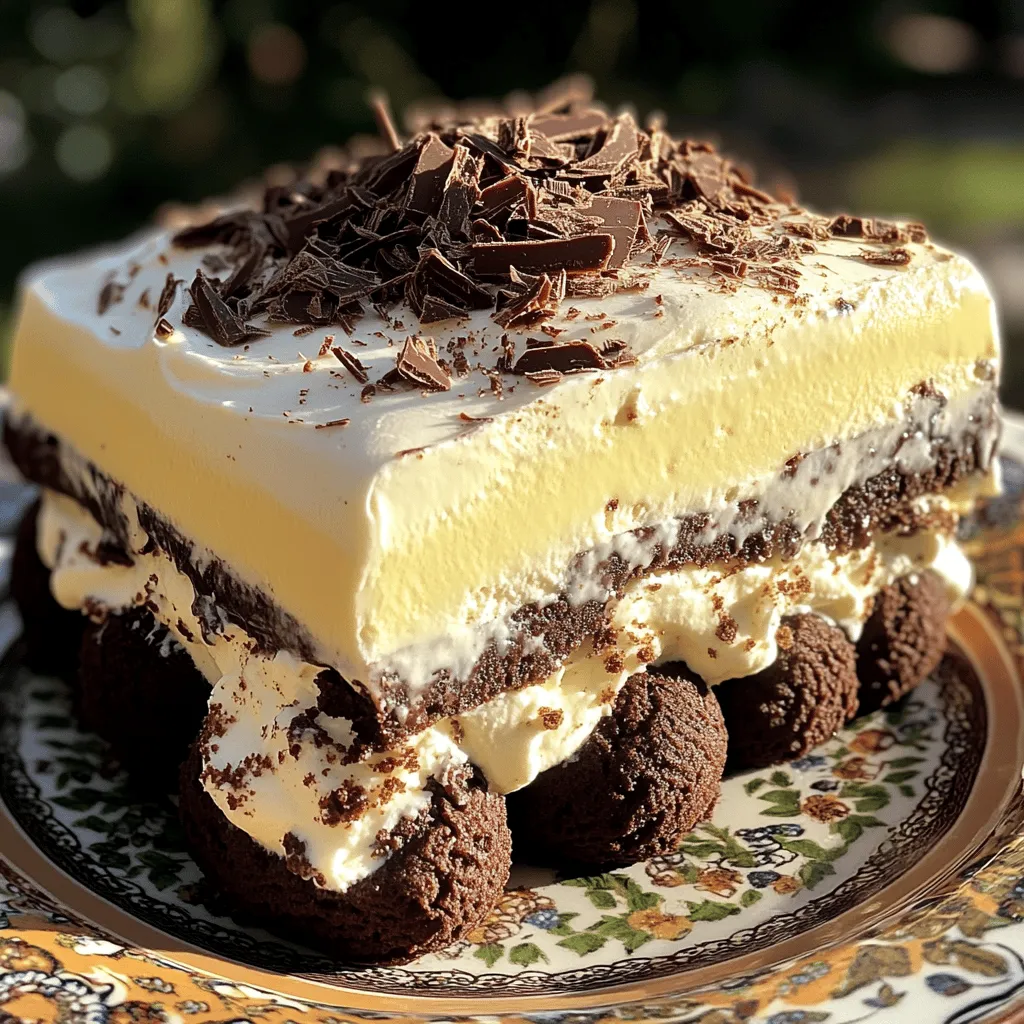
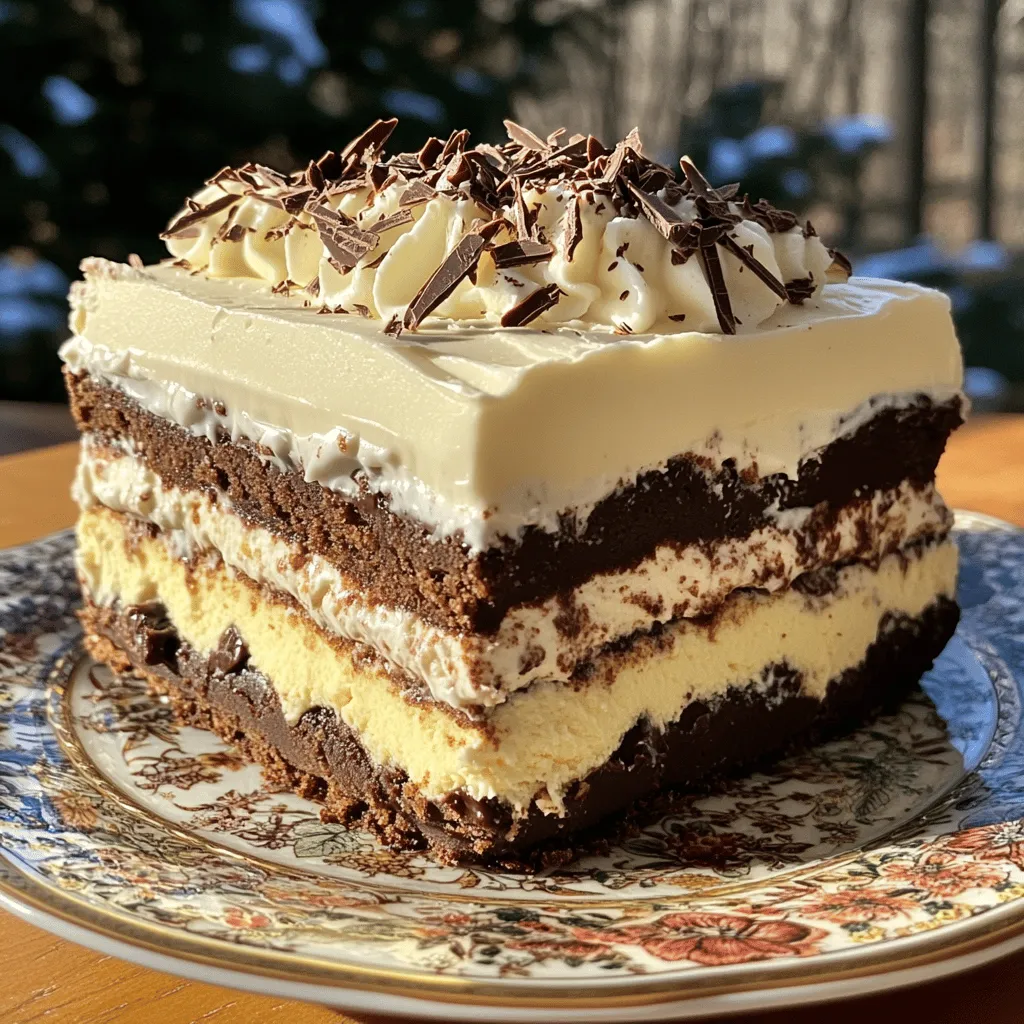
Take 1 cup of milk and pour it into a shallow dish. Dip each whole chocolate sandwich cookie into the milk for about 1 second. Don’t soak them; just give them a quick dip. Place these dipped cookies in a single layer at the bottom of a 9×13 inch baking dish. Spread a layer of your cream mixture over the cookies. Smooth it out evenly with a spatula.
Next, sprinkle a layer of crushed chocolate sandwich cookies over the cream. Repeat this process: dip more cookies, layer them, and add cream. Keep going until all your ingredients are used up. Finish with a smooth layer of the cream mixture on top. Cover the dish with plastic wrap. Refrigerate for at least 4 hours, or overnight if you can wait. This helps the cookies soften and the flavors blend.
Tips & Tricks
How to Achieve Perfect Whipped Cream
To make great whipped cream, start with cold tools. Use a chilled bowl and beaters. Whip the heavy cream until soft peaks form. This means it should hold some shape but still be soft. Then, slowly add the powdered sugar and vanilla extract. Keep whipping until you see stiff peaks. This will give your cake a light and fluffy feel.
Best Practices for Layering Cookies
When layering cookies, dip them quickly in milk. Just one second is enough. Too much soaking can make them soggy. Place them in a single layer in the dish. Spread the cream mixture evenly on top of the cookies. Sprinkle crushed cookies on this layer. Keep repeating the layers until you use all the cream and cookies.
Adding Flavor Variations
You can add fun flavors to your icebox cake. Try mixing in some peanut butter or mint extract. You can also fold in crushed candy bars or nuts into the cream. For a fruity twist, add fresh berries. These small changes can make your cake unique and exciting.
Variations
Using Different Types of Cookies
You can switch up the cookies for a fun twist. Use vanilla sandwich cookies if you want a lighter flavor. Try peanut butter cookies for a rich and nutty taste. You can even use gluten-free cookies for a treat that fits special diets. Just remember to keep the cookie texture in mind. Softer cookies may not hold up well in layers.
Alternative Flavor Additions
Want to mix in some flair? Add a bit of mint extract for a cool touch. You can also sprinkle in crushed candies or nuts for crunch. For a fruity twist, try adding strawberry or raspberry puree between layers. This adds a fresh taste that pairs well with the creaminess. Experimenting with flavors can make this cake truly unique.
Dairy-Free or Low-Sugar Options
If you need dairy-free options, use coconut cream instead of heavy cream. Look for dairy-free cream cheese for a smooth texture. For a low-sugar version, swap powdered sugar with a sugar substitute. You can also find cookies made with less sugar or natural sweeteners. These changes keep the cake delicious while fitting your dietary needs.
Storage Info
How to Store Leftovers
To keep your Cookies & Cream Icebox Cake fresh, cover it tightly with plastic wrap. This helps prevent air from drying it out. If you have a large piece, you can also use a cake dome. Store it in the fridge for best results. The cool temperature keeps the cake firm and tasty.
Best Practices for Freezing
If you want to freeze your cake, slice it first. Wrap each slice in plastic wrap. Then, place the slices in a freezer-safe bag or container. This helps keep the cake fresh and prevents freezer burn. When you are ready to eat, let it thaw in the fridge overnight.
Shelf Life Expectations
In the fridge, your icebox cake lasts about 3 to 5 days. If you freeze it, it can last up to 3 months. However, the texture may change after thawing. The flavors will still be good, but the cream may not be as fluffy. Enjoy your icebox cake while it’s fresh for the best taste!
FAQs
Can I make this cake ahead of time?
Yes, you can make this cake ahead of time. This icebox cake tastes even better after it sits. I suggest making it a day before you plan to serve. This allows the flavors to mix and the cookies to soften perfectly. Just cover it well in the fridge.
What can I use instead of cream cheese?
If you need a substitute for cream cheese, use mascarpone cheese. It has a smooth texture and a mild taste. Another option is Greek yogurt. It adds a tangy flavor and works well in this recipe. Just be sure to use plain yogurt to keep the taste right.
How long does the cake need to chill?
The cake needs to chill for at least 4 hours. For best results, refrigerate it overnight. This helps the cookies soften and blend with the cream layers. A longer chill time gives you a creamier and more delicious cake.
This blog post covered all you need for a delicious icebox cake. We discussed key ingredients like heavy cream and chocolate cookies, plus step-by-step instructions for success. I shared tips for great whipped cream and creative variations to try. Don’t forget how to store leftovers well, too.
Enjoy making this cake, and feel free to experiment with flavors or toppings. It’s a fun dessert that’s sure to impress. You can easily adjust it to fit your taste. Happy baking!


