No-Bake Pumpkin Cheesecake Bars with Gingersnap Crust

WANT TO SAVE THIS RECIPE?

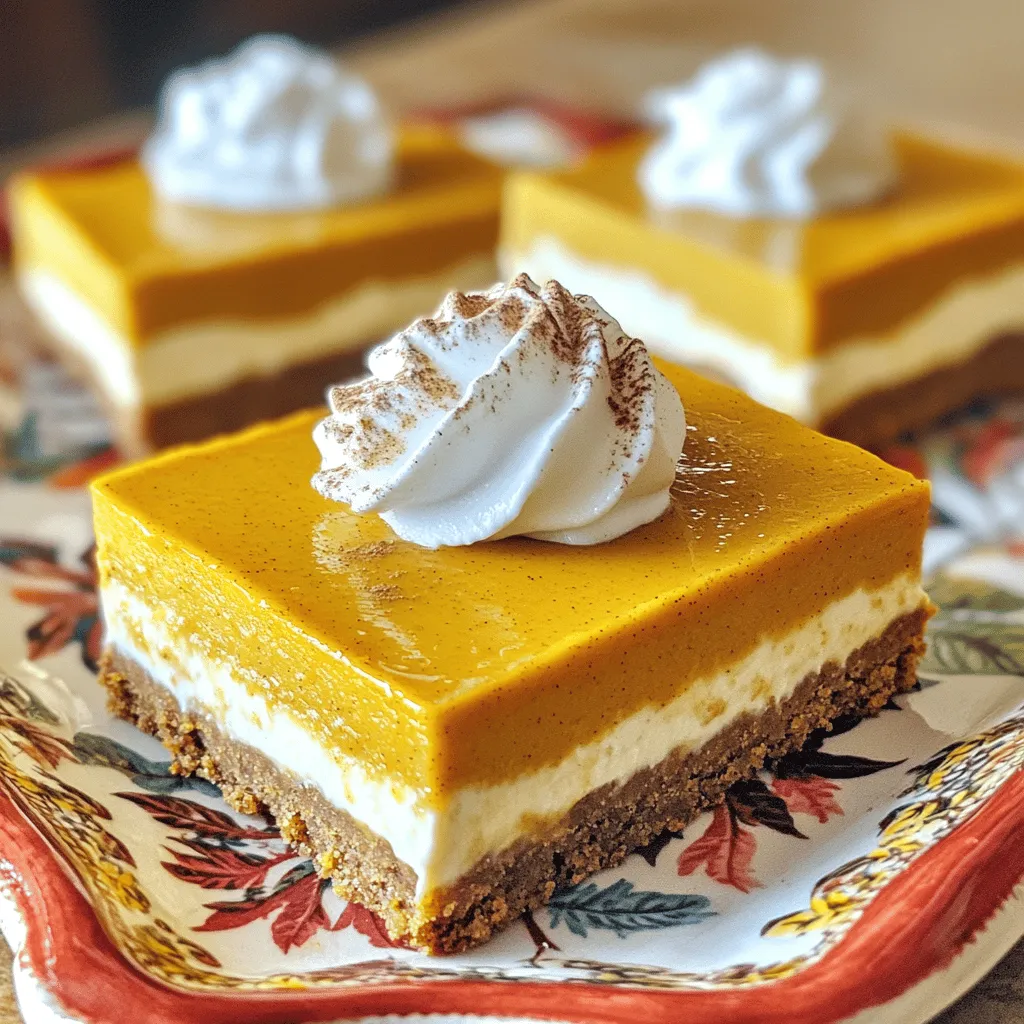
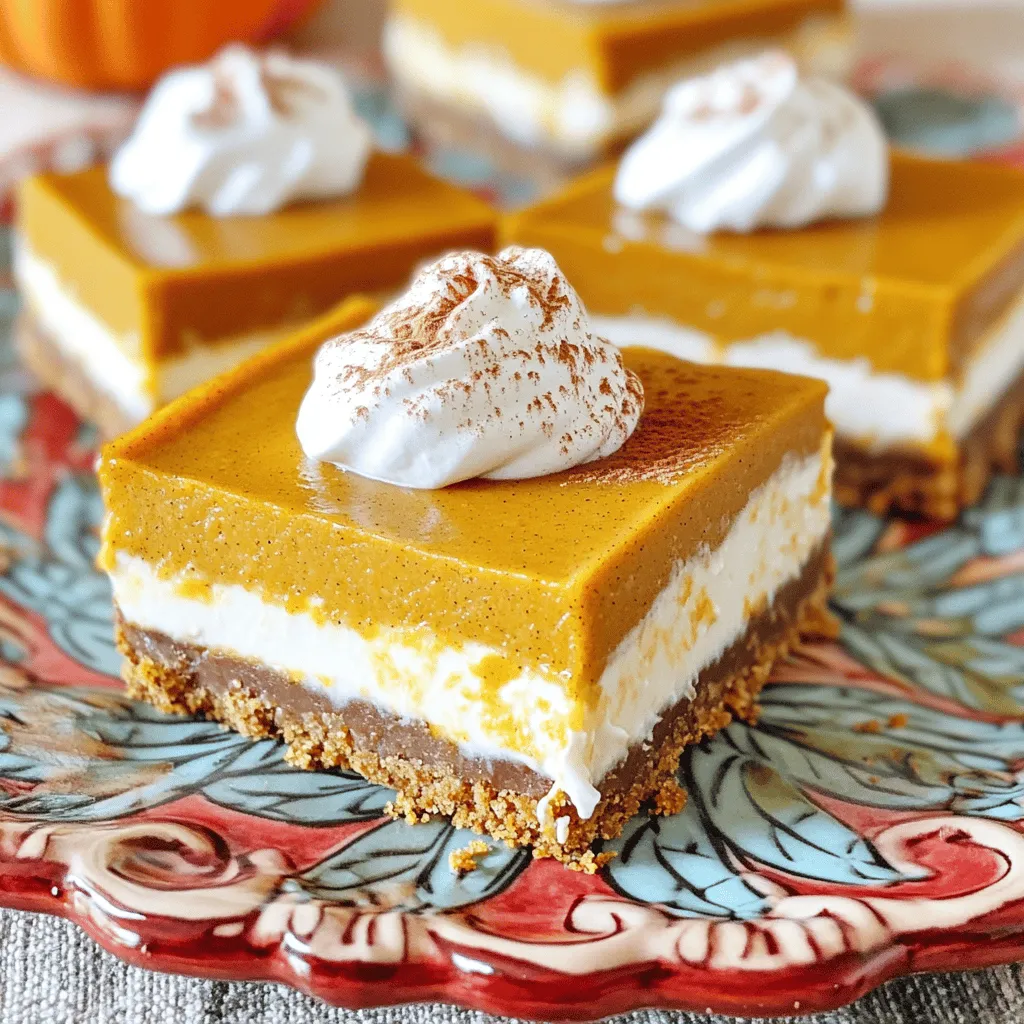
Craving something simple yet delicious? These No-Bake Pumpkin Cheesecake Bars with Gingersnap Crust are your answer! With rich pumpkin flavor and a crunchy gingersnap base, they’re perfect for fall gatherings or any time you want a sweet treat. Best of all, you can whip them up without turning on the oven. Let’s dive into the easy steps to create this delightful dessert!

Ingredients

Main Ingredients

  • 1 ½ cups gingersnap cookies, crushed
  • ¼ cup unsalted butter, melted
  • 2 cups cream cheese, softened
  • 1 cup canned pure pumpkin puree
  • 1 cup powdered sugar
  • 1 teaspoon vanilla extract
  • 1 teaspoon ground cinnamon
  • ½ teaspoon ground ginger
  • ½ teaspoon ground nutmeg
  • 1 cup heavy whipping cream

I love using gingersnap cookies for the crust. They add a spicy crunch that pairs well with pumpkin. The unsalted butter helps bind the cookies together. Cream cheese gives the bars a rich and creamy texture. Canned pumpkin makes it easy, and it tastes great. Powdered sugar sweetens the filling without making it gritty. Vanilla extract enhances the flavor.

I always add ground cinnamon, ginger, and nutmeg. These spices warm up the taste and make it feel like fall. Heavy whipping cream is key for that light and fluffy texture. When you whip it, it becomes airy and adds volume to the filling.

Tools and Equipment

  • 9×9-inch baking dish
  • Mixing bowls
  • Electric mixer
  • Spatula
  • Refrigerator

You will need a 9×9-inch baking dish. This size helps the bars set well and makes them easy to cut. Mixing bowls are a must for combining all the ingredients. An electric mixer speeds up the process of beating the cream cheese. A spatula helps you scrape down the sides of the bowl and fold in the whipped cream. Finally, a refrigerator is essential for chilling the bars. This step lets the flavors blend and allows the filling to firm up.

Step-by-Step Instructions

Preparing the Gingersnap Crust

  • First, combine 1 ½ cups of crushed gingersnap cookies with ¼ cup of melted unsalted butter in a mixing bowl. Stir until it looks like wet sand.
  • Next, press the gingersnap mixture firmly into the bottom of a 9×9-inch baking dish. Make sure it’s even all around.
  • Now, place the baking dish in the refrigerator. This helps the crust firm up while you work on the filling.

Making the Pumpkin Cheesecake Filling

  • In a large bowl, beat 2 cups of softened cream cheese with an electric mixer until it’s smooth and creamy.
  • Add in 1 cup of canned pure pumpkin puree, 1 cup of powdered sugar, 1 teaspoon of vanilla extract, 1 teaspoon of ground cinnamon, ½ teaspoon of ground ginger, and ½ teaspoon of ground nutmeg. Mix until it’s fully combined and smooth.
  • In another bowl, whip 1 cup of heavy whipping cream until stiff peaks form. This adds nice texture to the filling.

Assembling the Bars

  • Gently fold the whipped cream into the pumpkin mixture. Be careful not to deflate the whipped cream. This keeps the filling light and airy.
  • Spread the pumpkin cheesecake filling evenly over the gingersnap crust in the baking dish.
  • Finally, cover the dish and refrigerate for at least 4 hours, or ideally overnight, to let the cheesecake set properly.

Tips & Tricks

Achieving the Perfect Texture

To get the best texture, start with room temperature cream cheese. Cold cream cheese will make it hard to mix. It will also give your filling a lumpy look. Leave the cream cheese out for about an hour before you start. This small step makes a big difference.

When you whip the cream, aim for stiff peaks. This means the cream holds its shape well. Then, gently fold the whipped cream into the pumpkin mixture. Use a spatula and mix slowly. Be careful not to deflate the whipped cream. This step keeps your cheesecake light and airy.

Enhancements for Flavor

To make your bars extra tasty, add more spices. You can increase the cinnamon or add a pinch of clove. These spices boost that warm fall flavor. You can also use flavored extracts, like almond or maple. Just a little bit can change the whole taste!

Presentation Tips

For a beautiful presentation, serve the bars on a decorative platter. Each slice looks great with a dollop of whipped cream on top. A sprinkle of ground cinnamon adds a nice touch. You can also add a few pumpkin seeds or a drizzle of caramel for extra flair.

Variations

Flavor Variations

You can change the flavor of your cheesecake bars easily. Swap pumpkin puree for sweet potato or butternut squash. Both options add a creamy texture and great taste. You can also add chocolate or caramel to the filling. This twist creates a rich and sweet experience.

Dietary Modifications

If you need a gluten-free option, use gluten-free gingersnap cookies for the crust. You can also make a vegan version. Use vegan cream cheese and coconut cream instead of heavy cream. These changes let everyone enjoy these delicious bars.

Seasonal Twists

For a holiday-themed dessert, add nutmeg or maple syrup to the filling. These spices bring warmth and comfort to the bars. You can top your cheesecake with seasonal fruits like cranberries or pecans. This adds color and flavor for a festive touch.

Storage Info

Best Practices for Storing

To keep your no-bake pumpkin cheesecake bars fresh, store them in the fridge. Use an airtight container to prevent them from drying out or absorbing odors. If you have leftovers, cover them with plastic wrap. This simple step helps maintain their creamy texture and flavor. Ideally, enjoy the bars within five days for the best taste.

Freezing the Bars

You can freeze the cheesecake bars for longer storage. First, cut the bars into individual pieces. Wrap each piece in plastic wrap, then place them in a freezer-safe bag. This prevents freezer burn and keeps them fresh. They can last up to three months in the freezer.

When you’re ready to enjoy them, take the bars out of the freezer and place them in the fridge. Let them thaw for about four hours or overnight for the best results. This way, your dessert will return to its creamy goodness, just like when you first made it.

FAQs

Can I use fresh pumpkin instead of canned?

Yes, you can use fresh pumpkin. Just cook and puree it first. Make sure it’s smooth. Fresh pumpkin gives a bright taste. It can be a bit watery, though. Drain any excess liquid before using it.

How long do the cheesecake bars last in the fridge?

These cheesecake bars last about five days in the fridge. Keep them covered to stay fresh. I recommend using an airtight container. This keeps them tasty and prevents drying out.

What can I substitute for gingersnap cookies?

You can use other cookies like graham crackers or digestive biscuits. If you like spice, try molasses cookies. These options give a different flavor but still taste great. Adjust sugar based on cookie sweetness.

Is this recipe suitable for a no-bake dessert?

Yes, this recipe is perfect for a no-bake dessert. It requires no oven time. Just mix, layer, and chill in the fridge. This makes it easy and fun to prepare, especially in warm weather!

This blog post outlined a simple way to make pumpkin cheesecake bars. You learned about the key ingredients, tools needed, and step-by-step instructions to create a delicious dessert. I shared tips for achieving the right texture and ideas for flavor variations. Remember, you can customize this recipe to fit your taste and dietary needs. With the right storage methods, these bars can stay fresh longer. Now, you can enjoy a tasty treat that impresses everyone!

- 1 ½ cups gingersnap cookies, crushed - ¼ cup unsalted butter, melted - 2 cups cream cheese, softened - 1 cup canned pure pumpkin puree - 1 cup powdered sugar - 1 teaspoon vanilla extract - 1 teaspoon ground cinnamon - ½ teaspoon ground ginger - ½ teaspoon ground nutmeg - 1 cup heavy whipping cream I love using gingersnap cookies for the crust. They add a spicy crunch that pairs well with pumpkin. The unsalted butter helps bind the cookies together. Cream cheese gives the bars a rich and creamy texture. Canned pumpkin makes it easy, and it tastes great. Powdered sugar sweetens the filling without making it gritty. Vanilla extract enhances the flavor. I always add ground cinnamon, ginger, and nutmeg. These spices warm up the taste and make it feel like fall. Heavy whipping cream is key for that light and fluffy texture. When you whip it, it becomes airy and adds volume to the filling. - 9x9-inch baking dish - Mixing bowls - Electric mixer - Spatula - Refrigerator You will need a 9x9-inch baking dish. This size helps the bars set well and makes them easy to cut. Mixing bowls are a must for combining all the ingredients. An electric mixer speeds up the process of beating the cream cheese. A spatula helps you scrape down the sides of the bowl and fold in the whipped cream. Finally, a refrigerator is essential for chilling the bars. This step lets the flavors blend and allows the filling to firm up. - First, combine 1 ½ cups of crushed gingersnap cookies with ¼ cup of melted unsalted butter in a mixing bowl. Stir until it looks like wet sand. - Next, press the gingersnap mixture firmly into the bottom of a 9x9-inch baking dish. Make sure it’s even all around. - Now, place the baking dish in the refrigerator. This helps the crust firm up while you work on the filling. - In a large bowl, beat 2 cups of softened cream cheese with an electric mixer until it’s smooth and creamy. - Add in 1 cup of canned pure pumpkin puree, 1 cup of powdered sugar, 1 teaspoon of vanilla extract, 1 teaspoon of ground cinnamon, ½ teaspoon of ground ginger, and ½ teaspoon of ground nutmeg. Mix until it’s fully combined and smooth. - In another bowl, whip 1 cup of heavy whipping cream until stiff peaks form. This adds nice texture to the filling. - Gently fold the whipped cream into the pumpkin mixture. Be careful not to deflate the whipped cream. This keeps the filling light and airy. - Spread the pumpkin cheesecake filling evenly over the gingersnap crust in the baking dish. - Finally, cover the dish and refrigerate for at least 4 hours, or ideally overnight, to let the cheesecake set properly. To get the best texture, start with room temperature cream cheese. Cold cream cheese will make it hard to mix. It will also give your filling a lumpy look. Leave the cream cheese out for about an hour before you start. This small step makes a big difference. When you whip the cream, aim for stiff peaks. This means the cream holds its shape well. Then, gently fold the whipped cream into the pumpkin mixture. Use a spatula and mix slowly. Be careful not to deflate the whipped cream. This step keeps your cheesecake light and airy. To make your bars extra tasty, add more spices. You can increase the cinnamon or add a pinch of clove. These spices boost that warm fall flavor. You can also use flavored extracts, like almond or maple. Just a little bit can change the whole taste! For a beautiful presentation, serve the bars on a decorative platter. Each slice looks great with a dollop of whipped cream on top. A sprinkle of ground cinnamon adds a nice touch. You can also add a few pumpkin seeds or a drizzle of caramel for extra flair. {{image_2}} You can change the flavor of your cheesecake bars easily. Swap pumpkin puree for sweet potato or butternut squash. Both options add a creamy texture and great taste. You can also add chocolate or caramel to the filling. This twist creates a rich and sweet experience. If you need a gluten-free option, use gluten-free gingersnap cookies for the crust. You can also make a vegan version. Use vegan cream cheese and coconut cream instead of heavy cream. These changes let everyone enjoy these delicious bars. For a holiday-themed dessert, add nutmeg or maple syrup to the filling. These spices bring warmth and comfort to the bars. You can top your cheesecake with seasonal fruits like cranberries or pecans. This adds color and flavor for a festive touch. To keep your no-bake pumpkin cheesecake bars fresh, store them in the fridge. Use an airtight container to prevent them from drying out or absorbing odors. If you have leftovers, cover them with plastic wrap. This simple step helps maintain their creamy texture and flavor. Ideally, enjoy the bars within five days for the best taste. You can freeze the cheesecake bars for longer storage. First, cut the bars into individual pieces. Wrap each piece in plastic wrap, then place them in a freezer-safe bag. This prevents freezer burn and keeps them fresh. They can last up to three months in the freezer. When you're ready to enjoy them, take the bars out of the freezer and place them in the fridge. Let them thaw for about four hours or overnight for the best results. This way, your dessert will return to its creamy goodness, just like when you first made it. Yes, you can use fresh pumpkin. Just cook and puree it first. Make sure it’s smooth. Fresh pumpkin gives a bright taste. It can be a bit watery, though. Drain any excess liquid before using it. These cheesecake bars last about five days in the fridge. Keep them covered to stay fresh. I recommend using an airtight container. This keeps them tasty and prevents drying out. You can use other cookies like graham crackers or digestive biscuits. If you like spice, try molasses cookies. These options give a different flavor but still taste great. Adjust sugar based on cookie sweetness. Yes, this recipe is perfect for a no-bake dessert. It requires no oven time. Just mix, layer, and chill in the fridge. This makes it easy and fun to prepare, especially in warm weather! This blog post outlined a simple way to make pumpkin cheesecake bars. You learned about the key ingredients, tools needed, and step-by-step instructions to create a delicious dessert. I shared tips for achieving the right texture and ideas for flavor variations. Remember, you can customize this recipe to fit your taste and dietary needs. With the right storage methods, these bars can stay fresh longer. Now, you can enjoy a tasty treat that impresses everyone!

No-Bake Pumpkin Cheesecake Bars with Gingersnap Crust

Indulge in the creamy goodness of No-Bake Pumpkin Cheesecake Bars that are perfect for fall! With a delicious gingersnap crust and a smooth pumpkin filling, these treats are a festive delight. Whip them up in just 20 minutes and let them chill for the perfect dessert. Ready to impress your friends and family? Click through to discover the full recipe and step-by-step instructions for these lip-smacking pumpkin cheesecake bars!

Ingredients
  

1 ½ cups gingersnap cookies, crushed

¼ cup unsalted butter, melted

2 cups cream cheese, softened

1 cup canned pure pumpkin puree

1 cup powdered sugar

1 teaspoon vanilla extract

1 teaspoon ground cinnamon

½ teaspoon ground ginger

½ teaspoon ground nutmeg

1 cup heavy whipping cream

Instructions
 

In a mixing bowl, combine the crushed gingersnap cookies and melted butter. Stir until the mixture resembles wet sand.

    Press the gingersnap mixture firmly into the bottom of a 9x9-inch baking dish to create an even layer. Refrigerate while preparing the filling.

      In a large bowl, beat the softened cream cheese until smooth and creamy using an electric mixer.

        Add the pumpkin puree, powdered sugar, vanilla extract, cinnamon, ginger, and nutmeg to the cream cheese. Mix until fully combined and smooth.

          In a separate bowl, whip the heavy cream until stiff peaks form.

            Gently fold the whipped cream into the pumpkin mixture until well incorporated, being careful not to deflate the whipped cream.

              Spread the pumpkin cheesecake filling evenly over the gingersnap crust in the baking dish.

                Cover and refrigerate for at least 4 hours, or ideally overnight, to allow the cheesecake to set properly.

                  Once set, cut into bars and serve chilled.

                    Prep Time: 20 minutes | Total Time: 4 hours 20 minutes | Servings: 12

                      - Presentation Tips: Serve the bars on a decorative platter, and garnish each slice with a dollop of whipped cream and a sprinkle of ground cinnamon for an appealing touch.

                        WANT TO SAVE THIS RECIPE?

                        Leave a Comment

                        Recipe Rating