Are you ready to indulge in a sweet, creamy delight? Pumpkin cheesecake truffles combine the rich taste of pumpkin with a smooth cream cheese filling. This treat is perfect for gatherings or a cozy night in. You can customize them with different coatings and flavors too! Join me as I share how to make these delicious truffles step by step and elevate your dessert game. Let’s dive in!
Ingredients
Complete List of Ingredients
– 1 cup cream cheese, softened
– 1 cup pumpkin puree
– 1 cup powdered sugar
– 1 teaspoon vanilla extract
– 1 teaspoon pumpkin pie spice
– 1 cup graham cracker crumbs
– 1 cup white chocolate chips
– 2 tablespoons coconut oil (optional)
– Extra graham cracker crumbs or crushed pecans for rolling
To make these truffles, you need a mix of sweet and creamy ingredients. The cream cheese adds richness. Pumpkin puree gives it that warm, fall flavor. Powdered sugar sweetens it all up. Vanilla extract adds a nice touch of aroma. Pumpkin pie spice brings in that cozy taste we love.
The graham cracker crumbs form the base. They add texture and that classic cheesecake flavor. White chocolate chips melt into a sweet coating. The coconut oil is optional but helps create a smooth chocolate finish. You can also roll the truffles in more crumbs or crushed pecans for extra crunch.
Optional Ingredients for Variation
– Various types of chocolate for coating
– Flavored extracts like almond or maple
Feel free to switch it up! You can use dark, milk, or even colored chocolates to coat your truffles. Adding flavored extracts like almond or maple can give your truffles a unique twist. These options let you customize your treat to your liking.
Step-by-Step Instructions
Preparation Steps
1. Mixing the cream cheese and pumpkin:
Start by taking a medium bowl. Add 1 cup of softened cream cheese and 1 cup of pumpkin puree. Mix these well until smooth. You want to blend the cream cheese and pumpkin perfectly. Then, add 1 cup of powdered sugar, 1 teaspoon of vanilla extract, and 1 teaspoon of pumpkin pie spice. Stir these ingredients until they form a creamy mixture.
2. Incorporating the graham cracker crumbs:
Gradually add 1 cup of graham cracker crumbs to the creamy mixture. Use a spatula or your hands to mix until it thickens. The mixture should be moldable but not too sticky. This texture is key for shaping your truffles.
Chilling and Coating
3. Freezing the truffles for the right texture:
After mixing, take small amounts of the mixture and roll them into balls. Aim for about 1 inch in diameter. Place these on a parchment-lined baking sheet. Then, freeze the truffles for about 30 minutes. This step helps them firm up and makes them easier to coat.
4. Melting and preparing the white chocolate:
While the truffles chill, melt 1 cup of white chocolate chips. You can do this in a heatproof bowl set over simmering water. This method is called a double boiler. If you want, you can add 2 tablespoons of coconut oil to the chocolate. This makes the chocolate thinner and easier to coat the truffles.
Final Touches
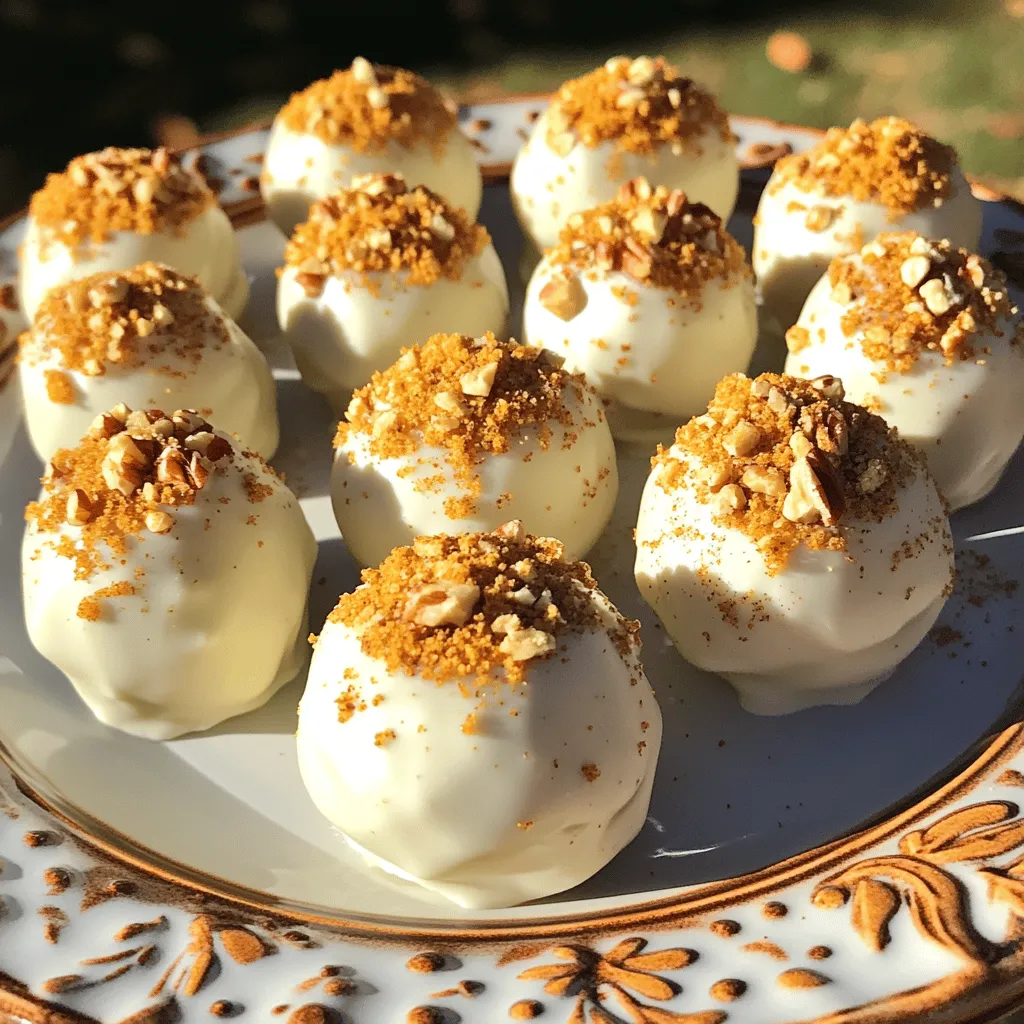
5. Rolling in graham cracker crumbs or nuts:
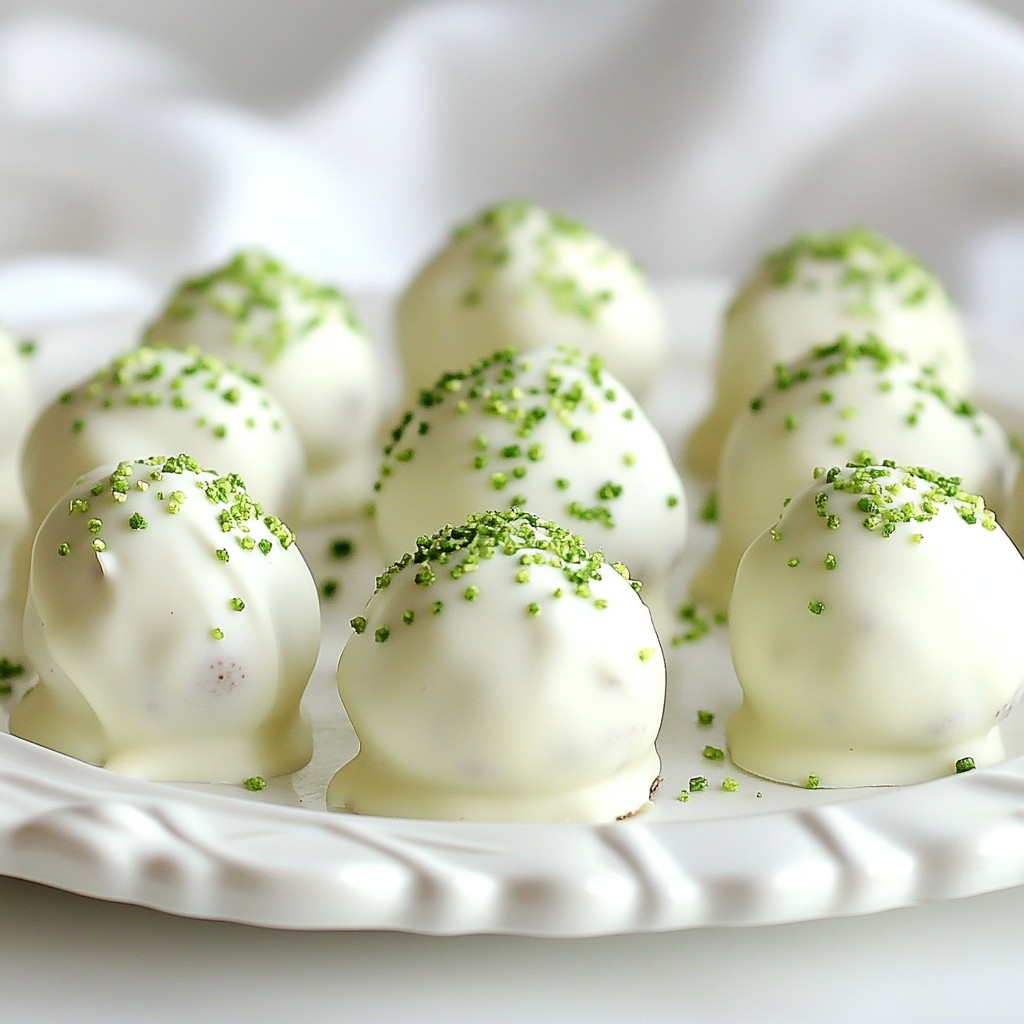
Once the truffles are firm, take them out of the freezer. Dip each truffle into the melted white chocolate. Make sure each one is fully coated. After dipping, roll them in extra graham cracker crumbs or crushed pecans to add texture and flavor.
6. Setting the truffles for serving:
Place the coated truffles back on the baking sheet. Refrigerate them until the chocolate sets completely, which takes about 30 minutes. This final step ensures your truffles are ready to enjoy and look great on a plate.
Tips & Tricks
Tips for Perfect Truffles
– Ensuring the cream cheese is properly softened: Start with cream cheese at room temperature. This helps mix it smoothly with the pumpkin puree. If it’s too cold, the truffles will be lumpy.
– Adjusting sweetness to personal preference: Taste the filling before you form the truffles. If you want them sweeter, add more powdered sugar a little at a time.
Common Mistakes to Avoid
– Overmixing the filling: Mix just until combined. Overmixing can make the truffles tough instead of creamy.
– Not allowing the truffles to chill enough: Chilling is key to firming up the truffles. If they are too soft, they will not hold their shape when dipped in chocolate.
These tips will help you create the perfect pumpkin cheesecake truffles.

Variations
Flavor Variations
You can change the taste of your Pumpkin Cheesecake Truffles easily. Try using chocolate or dark chocolate coating. This switch adds a rich flavor that pairs well with the sweet pumpkin. You can also add flavored extracts or spices to the mix. Almond extract or a hint of nutmeg can give a unique twist. These simple changes let you customize your truffles to fit your taste.
Dietary Modifications
If you’re looking for gluten-free options, swap out the graham cracker crumbs. Use crushed nuts or gluten-free cookies instead. This way, everyone can enjoy the treat. For vegan adaptations, use dairy-free cream cheese and chocolate. Coconut cream can also replace regular cream cheese for a delicious option. These tweaks make the truffles inclusive for different diets.
Storage Info
How to Store Pumpkin Cheesecake Truffles
To keep your pumpkin cheesecake truffles fresh, use an airtight container. This will stop moisture from getting in and ruining the texture. You can layer the truffles with parchment paper to avoid sticking. Store them in the fridge for up to one week. This keeps them cool and tasty for your next treat.
Freezing Instructions
If you want to save some truffles for later, freezing is a great option. Place the truffles in a single layer on a baking sheet. Freeze them for about an hour until they are hard. Then, transfer them to a freezer-safe bag or container. They can last up to three months in the freezer.
When you’re ready to enjoy them, thaw the truffles in the fridge overnight. This helps keep them creamy and delicious. Avoid thawing them at room temperature, as this can make them too soft and lose their nice shape.
FAQs
Can I make these truffles ahead of time?
Yes, you can prepare these truffles ahead. I suggest making them one to two days before you plan to serve. This gives the flavors time to blend. Just store them in the fridge in an airtight container.
What can I substitute for pumpkin puree?
If you don’t have pumpkin puree, you can use butternut squash puree. It has a similar taste and texture. Sweet potato puree also works well. Both options give you that nice, sweet fall flavor.
How long do pumpkin cheesecake truffles last?
These truffles stay fresh for up to one week in the fridge. To keep them longer, store them in the freezer. They can last up to three months when frozen. Just thaw them in the fridge before serving. Enjoy these sweet treats with friends and family!
These pumpkin cheesecake truffles are easy and fun to make. We covered key ingredients, from cream cheese to graham cracker crumbs. I shared steps to mix, chill, and coat them for the best taste. Tips help avoid mistakes, and variations allow for creativity. Store them right for lasting flavor. Enjoy these treats anytime, and feel free to tweak them to your taste. You have the tools to make something yummy that fits your style. Happy making!