
You’ll love these Red Velvet Cookies with Cream Cheese Frosting! They are easy to make and so tasty. I’ll walk you through every step, from the ingredients you need to the tips that ensure success. With this guide, you can impress friends and family with incredible cookies. Get ready to bake a treat that’s soft, sweet, and topped with rich cream cheese frosting. Let’s dive in!
Why I Love This Recipe
- Deliciously Unique Flavor: The combination of red velvet and cream cheese frosting creates a delightful flavor profile that is both rich and comforting.
- Beautiful Presentation: The vibrant red color of the cookies, topped with creamy frosting, makes them a stunning addition to any dessert table.
- Perfect for Any Occasion: These cookies are not just for Valentine's Day; they are perfect for birthdays, holidays, or just a sweet treat any day of the week.
- Simple to Make: With easy-to-follow instructions and common ingredients, these cookies can be whipped up in no time, even by novice bakers.
Ingredients
List of Ingredients
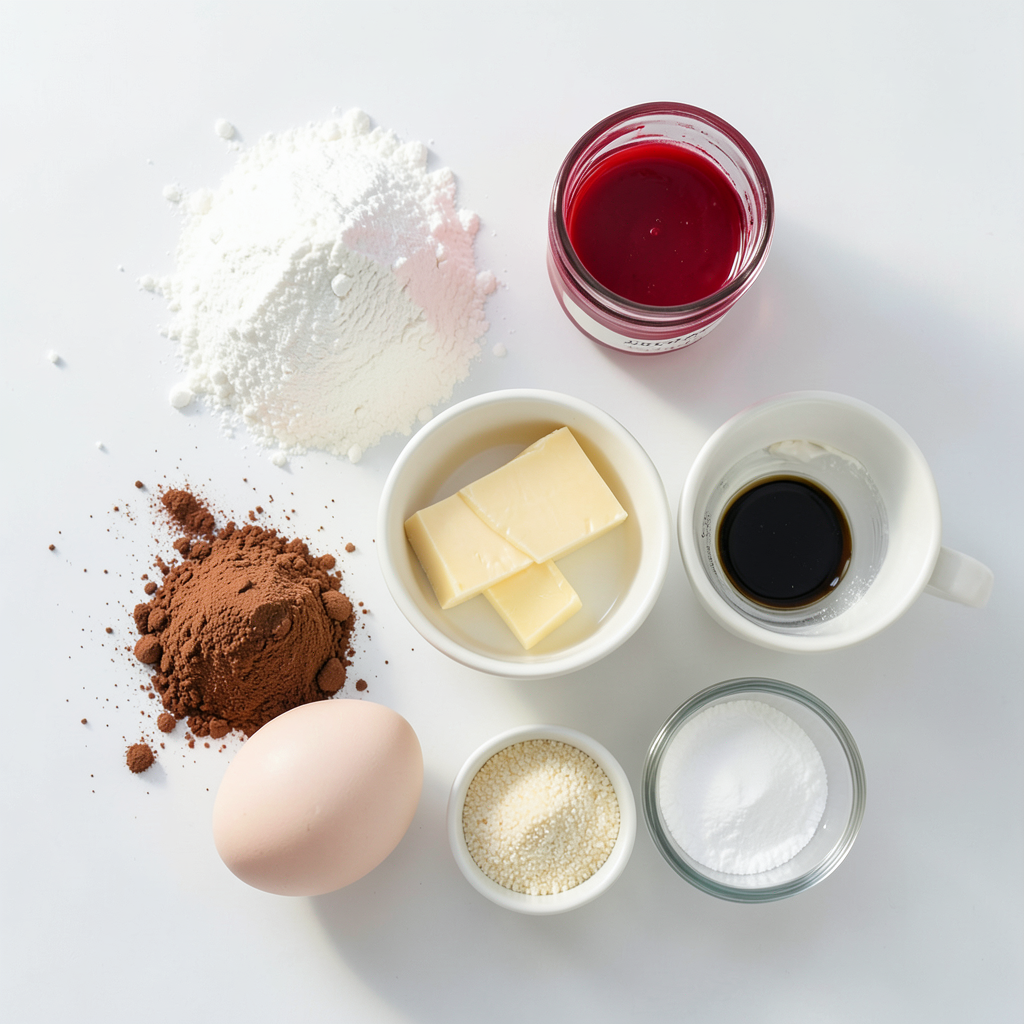
To make Red Velvet Cookies with Cream Cheese Frosting, gather the following ingredients:
- 1 ½ cups all-purpose flour
- 1 tablespoon cocoa powder
- ½ teaspoon baking soda
- ½ teaspoon salt
- ½ cup unsalted butter, softened
- 1 cup granulated sugar
- 1 large egg
- 1 teaspoon vanilla extract
- 2 tablespoons buttermilk
- 1 tablespoon red food coloring
For the Cream Cheese Frosting:
- 4 oz cream cheese, softened
- ¼ cup unsalted butter, softened
- 1 ½ cups powdered sugar
- ½ teaspoon vanilla extract
Measurements for Accuracy
Using precise measurements ensures your cookies turn out perfect. I always use a dry measuring cup for flour and cocoa powder. Level off the top with a knife for accuracy. For sticky ingredients like butter and food coloring, use a liquid measuring cup for best results. This keeps the cookie dough consistent and aids in even baking.
Ingredient Substitutions
You can adjust some ingredients if needed:
- For gluten-free cookies, try a 1:1 gluten-free flour blend.
- Need a dairy-free option? Use coconut oil instead of butter and a dairy-free cream cheese.
- If you don’t have buttermilk, mix 2 tablespoons of milk with ½ teaspoon of vinegar or lemon juice. Let it sit for a few minutes to sour.
These swaps still give you delicious cookies!
Step-by-Step Instructions
Prepping the Oven and Baking Sheet
Start by preheating the oven to 350°F (175°C). This step warms the oven for even baking. Next, line a baking sheet with parchment paper. This helps the cookies lift off easily after baking.
Mixing the Dry Ingredients
In a medium bowl, whisk together the flour, cocoa powder, baking soda, and salt. Mixing these dry ingredients well ensures they blend evenly. This step is key to a great cookie texture.
Creaming Butter and Sugar
In a large mixing bowl, cream the softened butter and granulated sugar. Use an electric mixer for about 2-3 minutes. The mixture should turn light and fluffy. This process adds air, making your cookies soft.
Combining Wet Ingredients
Add the egg, vanilla extract, buttermilk, and red food coloring to the creamed mixture. Beat these together until smooth. This step brings a rich color and flavor to your cookies.
Mixing Dry and Wet Ingredients
Gradually add the dry ingredients to the wet mixture. Mix until just combined. Be careful not to overmix, or the cookies might turn tough. You want a soft dough that holds shape.
Scooping and Spacing Cookies
Use a cookie scoop or a tablespoon to drop rounded balls of dough onto the prepared baking sheet. Space them about 2 inches apart. This gives them room to spread while baking.
Baking Time and Cooling Instructions
Bake the cookies for 10-12 minutes. The edges should be set while the centers remain soft. Once done, remove them from the oven and let them cool on the baking sheet for 5 minutes. Then transfer to a wire rack to cool completely.
Preparing the Cream Cheese Frosting
While the cookies cool, beat the softened cream cheese and butter in a mixing bowl until creamy. Gradually add the powdered sugar and vanilla extract. Beat until the frosting is smooth and fluffy.
Frosting the Cookies
Once the cookies are fully cool, spread a generous dollop of cream cheese frosting on top. Make sure to cover each cookie well for a rich taste.
Serving Suggestions
Arrange your cookies on a bright plate for a stunning look. For extra flair, sprinkle a bit of cocoa powder or edible glitter on top. Serve with cold milk or warm tea for a perfect treat!
Tips & Tricks
Achieving the Perfect Cookie Texture
To get that soft and chewy texture, use softened butter. It helps create air pockets. When mixing, beat the butter and sugar together until light and fluffy. This takes about 2-3 minutes. Make sure not to overmix after adding the dry ingredients. Just mix until combined. This keeps the cookies soft.
Common Mistakes to Avoid
One common mistake is overbaking. The cookies should look set at the edges but still soft in the middle. Remember, they will continue to cook as they cool. Another mistake is skipping the cooling time. Letting them cool on the baking sheet for 5 minutes helps them hold their shape.
Making Ahead Tips
You can make the dough ahead of time. After mixing the dough, cover it and chill it in the fridge. This helps the flavors blend. You can also freeze unbaked cookie dough. Just scoop the dough onto a baking sheet and freeze until firm. Then, transfer the balls to a freezer bag. When you're ready, bake them straight from the freezer. Just add a minute or two to the baking time.
Pro Tips
- Use Room Temperature Ingredients: Ensure your butter and cream cheese are at room temperature for easier mixing and a smoother frosting.
- Don't Overmix the Dough: To keep your cookies tender and soft, mix until just combined; overmixing can result in tough cookies.
- Chill the Dough (Optional): For thicker cookies, chill the dough in the refrigerator for 30 minutes before baking to prevent spreading.
- Experiment with Add-Ins: Consider adding chocolate chips or nuts to the cookie dough for an extra texture and flavor boost.
Variations
Red Velvet Cookie Sandwiches
Red velvet cookie sandwiches are a fun twist on the classic cookie. To make these, simply frost one cookie and top it with another. This adds creaminess and makes for a tasty treat. You can even make mini sandwiches for a bite-sized snack.
Different Frosting Options
While cream cheese frosting is a favorite, you can explore other options. Try chocolate ganache or vanilla buttercream for a new flavor. You can also add a touch of almond extract to your frosting for a unique twist. Experiment with different colors of frosting to make your cookies pop.
Adding Mix-Ins
Mix-ins can take your cookies to the next level. Consider adding chocolate chips, nuts, or dried fruit. These ingredients add texture and flavor. Just fold them into the dough before baking. You can also sprinkle some on top of the frosting for extra flair.
Storage Info
Storing Cookies for Freshness
To keep your red velvet cookies fresh, store them in an airtight container. This will help keep them soft and tasty. Place parchment paper between layers if you stack them.
Freezing Instructions
You can freeze these cookies for later. Let them cool completely first. Then, place them in a single layer on a baking sheet. Freeze for about an hour. After that, transfer them to a freezer bag. Remove as much air as you can before sealing.
How Long Cookies Last
These cookies can last for about a week at room temperature. If you store them in the fridge, they will stay fresh for about two weeks. Frozen cookies can last for about three months. Just remember to thaw them before enjoying!
FAQs
Can I make these cookies without food coloring?
Yes, you can skip the food coloring. The cookies will still taste great. They will be more like a chocolate cookie than red velvet. If you want a hint of red, consider using beet juice instead. This will give a natural color without artificial dyes.
What can I substitute for buttermilk?
You can use regular milk with a splash of vinegar or lemon juice. Just add one tablespoon of vinegar or lemon juice to a cup of milk. Let it sit for five minutes. This creates a sour milk that works well in baking.
How do I know when the cookies are done?
Look for set edges and soft centers. The cookies will look slightly puffed but still soft. They will continue to cook a bit as they cool. If the edges are firm, you can take them out of the oven.
Can I use a different frosting for these cookies?
Yes, you can! Vanilla buttercream or chocolate ganache works nicely. If you want a fruit flavor, try cream cheese with strawberry or raspberry. Just make sure the frosting pairs well with the cookie’s taste.
How do I store leftover cream cheese frosting?
Store any leftover frosting in an airtight container. Place it in the fridge for up to one week. When you are ready to use it, just re-whip it for the best texture. You can also freeze it for up to three months.
You now know the key ingredients and steps to bake perfect cookies. From measuring accurately to mixing dry and wet ingredients, each part plays a role. Use tips to avoid common mistakes and try fun variations like red velvet sandwiches. With proper storage, your cookies will stay fresh for days. Remember, baking is both a science and an art. So, enjoy the process and share your tasty results!


