
Are you ready to take your dessert game to the next level? Salted Caramel Chocolate Éclairs are rich, creamy, and simply irresistible! With a light choux pastry, luscious salted caramel filling, and a decadent chocolate glaze, these treats will please any sweet tooth. In this article, I’ll guide you step-by-step through the simple process of making these delightful éclairs. Let’s indulge and enjoy this delicious journey together!
Why I Love This Recipe
- Unique Flavor Combination: This recipe combines the richness of chocolate with the indulgence of salted caramel, creating a deliciously balanced treat that satisfies both sweet and salty cravings.
- Impressive Presentation: These éclairs are visually stunning, making them perfect for special occasions or gatherings. They’re sure to impress your guests!
- Fun to Make: From whipping up the choux pastry to filling the éclairs with luscious caramel, this recipe is a delightful culinary adventure that’s enjoyable to prepare.
- Customizable: You can personalize the toppings and fillings, adding your twist to this classic dessert, making it versatile for any palate.
Ingredients
Choux Pastry Ingredients
- 1 cup water
- 1/2 cup unsalted butter
- 1 cup all-purpose flour
- 4 large eggs
- 1/4 teaspoon salt
Salted Caramel Filling Ingredients
- 1 cup granulated sugar
- 6 tablespoons unsalted butter, cubed
- 1/2 cup heavy cream
- 1 teaspoon sea salt
Chocolate Glaze Ingredients
- 4 ounces bittersweet chocolate, chopped
- 1 tablespoon unsalted butter
Optional Toppings
- Whipped cream
- Sea salt flakes for garnish
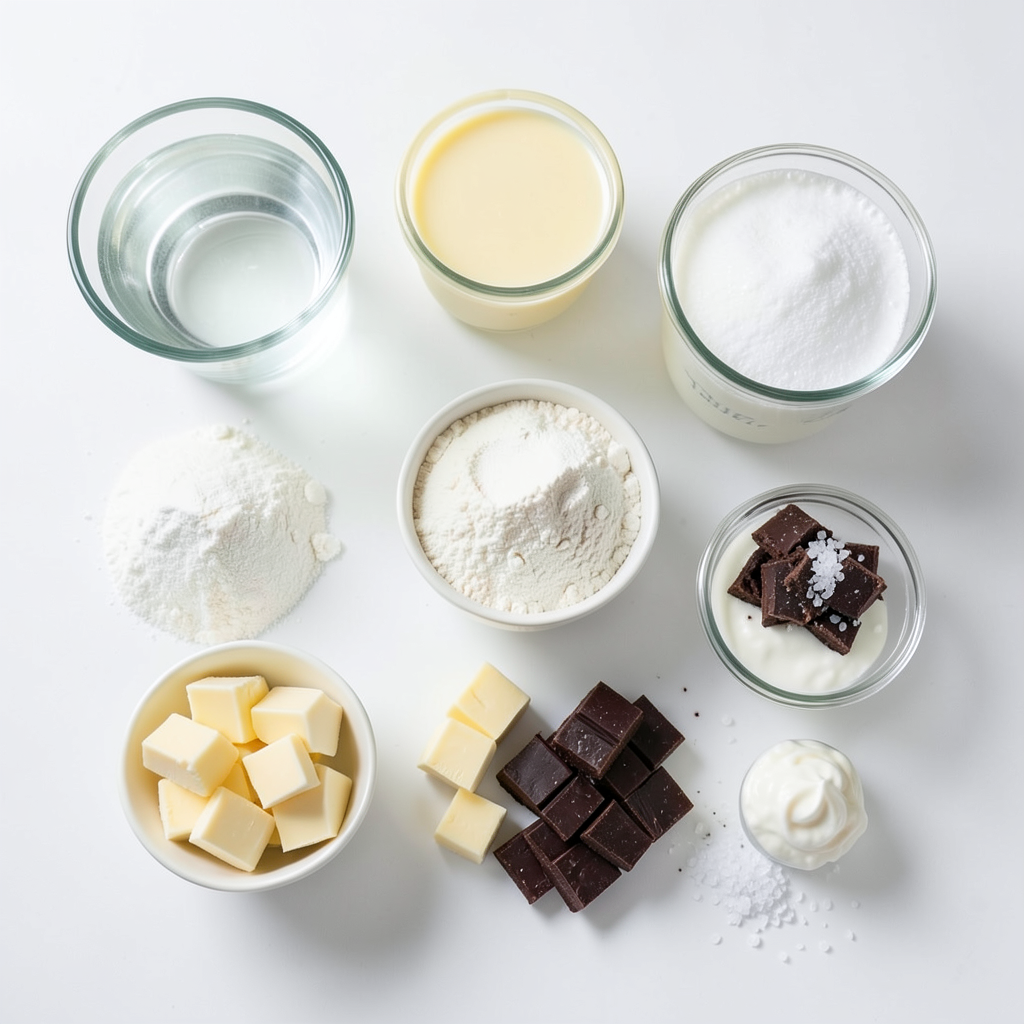
Making salted caramel chocolate éclairs starts with these simple ingredients. The choux pastry forms a light and airy shell. The salted caramel filling adds a sweet and salty touch. Lastly, the chocolate glaze gives a rich finish.
Each ingredient plays a key role. The water and butter create steam, making the pastry puff. The flour gives structure. Eggs bind it all together, ensuring a smooth texture.
For the salted caramel, sugar transforms into a rich sauce. The butter adds creaminess, while heavy cream balances the sweetness. Sea salt enhances every bite, making it more delicious.
The chocolate glaze brings all the flavors together. It adds a glossy finish that is hard to resist. You can choose to top your éclairs with whipped cream and sea salt. This gives a beautiful presentation that impresses anyone.
Gather these ingredients, and let's create something amazing!
Step-by-Step Instructions
Making the Choux Pastry
- Combine 1 cup water, 1/2 cup unsalted butter, and 1/4 teaspoon salt in a saucepan. Bring to a boil over medium heat.
- Once boiling, add 1 cup all-purpose flour all at once. Stir until the mixture pulls away from the sides and forms a ball.
- Remove from heat and cool for 5 minutes before adding eggs.
Piping and Baking the Éclairs
- Preheat your oven to 400°F (200°C) and prepare a baking tray with parchment paper.
- Transfer the choux pastry to a piping bag fitted with a large round tip. Pipe 4-inch long strips on the tray.
- Bake for 25-30 minutes, until golden brown. Do not open the oven during baking.
Preparing the Salted Caramel Filling
- In a saucepan, melt 1 cup of granulated sugar over medium heat. Stir until it turns deep amber.
- Remove from heat and whisk in 6 tablespoons of cubed unsalted butter until smooth.
- Slowly pour in 1/2 cup of heavy cream while whisking. Add 1 teaspoon of sea salt and let it cool until slightly thickened.
Filling and Finishing the Éclairs
- Use a pastry cream tip to fill each cooled éclair with the salted caramel. Insert the tip into one end and squeeze gently.
- For the chocolate glaze, microwave 4 ounces of chopped bittersweet chocolate and 1 tablespoon of unsalted butter in 30-second intervals until melted and smooth.
- Dip the top of each éclair in the chocolate glaze or drizzle it over. Add sea salt flakes on top for a finishing touch.
Tips & Tricks
Achieving Perfect Choux Pastry
- Use a good quality butter for best results.
High-quality butter gives your éclairs a rich taste. It adds flavor and helps the pastry rise well.
- Ensure eggs are at room temperature for easier mixing.
Warm eggs blend better with the dough. This step helps create a smooth and even batter.
Salted Caramel Success Tips
- Watch the sugar carefully to avoid burning.
Sugar can turn from perfect to burnt in seconds. Stir constantly as it melts to control the heat.
- Allow the caramel to cool slightly for easier filling.
Cool caramel is easier to pipe into the éclairs. It will not run out and makes a nice filling.
Chocolate Glaze Consistency
- Microwave in short intervals to prevent overheating.
Melting chocolate takes time. Stir after each interval for the best texture.
- Adjust chocolate amount based on preference for thickness.
Use more chocolate for a thicker glaze. For a lighter touch, use less.
Pro Tips
- Use Fresh Ingredients: Always opt for fresh eggs and high-quality chocolate to enhance the flavor and texture of your éclairs.
- Don’t Rush the Baking: Allow the éclairs to bake fully without opening the oven door, as this can cause them to deflate.
- Cool Before Filling: Ensure the éclairs are completely cool before filling them with the salted caramel to prevent the filling from melting the pastry.
- Experiment with Flavors: Feel free to add different flavors to the salted caramel, such as vanilla or espresso, for a unique twist on your éclairs.
Variations
Alternative Fillings
You can change the filling in your éclairs. For a classic taste, use vanilla pastry cream. This creamy filling adds a sweet and smooth flavor. You can also try coffee-infused creme patissiere. The coffee flavor adds a nice twist and pairs well with chocolate.
Flavor Swaps for Chocolate Glaze
Switch up the chocolate glaze for a different taste. Use milk chocolate for a sweeter option. If you love white chocolate, that works great too! You can also infuse the glaze with espresso or flavored extracts. A hint of orange or almond can really elevate your éclairs.
Different Toppings
Toppings can bring your éclairs to the next level. Try adding crushed nuts for a crunchy texture. Walnuts or hazelnuts work well. You can drizzle with caramel sauce or melted chocolate for extra sweetness. This will make your éclairs look even more tempting!
Storage Info
Storing Éclairs
To keep your éclairs fresh, place them in an airtight container. This helps keep moisture out. You can store them in the fridge for up to two days. After that, they may lose their tasty crunch.
Freezing Instructions
If you want to save éclairs for longer, freeze them before adding the glaze. This method helps keep their shape and taste. When you're ready to enjoy them, thaw the éclairs in the fridge overnight. This will make them perfect for serving.
Best Practices to Reheat
If you want to warm them up, use the oven. Reheat them slightly to regain that crispy texture. Avoid using the microwave because it can make the pastry soggy. A quick oven heat will keep your éclairs delicious.
FAQs
What is the best way to pipe the éclairs?
- Use a large round piping tip for even shapes.
- Practice on parchment paper before baking if needed. This will help you get the hang of it.
Can I make salted caramel ahead of time?
- Yes, prepare and store in the fridge for up to a week. This makes your baking day easier.
Why are my éclairs flat?
- Ensure you don’t open the oven door during baking.
- Check that your oven temperature is accurate. A steady heat is key for puffing them up.
Can I use gluten-free flour in the recipe?
- Yes, substitute with a gluten-free all-purpose flour blend. This way, everyone can enjoy these treats.
How long do salted caramel chocolate éclairs last?
- Best eaten fresh but can be stored in the fridge for 2 days. After that, they may lose their crispness.
In this post, you learned how to make delicious salted caramel chocolate éclairs. We covered the ingredients for choux pastry, salted caramel filling, and chocolate glaze. I shared key tips to perfect your éclairs and offered ideas for variations and storage.
These treats are fun to make and tasty to eat. Follow these steps, and you’ll impress everyone with your baking skills. Enjoy every bite of your lovely creations!