Looking for a snack that will impress your friends and family? You’re in the right place! This Delicious Cheesy Garlic Bombs Recipe offers cheesy, buttery goodness in every bite. I’ll guide you through the simple steps to create these mouthwatering treats, from selecting the right cheese to perfecting the dough. Get ready to elevate your snack game with these easy-to-make garlic bombs everyone will love!
What Ingredients Do You Need for Delicious Cheesy Garlic Bombs?
To create these tasty treats, you need just a few simple ingredients. The main star is biscuit dough. You can use one can of refrigerated biscuit dough, which gives a nice rise. Next, grab one cup of shredded mozzarella cheese. This cheese melts beautifully and gives a gooey center.
You will also need four tablespoons of unsalted butter. Melt the butter to mix with garlic for a rich flavor. For that intense garlic taste, you will need four cloves of garlic, minced finely. Then, add one teaspoon of dried Italian herbs. A mix of oregano, basil, and thyme works well.
You should also have half a teaspoon of salt and a quarter teaspoon of black pepper. These spices enhance your garlic bombs. For a fresh touch, chop some parsley to garnish your dish.
What are the Essential Ingredients?
The essential ingredients include biscuit dough, cheese, garlic, and butter. Each ingredient plays a key role. The dough provides the outer layer, while the cheese gives a melty center. Garlic adds flavor, and butter helps in cooking.
How to Choose the Best Cheese for Baking?
When choosing cheese, go for cheese that melts well. Mozzarella is a perfect choice. It stretches and becomes gooey. You can also try cheddar for a sharper taste. Just remember, the cheese should be shredded for easier melting.
Can You Use Alternatives for Some Ingredients?
Yes, you can swap some ingredients. If you want a healthier option, use whole wheat biscuit dough. You can also use vegan butter and cheese for a plant-based version. If you don’t have Italian herbs, try using any dried herbs you have on hand. This recipe is flexible, so feel free to get creative!Enjoy your cooking!
How Do You Prepare the Dough for Cheesy Garlic Bombs?
To make cheesy garlic bombs, you start with biscuit dough. You can use a cheesy dough recipe from a can. This makes it easy and fun to prepare.
What are the Steps to Prepare Biscuit Dough?
First, preheat your oven to 375°F (190°C). Then, take a can of refrigerated biscuit dough. Open the can and remove the biscuits. Each biscuit will be the base for your cheesy filling.
Next, take each biscuit and flatten it in your hand. You want it to be about the size of your palm. This makes it easy to fill with cheese.
How Do You Flatten and Fill the Biscuits?
Once you have flattened the biscuit, add about 2 tablespoons of shredded mozzarella cheese in the center. Make sure to keep the cheese in the middle.
Now, gather the edges of the biscuit around the cheese. Pinch the edges to seal it well. Then, roll it into a smooth ball. This helps keep the cheese inside while baking.
What Tips Can Enhance the Dough Preparation Process?
For the best cheesy garlic bombs, make sure to work quickly. If the dough gets too warm, it can be hard to shape.
You can also coat each ball in garlic butter. This adds flavor and helps them brown. Lastly, give them some space on the baking sheet. This lets them puff up nicely while cooking.Enjoy making these tasty snacks!
What Is the Step-by-Step Cooking Process for These Garlic Bombs?
To bake garlic bombs, you need a few simple steps. First, let’s create the garlic butter mixture. In a small bowl, mix melted butter, minced garlic, dried herbs, salt, and black pepper. This garlic butter will give your bombs a rich flavor.
Next, let’s focus on the key steps for baking the garlic bombs. Start by preheating your oven to 375°F (190°C). While the oven warms up, open your can of biscuit dough and separate the biscuits. Flatten each biscuit slightly in your hand. Then, add about 2 tablespoons of mozzarella cheese to the center of each biscuit. Gather the edges of the biscuit around the cheese and pinch to seal. Roll them into smooth balls.
Now, dip each dough ball into the garlic butter mixture. Make sure each one is coated well. Place the garlic bombs on a lined baking sheet with some space in between. Drizzle any leftover garlic butter on top.
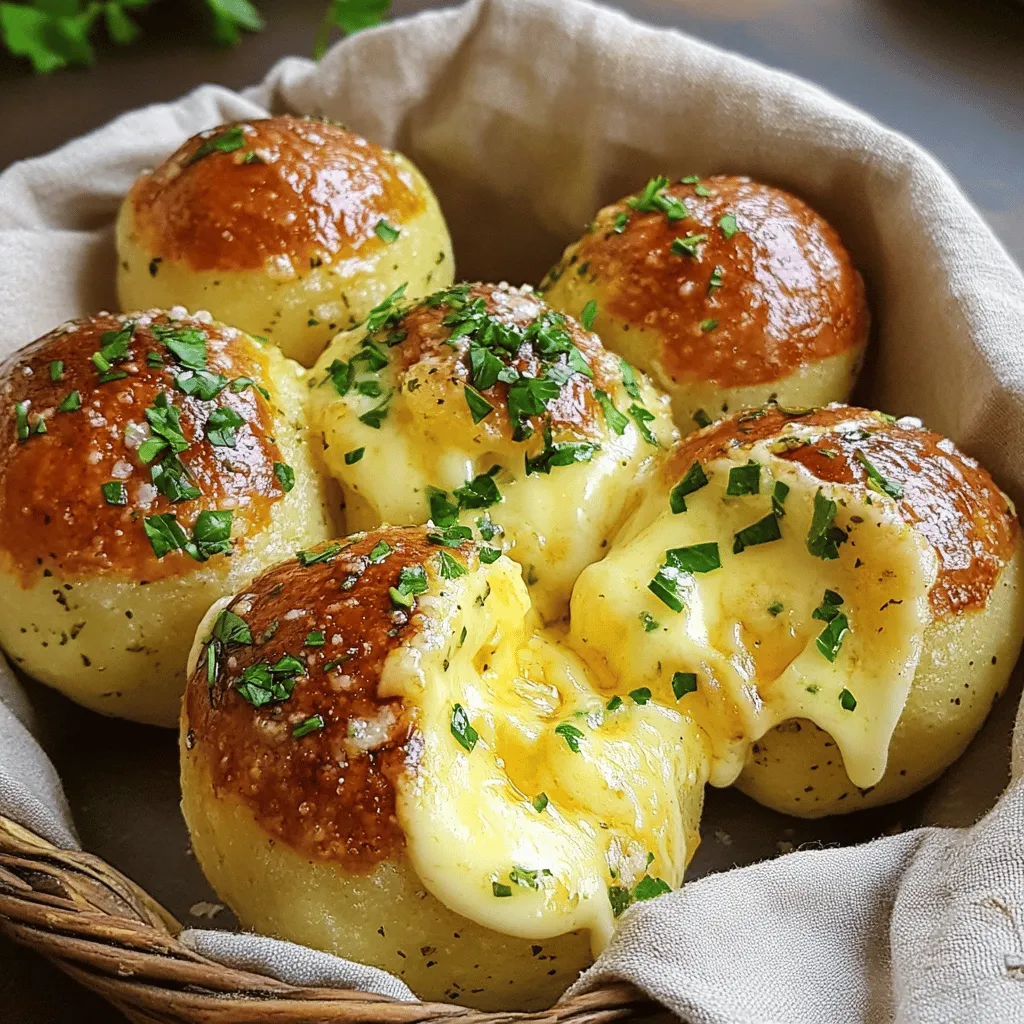
Bake the bombs for 15-18 minutes. Watch for them to turn golden brown and the cheese to melt. When done, take them out and let them cool slightly.
When cooking, be sure to check the color of the tops. They should be golden brown. This shows they are baked well. Enjoy your cheesy garlic bombs warm and fresh!
How Can You Serve and Enjoy Cheesy Garlic Bombs?
Serving cheesy garlic bombs is simple and fun. You want to impress your family and friends. Here are some great ways to do that.
What Are the Best Serving Suggestions?
Warm cheesy garlic bombs are best right out of the oven. Place them on a big platter or in a cute basket. You can line the basket with a cloth for a nice touch. This makes it feel special and inviting. Each person can grab their own bomb, making it a fun snack for everyone.
How to Plate for Maximum Appeal?
To make your dish pop, add fresh parsley on top. The green color looks great against the golden bread. You can also sprinkle a little extra cheese on top before baking. This gives a delicious, gooey look. Serve with a side of marinara sauce, too. It adds flavor and color to your plate.
Can You Pair Them with Dipping Sauces?
Absolutely! Dipping sauces make these snacks even better. Marinara sauce is a classic choice. It gives a nice tang and pairs well with the garlic. You can also try ranch or a creamy garlic sauce. A spicy sauce can add a fun kick for those who love heat. Enjoy your cheesy garlic bombs with your favorite dips for a tasty treat.
What Variations Can You Make on the Garlic Bombs Recipe?
You can make garlic bombs even more fun by trying different cheese types. For instance, cheddar or pepper jack cheese can add a nice kick. You might also try cream cheese for a creamy center. Mixing cheeses can create a unique flavor blend.
Can You Experiment with Different Cheese Types?
Yes, experimenting with cheese is a great way to change things up. Mozzarella is classic, but other cheeses work well too. Gouda melts beautifully and has a rich flavor. Even blue cheese adds a bold taste.
What Additional Ingredients Can You Include?
Adding extra ingredients can make your garlic bombs special. You can include cooked bacon bits for a savory touch. Spinach or roasted red peppers can add color and nutrition. If you love herbs, try adding fresh basil or chives for extra flavor.
How to Adjust for Dietary Restrictions or Preferences?
To cater to dietary needs, you can swap out the biscuit dough. Use gluten-free dough for a gluten-free option. For a vegan version, replace the cheese with plant-based cheese. You can also use olive oil instead of butter. These swaps keep the dish tasty for everyone.
What Are Some Tips for Perfecting Your Cheesy Garlic Bombs?
To make perfect cheesy garlic bombs, focus on a few key tips.
What Common Mistakes Should You Avoid?
One common mistake is not sealing the biscuits well. If the cheese leaks out, it can make a mess. Be sure to pinch the edges tightly. Another mistake is overfilling the biscuits. Too much cheese can cause them to burst. Stick to about two tablespoons for the best results. Lastly, don’t skip the garlic butter. It gives the bombs their great flavor.
How to Ensure a Golden Brown Finish?
To get that golden brown finish, preheat your oven properly. If the oven is not hot enough, the bombs won’t bake evenly. Brush the tops with extra garlic butter before baking. This adds flavor and helps with browning. Bake until they are golden brown, usually about 15-18 minutes. Keep an eye on them to avoid burning.
What Storage Advice Should You Follow for Leftovers?
If you have leftovers, let them cool completely before storing. Place them in an airtight container. They will stay fresh for about 2-3 days in the fridge. To reheat, pop them in the oven at 350°F (175°C) for about 10 minutes. This will help restore their crispy texture. For longer storage, you can freeze them. Just make sure to wrap them well in plastic wrap.
You’ve learned how to make delicious cheesy garlic bombs from scratch, focusing on essential ingredients, dough preparation, and cooking tips. We discussed tasty cheese options and creative ingredient substitutions. You can enhance your cooking with smart baking tips and serving ideas, making these bites perfect for any gathering. Experimenting with variations will keep your dishes fresh and fun. Enjoy creating these cheesy treats, and impress your friends and family with your newfound skills.
