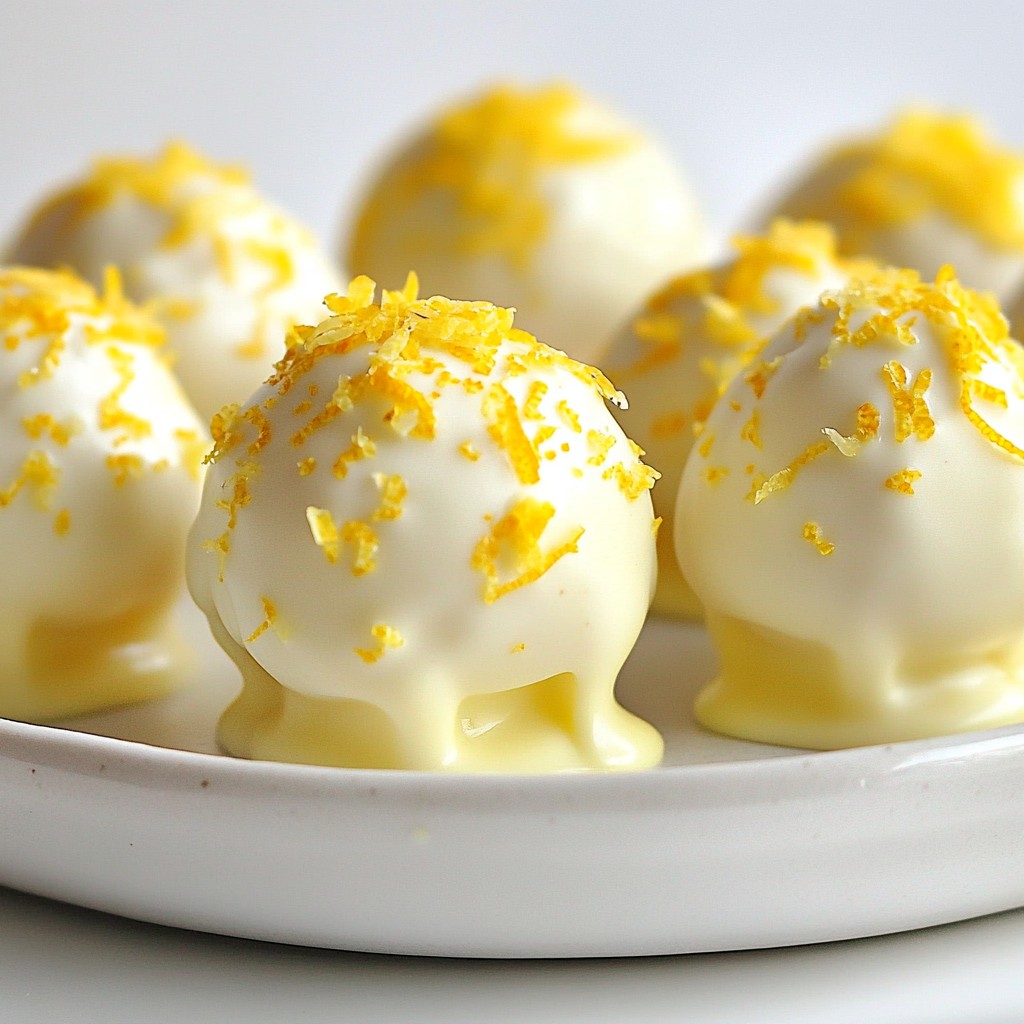
Are you ready to elevate your dessert game? Let me introduce you to Lemon Oreo Truffles, a creamy and easy delight that will impress everyone! These little bites pack a punch of zesty flavor and sweetness. Best of all, they require just a few simple ingredients and steps. Follow me as I guide you through the fun process of making these treats, perfect for any occasion!
Why I Love This Recipe
- Bright Flavor: The zesty lemon adds a refreshing twist that perfectly complements the sweetness of the Oreo cookies.
- Easy to Make: With just a few simple ingredients and steps, these truffles come together quickly, making them perfect for any occasion.
- Fun to Customize: You can easily adjust the toppings or chocolate coating to suit your taste, making each batch unique.
- Perfect Treat for Any Occasion: These truffles are great for parties, holidays, or just a sweet treat at home!
Ingredients
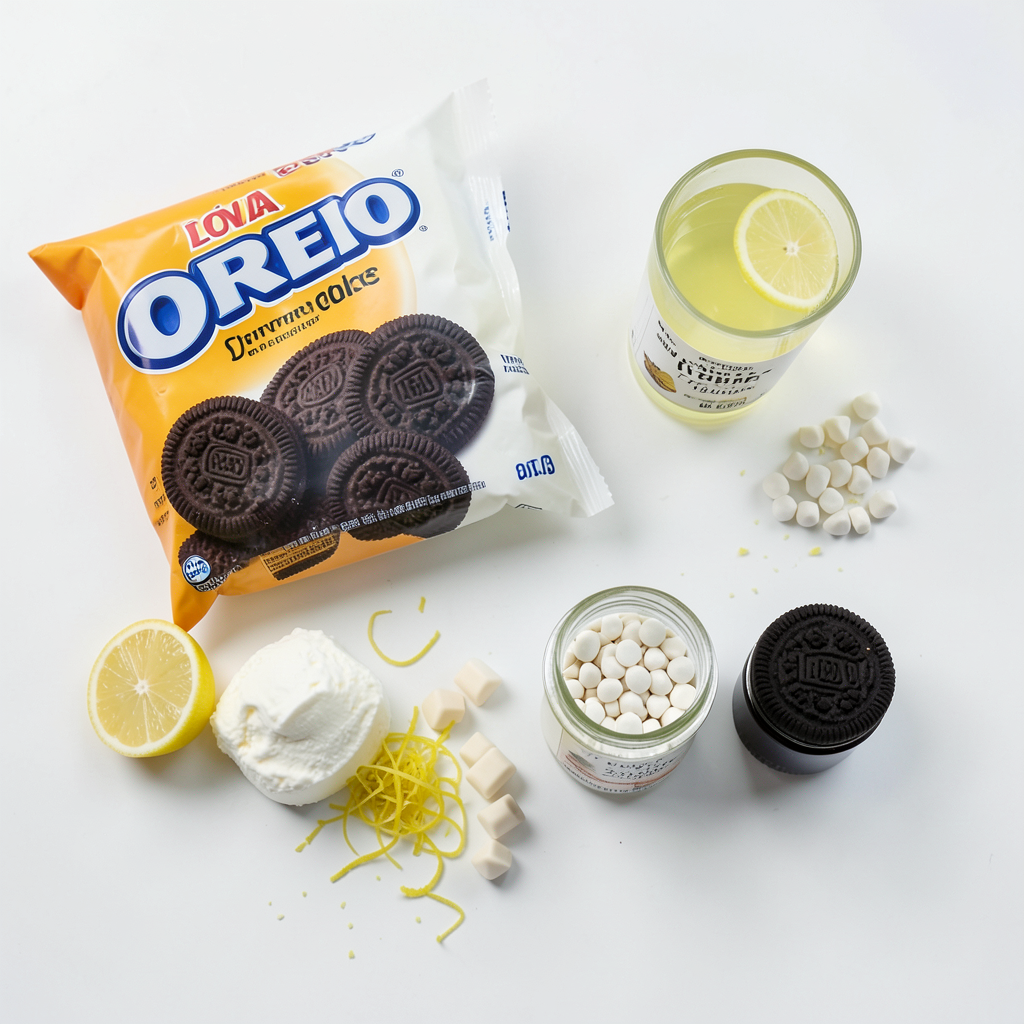
Main Ingredients for Lemon Oreo Truffles
To make Lemon Oreo Truffles, you need these key items:
- 1 package (14.3 oz) Oreo cookies
- 8 oz cream cheese, softened
- Zest of 1 lemon
- 2 tablespoons fresh lemon juice
- 1 teaspoon vanilla extract
- 2 cups white chocolate chips
These main ingredients create a creamy and zesty treat. The Oreo cookies give a rich flavor. The cream cheese adds smoothness. The lemon zest and juice give a fresh taste.
Optional Ingredients for Enhanced Flavor
You can add one optional item to improve the truffles:
- 1 tablespoon coconut oil
Coconut oil helps the chocolate shine and makes it smooth. You may also add extra lemon zest for a bright garnish. This makes your truffles look pretty and taste even better.
Equipment Needed
Gather these tools to make your truffles:
- Food processor
- Mixing bowl
- Baking sheet
- Parchment paper
- Microwave-safe bowl
- Fork
Using the right equipment makes the process easier. A food processor quickly crushes the cookies. Parchment paper helps the truffles not to stick.
Step-by-Step Instructions
Preparation and Combining Ingredients
Start by crushing the Oreo cookies. Use a food processor to turn them into fine crumbs. This step makes a great base for your truffles. Once you have the crumbs, transfer them to a mixing bowl.
Next, add the softened cream cheese. This helps bind the truffles together. Then, add the lemon zest, fresh lemon juice, and vanilla extract. Mixing these flavors creates a bright and zesty taste. Use a spatula or your hands to mix everything until it forms a dough-like consistency.
Shaping the Truffles
Now it’s time to shape the truffles. Take a small amount of the mixture and roll it into a ball. Aim for about one inch in diameter. This size is just right for a bite-sized treat. Place each ball on a baking sheet lined with parchment paper.
Once you have shaped all the truffles, freeze them for 30 minutes. This helps them firm up and makes them easier to coat in chocolate.
Melting and Coating with White Chocolate
While the truffles freeze, melt the white chocolate chips. Use a microwave-safe bowl and heat the chips in short intervals of 30 seconds. Stir the chocolate between each interval. This prevents burning and helps it melt evenly. If you want a shiny finish, add coconut oil to the melted chocolate.
After the truffles are firm, take them out of the freezer. Dip each truffle into the melted chocolate. Make sure they are fully covered. Use a fork to lift them out and tap off any extra chocolate.
Place the dipped truffles back on the parchment-lined baking sheet. Before the chocolate sets, sprinkle extra lemon zest on top. This adds a nice touch and extra flavor. Let the truffles sit until the chocolate hardens. You can also refrigerate them to speed up the process. Enjoy your delightful Lemon Oreo Truffles!
Tips & Tricks
How to Achieve the Perfect Dough Consistency
To get the right dough, mix well. You want it to be moist but not sticky. If it feels too dry, add a bit more cream cheese. If too wet, add more crushed Oreos. The dough should hold its shape when you roll it into balls.
Best Practices for Melting Chocolate
When melting chocolate, use short bursts of heat. Heat it in the microwave for 30 seconds at a time. Stir after each interval to check the smoothness. This helps avoid burning the chocolate. If you want extra shine, add coconut oil while melting.
Garnishing Ideas for Presentation
Garnishing your truffles makes them look fancy. Use extra lemon zest for a pop of color. You can also add colorful sprinkles or crushed nuts. Place them in cute paper cups for a nice touch. This adds fun and flair to your dessert.
Pro Tips
- Use Fresh Ingredients: Always opt for fresh lemon juice and zest to enhance the flavor of your truffles. Fresh ingredients make a noticeable difference!
- Chill for Better Dipping: Ensure your truffles are well-chilled before dipping in chocolate. This helps them maintain their shape and prevents them from melting in the warm chocolate.
- Experiment with Flavors: Don’t hesitate to mix up the flavors! Try adding a pinch of sea salt or a splash of almond extract for a unique twist on the classic recipe.
- Store Properly: Keep your Zesty Lemon Oreo Truffles in an airtight container in the refrigerator for up to two weeks. They also freeze well if you want to save some for later!
Variations
Alternative Flavor Combinations
You can mix things up with different flavors. Instead of lemon, try using orange zest and juice. This will give you a bright, citrus twist. Chocolate lovers may want to add cocoa powder to the cream cheese mix. It gives a rich, chocolatey taste. For a fun berry flavor, add crushed freeze-dried strawberries. Each option offers a unique taste that still feels special.
Dietary Modifications (Vegan, Gluten-Free)
You can adapt this recipe for different diets. To make it vegan, use vegan cream cheese and dairy-free chocolate. Check the Oreo package for gluten-free options. Some brands offer gluten-free cookies that work great. This way, everyone can enjoy Lemon Oreo Truffles without worry.
Creative Dipping Options
Dipping can be more than just white chocolate. Try dark chocolate for a richer taste. You can also use colored chocolate melts for a fun look. For a crunch, roll the truffles in crushed nuts or sprinkles right after dipping. These ideas will make your truffles stand out at any party.
Storage Info
Best Storage Practices for Freshness
To keep your Lemon Oreo Truffles fresh, store them in an airtight container. Use parchment paper to separate layers. This helps avoid sticking. Place the container in the refrigerator. The cool air keeps them firm and tasty.
Shelf Life of Lemon Oreo Truffles
Lemon Oreo Truffles last about one week in the fridge. After that, they may lose their flavor and texture. If you want to keep them longer, freezing is a great option. Just remember to check for any changes in taste.
Freezing Truffles for Long-Term Storage
To freeze your truffles, first let them cool completely. Then, place them in a single layer on a baking sheet. Freeze for about two hours until firm. After that, transfer them to an airtight container. Label the container with the date. Frozen truffles can last up to three months. When you want a treat, just thaw them in the fridge overnight.
FAQs
Can I use different types of cookies for this recipe?
Yes, you can use other cookies. Try chocolate cookies for a rich taste. Vanilla cookies work great too. Just keep the same amount of crumbs for balance.
How can I make these truffles more zesty?
Add more lemon zest! You can use the zest of two lemons for extra punch. Mixing in a bit of lemon extract boosts the flavor too. Just be careful, a little goes a long way.
What can I substitute for the cream cheese?
Cream cheese gives the truffles a soft texture. If you need a swap, use mascarpone cheese. Greek yogurt can also work but will change the taste a bit.
How do I know when the chocolate is fully melted?
Melt the chocolate in short bursts. Stir after each 30 seconds. It should be smooth and shiny when ready. If you see a few lumps, keep stirring! They will usually melt away.
You now know how to make Lemon Oreo Truffles, from start to finish. We covered the main ingredients, preparation steps, and helpful tips. Flavor variations let you be creative, and storage tips ensure your truffles stay fresh. Remember, you can customize your recipe for special diets and occasions. Enjoy your tasty treats, and share them with others! Your friends and family will love these fun desserts. Get ready to impress them with your new skills!